Monday, 30 September 2019

Christmas Snowman Dioroma

I think this is what you call a diorama????  I have seen them so may times on Pinterest but never thought I could ever be able to make one until recently.
I was looking through my box of saved wooden trays (the sort embellishments come in) and wondered what I could do with them and then I thought diorama.  I did a little "pinning" and finally felt brave enough to tackle one! 
I started by covering the back of a tray with suitable festive paper, the proportions of which I thought would go with the size of bottle brush tree I planned to use and the snowman I was going to make.
I used Martha Stewart paper clay to hold the tree in position, with a good dollop of glue and added some white glitter card to act as a snowy background.  This, at the time was all very much on the hoof.
I then built up the background "scene" using scraps of other Christmas papers ..........
........ plus tiny stickers that I already had.  In the end I decided not to use the "believe" embellishment as the snowman's hat I made later covered part of it up.  
I replaced it with "Let it Snow" using letters taken from a Tim Holtz Idea-ology Label Letters pad.
I trimmed the bristles on the back of the bottle brush tree so that it would fit and lay flat against the back of the decorated tray and then decorated it with flat back gems and an iridescent flat back star on the top.
I then added a pelmet to the top of the tray using a scrap of card, which I proceeded to cover with several layers of Dovecraft 3D Pearl Effects (£1 Poundland) and small, plastic snowflakes in the corners.

White iridescent micro glitter was added to the paper snow along the bottom and little flat back gems to the centre of the snowflakes.
Adding the snowman was the final touch.  My apologies, as I forgot to take pictures of him during the making process, doh! I used white Das baking clay for his body, red for his scarf and black for his hat, keeping things really simple as I am no modeller.  I used black flat back gems for his eyes and buttons, twisted wire for his arms and a cut down 3D paper embellishment for the holly on his hat, after he came out of the oven.

I am really chuffed with how the whole thing turned out. Now I have worked out the best way to make more, that's what I plan to do ...... the white clay and some more Christmas trees are already on order.  Unfortunately I don't have any more trays of the same size ........ but I have an idea, that I am hoping will work, so watch this space ........... for my Christmas dioramas part two!

Thursday, 26 September 2019

Very Simple Christmas Pudding Card

This card measures 6ins x 6ins and is made using a ready made card blank from a pack of 50 from Hobbycraft.
From the pictures it looks as if I have used a black and white gingham check paper to cover the front of the card but "in real life" it is actually bottle green, perhaps not the most vibrant colour to use on a Christmas card!
I used Christmas pudding toppers from The Works (6 for £1).  I covered the brown pudding part and holly leaves with a layer of Ranger Glossy Accents and small, red buttons to cover the holly berries, to help make the pudding stand out a bit more.
I put foam pads behind the pudding for more dimension and then mat and layered it on red check, white, plain red and finally silver with a little faux stitching added using a black fine liner pen for good measure.  Not an awful lot of skill or work required, but very quick if you need to make something at the very last minute.

Wednesday, 25 September 2019

Scandi Style Card - Scandi Shadowbox Picture

This 6ins x 6ins card was pants from the very start, I wasn't sure if I should actually post it, but then I thought what the heck.
All I had done was take a page from the embossed Christmas pad (below) that I found in Poundland last year (£1), it was this design in particular that made me buy the pad because, at the time, I thought as it screamed out to be embellished.  
However, when I did start to embellish it, it all seemed too small and subtle ...... the tiny gems and glitter were just lost in the fiddly detail.
........ and if I'm honest, my work didn't enhance the picture as I'd hoped.
I was disappointed, so the card ended up left to one side ...... then as I started to write this post I  suddenly thought, that the design really belongs in a frame ............ why hadn't I seen it before?  So I got out one of my spare Hobbycraft shadow boxes and it's perfect.
All I needed to do was add a matching turquoise edge so that it fit the frame aperture properly.  In the end I may have lost a card but I have gained a new festive decoration for the shelves in my guest/spare room this year. The room, when seasonally decorated, has a Scandi-esque theme to it anyway and since I've painted the wall behind the bed a deep turquoise, it's a no brainer.
Which got me thinking again ....... I have two spare, unadorned mirrors in my cupboard, the same as the jewelled mirrors I made for the room a while back.
........ perhaps I could embellish them too with a festive theme to add a slightly new look this Christmas?  Hmmmmmm watch this space ...........

Tuesday, 24 September 2019

Patchwork Christmas Card

Thia card measures 6ins x 6ins and is made using a hand cut, white, linen effect blank.
My apologises as I think I may have posted similar cards like this in the past but after ten years of blogging there's got to be a few repeats along the way. I was"stealing" my self with the idea of putting together some mini Christmas printer trays by using some of the embellishments I planned to use in them.
I used a variety of papers taken from a Works Christmas themed Origami stack for the four patches, which I then mat and layered on silver, white and then silver again, adding a little faux stitching using a black fine liner pen round the edges.
The glittered foam stockings came from this years Christmas range at Hobbycraft and were £1 per pack https://www.hobbycraft.co.uk/red-stocking-glitter-foam-stickers-20-pack/643915-1000

Monday, 23 September 2019

Mini Christmas Printers Trays

Eight mini Christmas printers trays for you delectation today, you just won't believe how cross eyed adding all the tiny details to them made me!
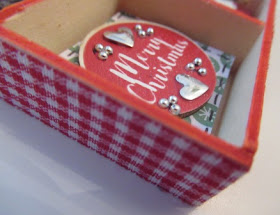
The trays were originally the boxes from the various sets of  wooden embellishments I have bought over the years, and squirrelled away to make a pile of mini Christmas printers trays when I had saved enough up. To date, I have never found anything similar for sale that I could use instead.

https://www.hobbycraft.co.uk/assorted-merry-christmas-wooden-toppers-36-pack/643871-1000?_br_psugg_q=wooden+embellishments
I have to admit to stealing myself to start making them this year as they are a bit fiddly, especially when adding the finer detail like the tiny stars and gems etc. but with eight trays saved I thought it was about time I did something with them, especially as I have a lady who will bite my hands off for any I do.
I start by creating the background for each square, backing a strong piece of card with a various appropriately proportioned Christmas design papers and glitter card if I am creating a snowy scene, like for the Christmas tree or teddy and faux stitch round the edges with a black fine liner pen.
Because there is a certain depth to the trays I put two or three foam pads behind the prepared squares to bring the embellishments a bit more forward, if that makes sense? 
Then it's time to add the embellishments made from a whole variety of materials, wood, resin, plastic etc. whatever I have and whatever will fit.
It's at this stage that my table becomes filled with boxes and tubs as I look for the tiny bits and pieces to either add to the embellishments or put in the background.
Some have a little extra glitter added or a layer of Ranger Glossy Accents.
This is a time to forget my usual crafting mantra of "less is more", when it comes to these trays embellishment and fiddle fart should be in abundance.
When I am happy that each square is finished I usually go around the edges with a red Sharpie pen, (the black trays obviously didn't need this doing). Then this year I "rediscovered" some lovely Christmas fabric tape (possibly from The Works)  to go round the sides.  I could  leave the bare wood showing, but the trays are not the best quality, and the tape has hidden a thousand sins!  I must look to see if The Works has any more this year.
So, that's all the trays used up for another year, I do have a few larger ones left, that have more compartments which are slightly bigger, a chance to use some bigger embellishments perhaps ........
...... but they won't stand on a shelf  without support and might be best hung, so before I go to all the fiddle fart of making them up I need to work out what I need put on the back of them to hang them.  I have just bought a staple gun, I wonder if that would work? I reckon until I experiment it's a case of watch this space!

Friday, 20 September 2019

Heads Up To Pep & Co - Halloween Outfits.

I have always had a little Halloween party at The Towers, but this year I plan to make it extra special as both Iris and Bertie are of an age to really absorb all the fun and magic and hopefully hold on to the memories for many years to come, long after (not wishing to sound morbid) I am gone!
And well .....  it's always lovely to have a new outfit to wear, which I hope will also, in part, help reinforce those memories ..... so when I saw this little dress for Iris in Pep & Co. for just £3.50, it was a no brainer, I have spent more on a cup of coffee!
I don't ever "do" gruesome and scary ....... so the cute, childlike print on the dress is perfect.
For Bertie ...... he'll love this glittery skeleton top £2.50 and matching leggings £3.00, also from Pep & Co. Bertie is very at home in pink, but it wouldn't be too much trouble to go over a few of the motifs with a darker colour Sharpie pen if need be, though doubtful!
As for The Monkeys, these newborn popper vests for £1.50 will fit the bill perfectly especially as they will be hosting the party (over on the other side). I could have done without the "Mummy's little pumpkin" bit, but since The Boyz only generally appear from the waist up it shouldn't really show and then they can be put away and used, like all their other "seasonal" outfits, over the next few years ........ and yes,  it does help to be a little bit mad!

Thursday, 19 September 2019

Meeting Up And Shopping With Marc In Worcester.

It's so brilliant that when we're both really busy, but Marc is at the cottage, we can still meet up for a day in Worcester for a catch up and a little retail as it's only 20 minutes away for me by train. and for Marc in the van. We met up a couple of weeks ago and it was sooooooooo good!
Needless to say we did all the discount and charity shops, with Marc finally got his little mitts on some "The Pink Stuff" as recommended by Mrs Hinch!
Poundland's Halloween range certainly did not disappoint, both our baskets were overflowing, although  I am in great need of assorted Halloween stickers none were to be found!  A few years back they used to be everywhere, but their popularity seems to have wanned.
Marc has bought quite a few of these glass light up skulls ...... well, a box of 24 from the Malvern store. He is going to remove the lights and stopper (which is attached to the lights and contains the battery) and after washing thoroughly will refill the bottles with flavoured vodka, replacing the stopper with a cork to give as favours or presents.  To buy the skulls as bottles would cost a fortune from a retailer ...... but with these Marc gets the extra bonus of also being be left with a string of lights, to use on other projects, if only round the odd potted plant, the stopper should be pretty easy to hide or disguise.

In our retail excitement I forget to take any pictures of Marc's haul in the large Home Bargains there, as he bought a HUGE open skull that is going to make the most fantastic planter for the garden, a large skeleton dog and another smaller skull which he is going to paint  black and then decorate with flowers as part of a "Mexican Day of The Dead" project.
Over lunch Marc shared with me the "artistic" meals Iain has been preparing for him of late, what is he like?
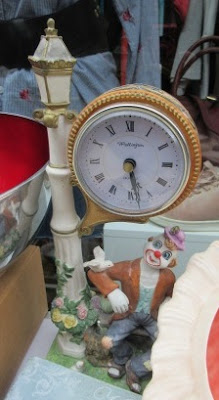
Almost all the charity shops in Worcester are based in one street which is really handy. We both somehow managed to resist tearing each other apart for the whimsical clock confection of a clown sitting under a lamppost with only a dove for a friend for only £3 (above).  To be honest, said charity shops yielded very little on the day  ....... until we came to the last one which I believe was the Birch Hill Dog Rescue and then I think I got my greatest charity shop buy ever .........
........ with this huge and stunning crocheted blanket for an unbelievable £10.  I have been looking for a crocheted blanket for ages, but had not found one that could compare. As you can see, it's in my spare/guest room ready for the autumn and winter. I hadn't really got the purchase of any more bedding on my to do list, but found a very reasonably priced plain, teal, king size duvet with matching pillowslips on Amazon to go with it, as the floral set (spring and summer) that was already on the bed wasjust too much and really didn't work with it. However, the yellow pillowslips and cushions work well with the new edition. Its weird how new bedding can change the whole look/feel of a bedroom ...... now the room feels cosy as opposed to being sharp and crisp.

It was a wonderful if tiring day, Marc and I never stopped talking and exchanging ideas ....... as well as a much lighter wallet/purse!

Wednesday, 18 September 2019

Half Marathon Good Luck Card

This card measures 6ins x 6ins and was made using a manufactured card blank.
I made this card for my beautiful niece Emily, who is running her first half marathon on 1st September in aid of the Epilepsy Society, a charity that is very dear to us all, we are all so proud.

I thought I would try to make a Good Luck card that would reflect her experience.  I started by covering the front of a 6in x 6ins card with a plain purple paper to match her running shirt.
I took a piece of gold glitter card and mat and layered it on silver adding her number using large wooden numbers (from The Works) which I had already coloured using a black Sharpie pen.  A layer of Ranger Glossy Accents helped to make the numbers pop.
Then ....... I got to thinking, what this card needed was a few tiny gold safety pins.  Now, I used to have hundreds of these little blighters in every colour imaginable, but sadly they went in the cull when I moved. I really wish I had kept just a few back because in the end I had to put a temporary halt on finishing the card until the ones I bought from e-bay arrived, but I think it was worth it in the end.

Tuesday, 17 September 2019

Christmas Wreath Card Using Hobbycraft Glitter Card Toppers.

This card measures 6ins x 6ins and is made using a hand cut white linen effect blank.

In my aim to keep things really quick and simple on the card front this year I decided to give these wreath design Hobbycraft glitter card toppers a whirl. They cost £1 for a pack of five
https://www.hobbycraft.co.uk/christmas-wreath-glitter-card-toppers-5-pack/643880-1000
I'll be honest, once I'd got them home I did wonder why I had bought them as they are not very me, however rather than put them in a drawer for another year, as is often my want, on this occasion I "made" myself use them. 
I started off by going  over the green glitter leaves with Ranger Glossy Accents and adding red, flat back pearl gems to accentuate the berries. Then using foam pads, for extra dimension, I put the wreath on a small square, which was mat and layered on silver, in the middle of the card.
Then I got stuck, something was missing, it need some sort of bow but the ready made ones I already had were totally out of sync with the wreath and just looked plain naff,  so the card lay on the table for a day or so while I tried to ignore it.
Then, I wondered about using some red cotton yarn that I had, I wasn't hopeful to be honest, but to my surprise it worked, the proportions were perfect. Putting a little PVA on the ends of the bow stopped the yarn from splitting/fraying and looking tatty.  Success! I also added some tiny clear flat back gems to the wreath for a little extra bling.  Another card done and dusted.