Thursday, 28 November 2019

Two "Crafty" Charity Shop Finds

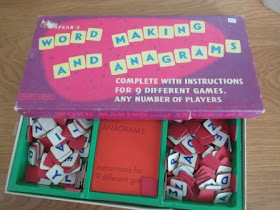
I am always on the look out for bits and pieces I can use for crafting in any charity shop I visit, in particular games that use letters and numbers and as it happened I found both these games on the same day, in different shops for just 50p each.
I thought that this blue set of capital letters will come in very handy on cards where I use different letter stickers/embellishments to spell out greetings i.e Happy Birthday. I am also wondering, taking into consideration their blue colour how they would look spelling out a complete festive phase or word on a plain white card, scattering snowflakes or stars around them for a snowy, cold feel?
...... And then, I am currently in two minds as to how to use this vintage Bingo game, initially it was the numbers I was after (all present and correct 1 - 99), perhaps using numbers 1 to 25 on a vintage style Advent Calendar, but after finding that it was complete I am now thinking that since Iris and Bertie love playing number games so much, perhaps we should (for a while at least) use it in the way it was meant to be?  Hmmmmm, lovely, lovely, lovely wooden numbers though!

Wednesday, 27 November 2019

Christmas Fairy Door

I have never attempted a fairy door before, but seeing as I had all the basic bits and pieces I thought it was about time I had a try .......
....... and for my first attempt I don't think I have done too bad.
The door, fence, trees and door wreath all came from The Works.  
I started off tentatively by attaching the door to a strip of spare balsa wood. I removed the original star on the door and put the little door wreath in it's place, which I later decorated with tiny weeny, silver flat backed gems.  I wish now that I had also replaced the pearl door handle with a large gold flat backed gem and gone over the black door hinges with gold 3D effect paint, but it's a lesson learnt for the next one I make!
I added the trees, which needed quite a bit of fluffing to make them presentable and covered the balsa base with 3D Snow Effect ..... at this stage it was beginning to look a lot like Christmas! 
I then got totally carried away, adding the fence to the back of the door, colouring it with a red sharpie pen. 
I filled the trees with various sized, pearl and gold effect flat backed gems with a large star on the top .......
......... followed by a"Welcome" mat using a textured brown card and an attempt at a doodled squiggly writing to look sort of "mat like", if that makes sense, using a black fine liner pen.
By this stage I decided I might as well go the whole hog, putting snow all round the door and then adding a string of little fairy lights to it, plus windswept snow on the fence. The very final touch came from the small, irredescent, polystyrere balls (Poundland) piled up to look like snowballs which I think really makes the scene. I have such a thing about proportion but with this door I think I have just about got it right, keeping it whimsical, without spoiling it with too much accuracy.
It sits very nicely on my skirting board, but when December comes I am thinking that it perhaps needs some tiny snowy footprints leading up to it, I can't wait to see Iris and Bertie's reaction when they see it for the first time. 

Tuesday, 26 November 2019

Poundland Paint Your Own Nutcracker

Following on from last week's "Heads Up" I have had a bash at "doing" one of my own "Paint Your Own" nutcrackers that Poundland have had amongst their Christmas craft section this year.
I knew it wasn't going to be as simple as it looked, from the start I decided that I wasn't going to use the brush and paint that it came with.  The brush was cheap and nasty and I guessed the paint wouldn't really be up to the job either and to be honest, it was just the wooden figure I was interested in when I bought it.
I left the face and hands as they were in the natural wood but used Sharpie pens to colour the rest, however I also needed to use coloured ultra fine tipped pens to work the edges first to help avoid the colours bleeding into each other and to get into all the tiny nooks and crannies. This was so fiddly.  Luckily the arms came off so I could get to the little fiddle farty bits, again using fine liner pens. I did use a tiny bit of the accompanying red and black paint in the end to colour the inside of the nutcracker as it was impossible to get even the fine liner pens in there.
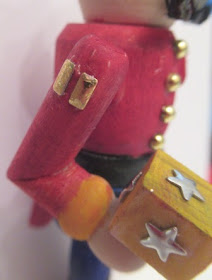
When the nutcracker was dry I used tiny, gold, flat back domes for his buttons and various shapes from a metal nail art set (also from Poundland) for the buckles on his shoes, belt, the epaulets on his shoulders and buttons on his boots, this made such a difference, bring the nutcracker to life.
Nutcracker as illustrated on the packaging.

I also used the tiny black rounds from the set for his eyes, because after all the fiddle fart I didn't want to risk using a black pen only to have it bleed into the face and ruin it.  It also made them stand out a little more.
I decorated his hat using a tiny holly punch (Hobbycraft £1) and equally tiny flat back, red pearls for the berries.
On his moustache I added Ranger Glossy Accents again to help make it stand out more, plus add a different texture.
I also added a few white lines on his boots and three white dots on his shoes using a white gel pen.....
....... however I only did this lightly because at that stage I could have very easily over embellished Mr Nutcracker and then completely ruined all my efforts. That's one down, another one to go! 

Monday, 25 November 2019

Merry and Bright Christmas Card

This card uses a pre- cut and scored, smooth, white manufactured blank as its base.
I think this card may be a case of Merry and Bright overkill! I simply arranged a selection of bright and/or sparkly random letters from all the sets I have in the centre of a card blank.........
....... and then surrounded them with various sized stars, gold flat backed domes and clusters of three  doodled dots using a black fine liner pen .......
........ but I think I got a little carried away in all its randomness and sheer number of bits and pieces, if I were to repeat the card again I think it needs to have some sort of symmetry to it, because to me  your eye just doesn't have a point to settle and focus on  ......... it's just too all over the shop!

Thursday, 21 November 2019

Heads Up - Poundland Paint Your Own Nutcracker

The only trouble with Halloween is that you have to wait until after it's all over before Poundland really gets to put all their Christmas bits and pieces out in full. Since the middle of September we've been getting tantalising glimpses but nothing like their full range, and as such I have tended to buy things when I have seen them or look for something after someone has posted an item of interest on The Poundland Appreciation page on Facebook.
This year their Christmas craft range is looking pretty interesting, so when I found these Paint Your Own Nutcracker tree decorations in the Birmingham shop, after first seeing them on Facebook, I knew Marc already wanted a couple and I thought I would have a couple too following that age old Poundland rule, if you don't get something when you see it you might not be able to find them again after.
I don't think I will be painting mine with the paints provided, I am thinking more along the lines of using Sharpie pens instead ..... I am also thinking that I could use my nail enamel pens or 3D Effect paints to add the little details, but before I get started I need do a little Googling to get a few ideas as to how I can really "pimp" my nutcracker .....  if you'll pardon the expression, as I feel there may be an element of competition between Marc and me when we get cracking!

Wednesday, 20 November 2019

Guest Crafter Bertie And His Printed Nursery Christmas Card

Awwww, Bertie isn't especially keen on drawing and painting which makes this card extra special ........ plus I am just a very proud Granny, so please bear with me!
I am reliably informed that it's Santa in the middle of his "design" and one of the first "people" Bertie has drawn and I presume the background is a copy taken of one of his finger paintings.
It's all part of a fundraising idea where families can not only order Christmas cards with this design, but also gift tags, wrapping paper, notebooks, stickers and mugs, to mention a few.  It's the mugs that I have my beady eye on to give as gifts, but before I put in my order I need to stand back to see if Mum and Dad have a similar idea, but I am determined that one way or another a mug will be mine!  Did I mention how proud I am?!!??!!

Tuesday, 19 November 2019

Re-Blinged Rockin' Robin Christmas Cards

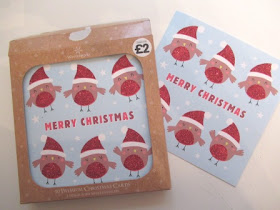
Is there such a thing as re-blinged?  I had an offer come through from The Works which included a festive free gift of a book, wrapping paper or pack of cards, I decided to choose the cards as I thought  Iris could make good use of them at Christmas to give to her friends.
Then.......I got to thinking, never a good thing, although the cards were plenty sparkly enough as they were, the robins would look even cuter if I gave them googly eyes ........
........ and then dear readers, I got completely carried away!  
Not only did I give said robins each a pair of googly eyes, I also decided to give their hats "woolly" trims and bobbles using 3D Snow Effect .........
....... added a little Ranger Glossy Accents to make their little rosy cheeks glow .......
....... not forgetting adding gold stars on top of the original white ones in the background and my customary scattering of three blacks dots here and there.  Talk about overkill! There's an awful lot of extra dimension and texture going on here!  I'll be honest, if the cards had been smaller I would have been very tempted to use the whole front as a topper, mat and layering it on red and silver perhaps!

Iris will be getting nine of the ten cards as I have kept one back because I think if I cut the front in two I could have two toppers to possibly work with  ...... I am not sure if the idea in my head will work out, but  watch this space!

Monday, 18 November 2019

Make A Wish Card with Pin Badge

This card measures 6ins x 6ins and uses a pre-scored, smooth, manufactured card as it's base.

I made this card for my sister-in law's 60th birthday, again, as is my want these days it is very plain and simple.
The badge came from a store called Hema (Birmingham Bull Ring) and cost just £1, as soon as I saw it I thought of Sarah and bought three (two for spares for other ideas)
I simply covered the front of the card with a paper of a suitable proportion to the badge. I then added  a scrap of white card to the back of a Works metallic gold card frame and placed the badge in the middle of it.
I then used the badge pin to pierce a hole through the card front and replaced its back.  Voila, another very simple card done!

Thursday, 14 November 2019

It Was Meant To Be .........

As you know I have a HUGE thing for 1950's/60s metal frame, fish eye mirrors and I thought with the three resprayed ones in my bedroom that I was done ......
However, to be honest, in the back of my mind I have always carried the memory of ".... the one that got away", a very colourful flower covered mirror I saw and lusted over at The Malt House Emporium in Tewksbury at least eighteen months ago.  I really can't remember at the time why I didn't buy it there and then, but it was most probably because I couldn't think where it would go as all my walls were pretty much covered.
Well, Lu and I returned a couple of weeks ago and half way round I said to Lu "I wonder if that mirror was still here and if it is I'm having it!"  .......
It was, ...... obviously no one else has my hideous taste!  It was still the same price and I couldn't get it down anymore as the lady said it had already been reduced (.....but still not moved for at least 18 months???!!!!) ...... however, I still bought it anyway. I'm not saying exactly what for, but perhaps a months worth of Costa coffees?
There is no age to it at all ....... it's just pretty and I have never seen anything else like it before, as Lu says it's very me.  Finding a place for it to live was hard as I had first anticipated, especially as I wanted to be able to see it all the time, I've put it in the hall, where I can pass and admire it often.  Happy days ...... it was meant to be!

Wednesday, 13 November 2019

Mid Century Style Birthday Card

This card measures 6ins x 6ins and uses a pre-scored, manufactured card as its base.
I think I could becoming a bit of a lazy card maker ......or am I simply just cutting out all the fiddle fart in my old age?
This card was made for my brother-in-law who fancies himself as a bit of a mid century boff. All I did was find a mid century design for the background and download a suitable mid century font for the sentiment, putting them all together using Publisher 2003 and then printing it off.
I covered the front of a pre-scored card with the background piece, then mat and layered the sentiment on black and silver card and mounting it on foam pads to give the card a little more dimention in the centre of the card.
The final touch was putting a tiny, cross eye making, silver gem in the middle of the stars to add a little extra, but subtle, birthday bling.

Tuesday, 12 November 2019

Out And About With Marc In Worcester.

Marc and I were able to meet up in Worcester in the middle of October, when as far as we concerned Halloween was done and dusted and we were eager to move on to what the shops had to offer of a crafty type nature for Christmas ........ but, as per usual, we do tend to get a little distracted .......
...... especially by things that shine and sparkle ....... like this wonderful Christmas de-baubled jumper  in B & M Bargains, it was hard to walk away, but, no considered purchase was make, just in case we came upon something that was even better!!
But while we thought we were a little early looking for Christmas, Home Bargains already had their Easter Crafts stocked, I thought poor Marc was never going to be able to stop laughing, we all know they start getting the Easter eggs out in January, but in October, it's got to be some sort of record.
As per usual Marc only agreed to having his picture taken with his face covered, he is such a diva, but does have such lovely blue eyes!!!
But didn't mind me taking a couple of pictures of his new walking stick. Wherever we go people always remark on his various sticks, we still chuckle about the reaction he once got during a bus ride into Wolverhampton!!
Anyway, on this clear, acrylic (I think) stick he had replaced the top with a skull that he had first coloured using a chrome effect spray paint and then underneath glued real Swarovski crystals so that it really caught the light when he moved. It was quite stunning!
 And finally, rather than bore you with our usual crafty haul and what we plan to do with each and every I thought I would share this prize nugget with you instead, not only in a picture ....... 
........ but to get the "full effect", in video form ......... enjoy!!!!!

Monday, 11 November 2019

Christmas Snowman Dioramas

At last, I have been happy enough with my Christmas snowman diorama design to go into mass production and I have finally have a whole batch of finished ones sitting on my craft table.
How many I could actually make was all reliant on how many frames I could wrestle from the compartment trays I already had (originally manufactured as boxes for wooden embellishments).
In the end I managed to get sixteen because instead of throwing away the frames that didn't have any sides when the boxes were carved up, I cut new ones from the scraps and carefully glued and taped them together to create a new complete frame ........ 
..... with the intention of using decorative fabric tape, when the time came, to cover any/all the imperfections from all that butchering .......... I was so chuffed!
The frames were then lined with a small print blue paper and scraps from a printed Christmas ticket design that were in perfect proportion to the diorama embellishments.
The snowmen were then made en-masse, with each taking about a quarter of a pack of soft white Fimo to make.  Hats, scarfs and carrot noses were made using scraps of Fimo I already had.  The real twig arms were added to the snowmen before the baking process.
The 10cm Christmas trees (The Works) were not, how shall I say, the bushiest and most were a little squashed and flat in places, however this sort of worked to my advantage as I didn't have to trim them, by finding their flattest angle and fluffing the rest up, they fit pretty easily into the frame, after removing their base and plunging the bare wire, with a little glue into Air Magic Soft Modelling Dough and then left to dry.
Now came the fiddly farty stage when all the flat back pearls had to be attached to the trees with great dollops of PVA glue, thank goodness it dries clear .......
...... and the Dymo tape "Let It Snow" sentiments added.  I wanted to put them in between the tree and the snowman, which was easier to do before gluing the snowman in permanently and I wanted to add small snowflake confetti (Hobbycraft) and tiny gold stars to the background as well, at the same time.  By the time I had finished I was almost crossed eyed.
My best buy so far this Christmas was buying a tiny £1 holly punch from Hobbycraft making decorating the snowmen's hats so much easier than my first attempts!
With that, snowmen were finally glued into position and when I admit to starting to feel frustrated, as it seemed every stage needed time to dry before I could move on.
The "pelmets" for the snow had to be added ...... so while they dried I made the corner "believe" signs using the left over bits from the original trays, writing using a black biro so that the ink didn't bleed into the wood.
When the pelmets were dry I decided to touch up the snow and snowmen up with a little white paint as the snow, through handling wasn't quite as pristine as I had hoped, however once applied the paint also added a certain pleasing snowy texture.
Next followed all the twiddly didly bits, first 3D textured snow applied to the pelmets, edges and bottom of the trays, followed by the holly and berries, plaques that I added a little beige felt pen to to add some "age" finally a stars to the top of the Christmas trees.
After allowing the snow to dry I was then able to add the Snowmen's eyes and to a few a mouth, then their buttons and a tiny silver heart on their scarves which fiannly gave each diorama its own individual character.
I thought the final touch was adding a sprinkling of translucent glitter, but before I did that I decided to add faux stitching where there was a small gap between the ribbon and the tray edges to add more detail.
I am really, really pleased with how they have all turned out, but they were a lot of work ...... I reckon they took at least an hour each to make.
They have evolved just a little in the process, I really like the ones with the house stickers in the background but sadly I ran out of them ...... and I couldn't really wait for shops to get their Christmas stock in, but if I see any this year I will stock up for future projects.

I now need time to rest and recover before I decide whether I will repeat this operation for another year and really that all depends on whether I can gather up a few more trays in the meantime!