Tuesday, 25 August 2009

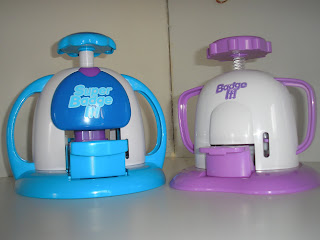
Recently, I bought a Bandai Super Badge It badge maker on e-bay for about £10 and then, would you believe it, found another smaller version at a carboot a few weeks later, for which I paid the princely sum of 10p, because the lady didn't want to take it home again!

Its a brillaint piece of crafting kit, (not just a kids toy), easy to use, with endless crafting possibilities, but here's the sad bit ........ Bandai have discontinued it! Badge refills are still available from their website, but when these sell out, that's it! Needless to say I have amassed a small stock.

Monday, 24 August 2009

A Birthday Card with a Difference

My Brother-In-Law is doing his Masters Degree in Art and I wanted to make him a birthday card this year that was a little bit different, this is the result!
I got the tiny easel and canvas from The Range in Telford a couple of weeks ago. A pack of two easels or canvases were £1.99 each, which I thought was a bargain.
All I have had to add, apart from the writing, is the palette embellishment, which was part of a pack of 3D stickers I've had for ages.

Sunday, 23 August 2009

How To Make An Itsy Bitsy Advent Calendar.

I have been asked for some instructions on how to make my little Advent Calendars. I am hoping that the pictures will do most of the work, please bear with me, I'll try my best and hope I get everything in the right order .........


First, design your numbers. I used A4 page setting in Publisher and 2 Peas font "Typo" (download from http://www.twopeasinabucket.com/), font size 16 for December and font size 65 for the number. Each square measures approx. 4.5cm x 4 cm. I managed to get all 25 on one sheet. Cut numbers out.To make the body of the calendar, cut a piece of card (I used dark blue leather effect) approx. 9cm long x 6.5cm wide. Add two wavy strips of white glitter card along the bottom . Put a length of ribbon on top of the "snow", leaving enough to stick behind the card to give a neater finish. Add a bow to the main ribbon by threading a smaller piece underneath and making a single knot. Mat and layer on silver card.

Cut a co-ordinating piece of card approx 5cm x 5cm and mat and layer on silver card and stick onto the snow scene.


Decorate a mini bulldog clip with co-ordinating ribbons and secure the numbers in its grip. Carefully attach the clip to the calendar body.

Add an embellishment to one side of the calendar, I used a "Dress It Up" snowman button. As a finishing touch add several clusters of three dots on the sky area in white pen.

Finally stick a magnet on the back. And voila!!!

Saturday, 22 August 2009

Christmas Is Coming ..... Mini Advent Calendar

Here are a couple of pictures of my latest project, itsy bitsy Advent Calendars. I know.... I know, it's too early to be thinking about Christmas, but the idea sort of snook into my head, and I just had to start making.

I used oddments of blue, silver and white glitter card that were too small to use on anything else, East of India gingham ribbon and some Dress It Up snowman buttons I got at a bargain price off E-Bay from a seller in America.
Once I put the design together they didn't take that long to make, but I hated cutting out 25 sets of numbers, next time I might try to print and cut them on my Silhouette Cutter.
I have stuck a magnet on the back so that they can be put on a fridge etc.
Looking at my box you can see that I am not the tidiest of crafters and I still have a few to finish off, but then I have plenty of time ...... ho ho ho!

Friday, 21 August 2009

A Special Australian Engagement Card


I make a lot of cards to order. This has come about by my leaving a box of general cards in the various school staffrooms where I have worked, and then someone coming up to me asking if would make them a "special" card but a bit bigger! From there it has become word of mouth, people show others the card I have made for them and I get asked again, a ripple effect.
I now have lots of "regulars" who send me long lists several months in advance that I can work through. I ask for a name, age, and interests and try to tailor my design around that, making it as personal to that person as I can. Sometimes what I make is not always too my taste, but as long as the giver and reciplicant are happy, I can only be happy too.
This is one of my favourite cards. It was made as an order for Mel, a lovely, lovely girl I used to work with. Her friends had got engaged in Australia and this is what I came up with.
I went on Google and found an outline map of Australia which I cut and pasted and then formatted to burgundy. The font is 2 Peas High Tide, the ribbon is from East of India and the hearts punched from matching paper, all matted on gold with faux stitching in burgundy round the edges.
I hear that it is now framed and hanging on a wall is Aus!

Thursday, 20 August 2009

Wecome to My Craft Room

This is my Craft Room, I really appreciate how lucky I am to have such a lovely room to work in, surrounded by my "treasures" and craft materials and tools.


My desk is L shaped and this is the view facing the wall. The picture of the pebbles is one of mine, taken on a beach in Wales when I had my first digital camera.
As you can see I have a thing for stones and wings!
And this is the view from the desk I work from.