Not suitable for children under three because of the eyes, but a fun chocolate bar for Trick and Treating!
When I mess about trying to decide where to put the tiniest and most insignificant of flat back gem I call it Fiddle Farting, hence the name of the blog!!!
Sunday, 3 October 2010
Boo – Halloween Cadbury Chocolate Bar
Not suitable for children under three because of the eyes, but a fun chocolate bar for Trick and Treating!
Saturday, 2 October 2010
Flip Over Advent Calendar
I found this Advent Calendar below and thought I’d like to have a go at making something similar:-http://www.fiskarettes.co.uk/index.php/date/2009/11
But, when I started making it I didn’t actually save the site or picture (which I have since found again) so I was working on a vaguish memory of what I thought it looked like, in my head.
Putting it together was a fiddle as I have only ever made small books using my Bind It All before, in fact I very nearly gave up! Please bear with me as the instructions may not be too detailed as I was making this very much on the hoof and was concentrating more on the making rather than remembering to take a picture at each stage.
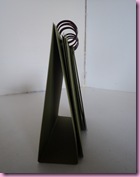
Each square measured 4 1/4in x 4.1/4ins and I used the width of a ruler to make the bottom of the calendar. I then cut it out and scored the middle lines, followed by punching both ends using my Bind It All.
The pages measure 4ins x 4ins, and were punched and then very carefully cut in two.
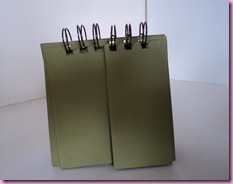
For my first attempt (above) I used 3 coils for each side of the calendar, but it looked wonky, as you can see, so I did it again, this time using just one length of 6 coils.
I created a set of numbers using Publisher on the same colour card as the calendar base and then added a K & Co. Christmas paper as a background. The rest is all the fiddly twiddly bits…….. which included lots of faux stitching using a white gel pen, large holly leaves made with a punch, and red foil holly berries. I tried to use red flat backed gems for the berries originally, but it made the right hand side of the calendar far too bulky.
I am not 100% happy with what I have made, if I were to do it again, I would make the number panels shorter to give me more space to vary the decoration at the bottom of each page, at the moment they are all pretty much the same. Having said that, it’ll look very nice on my festive desk at work.
Friday, 1 October 2010
Tesco Advent House Update 4
I thought I would have two updates today and just hope you aren’t too tired of reading about my house.

Before I finally glued the roof panel in place I decided it still needed something, so after a bit of rummaging in my drawers (oooooower), I found treasures that had been long forgotten but which seemed to be waiting for this project. I am pretty plain and simple in my crafting, a less is more girl, but I am really going for broke on this one – if you can’t be over the top at Christmas, when can you? I am just worried now that I won’t find the “perfect” snowmen to finish it off!
When I started the roof I added a peel off border to each tile, but it looked very flat and decidedly lacking …… so bring on the rik rac braid!!!
The ribbon and braid are HobbyCrafts own make, bought in a recent sale and the Paper Cellar self adhesive paper lace border which was 89p from a Dunelm Mill sale. I need to Modge Podge the top of the house, then I can go mad with all the embellishments I have been dying to use.
Tesco Advent House Update 3
Work is progressing well, be it in a very fiddly sort of way …
I then used the template to cut out the “Blitzen” paper, I don’t know how it fit but it did, perfectly, first time!
More fiddle farting followed to add the snow………
I realised that the top part of the house looked very stark and bare and decided to continue the snowy theme there too.
But being a triangle shape with a drawer in the middle I knew it wasn’t going to be easy, so I made a template first, this was such new territory for me!
And I sort of scribbled on the template outlining what I thought I would do ….. I then used the template to cut out the “Blitzen” paper, I don’t know how it fit but it did, perfectly, first time!
More fiddle farting followed to add the snow………
And it worked too!!! Now it just needs gluing in place and three layers of Modge Podge applied to the papered area. Modge Podge dries incredibly quickly, so it shouldn’t take too long.
Thursday, 30 September 2010
Ghostly Halloween Lollies
Oh my life, this seemed such a simple but effective idea when I found it on Google http://blog.makezine.com/ghost-lollies.jpg. But making cute ghost lollies is definitely NOT my forte!!! I seem to have turned them into the stuff of nightmares!!!!! These are just too spooky and would probably traumatise any little Trick or Treaters, who may happen upon my doorstep, for life ......
A ghost without a mouth isn’t quite right….. I think the eyes are too big. But add a mouth, and it takes on a terrifying persona.
I’ve used little Chupa Chups lollies ….. they are so cute, well ……. they were cute until I got hold of them! If I give these out at Halloween I’ll be branded as "The streets’ resident lady of evil” and given a wide berth in the Post Office and Chip Shop! Back to the drawing board........
This was the look I was going for!
Wednesday, 29 September 2010
Hubble Bubble Halloween Sweetie Bag - Haribo Frogs
WHOOPS!!!!!! Just noticed that I have spelt “cauldron” wrong !!!!! I was trying to get the project finished to post in too much of a hurry ………… a perfect excuse to open the pack and feast upon frogs of a jelly nature!!!
I love these jelly frogs but they are not the easiest sweet to work with as they are a tad sticky, but I thought that they were ideal for Halloween and witches spells etc.
The witch is a 3D sticker from a Poundland pack from last year, but I am sure they will have them in again this year. Tuesday, 28 September 2010
Dracula Halloween Cadbury Chocolate Bar
Another Halloween chocolate bar ….. I am afraid they are getting more fiddly as I go along …… sorry!
And, I know that I am terrible for not taking photos as I work …. but I remembered as I did this due to its fiddle fartyness. I hope you can get the gist of what I have done from the above picture.
The fastener on Dracula’s cloak is a small piece of peel off with a sequin at either end. I just love the effect that a few simple doodles using a white gel pen can bring a project alive, if you’ll pardon the pun!
Monday, 27 September 2010
Halloween Test Tube Favours
I love test tubes!
I got the taller plastic test tube from a site in the US ages ago, http://www.silvercrowcreations.com/ and must see if I can get some more. The smaller tube was from a crafty resource centre I visit now and again, but they are both perfect for Halloween trick or treat favours.
The tags are made using my Stampin Up scalloped and plain circle punches which I have decorated on both sides with Accessorize stickers and handwritten messages using black and white gel pens.
The tags are on a thread, kept in place by a piece of black and white gingham ribbon (now deleted from Stampin Up range) at the top of the test tube.
The tube is finished off with a large purple flat backed gem stuck on the cap.
The jelly beans are from the Original Jelly Bean Factory, they cost a bit more than ordinary jelly beans, but they are smaller and I can buy just the colours I need in their pick and mix section which gives this idea a lot of its charm.
Sunday, 26 September 2010
Inspiration …….
Oh my life how cute are these bracelets ……
I have seen other bracelets made using dolls/miniature tea sets and have often stood and ummed and ahhed when I have seen sets in Poundland, but have never taken the plunge …… I think I may just have to now ……… I could be so on trend!!!!!
http://dollarstorecrafts.com/2008/11/teaset-charm-bracelet/
I have also noticed, as I passed on the bus, Wolverhampton has now got a 99p Shop – I wonder if they have a little tea set?
Halloween Haunted House
This Halloween House is a download design from Quickutz Silhouette that I have doodled and embellished.
I was a bit disappointed because I thought it was a gift box, rather than a model.
But I have decided that when I make up another house I will put the sweets inside before I seal it up and complete the roof.
So the treat is the sweets ……. but the trick is trying to get them out! I am so wicked!!!
I’ve used a tiny silver brad for the door knob and the ghost, bats, spider and pumpkins are left over Poundland 3D stickers from last year.
It’s hard to see from the pictures, but the window shutters do open. I’ve coloured them and the door with black felt pen.
Quickutz Halloween House C00745_18816
Saturday, 25 September 2010
Cadbury Miniature Trick or Treat Bag Favour/Sweetie Bag
I love my Stampin Up circle punches, but wondered if I could make a simpler sort of Halloween Trick or Treat sweetie bag using my Accessorize stickers and Cadbury Dairy Milk Miniatures and this is what I have come up with ...
I made a template of the miniature wrapper so I knew what size to cut my “new” wrappers. It was easier to leave the original wrapper on the chocolate rather than risk ripping the foil and it made no difference to the finished idea.
After wrapping each chocolate, which only took a few seconds (using double sided tape with my ATG gun), I could get on with the best bit ….. the embellishing! I added a tiny bit of glue to the back of each sticker to make sure they didn’t come off, and then added a few doodles using black and white gel pens, which really made the stickers pop out.
The bag topper is made using a die from Nestabilities Label set No.4, with a bit of faux stitching and a Stampin Up scalloped circle. I just love these stickers …… it’s so hard to let them go!!!
The Cadbury Miniatures were from Home Bargains - they cost about £1.25 and there are 20 in a pack.
Subscribe to:
Posts (Atom)