Saturday, 11 December 2010

Altered Desk Calendar

I’ve made this desk calendar for me, altering it was a little unnecessary, but I am having a lot of fun experimenting with Modge Podge and covering things with different types of paper etc..
Altered desk Calendar
The calendar cost 99p and was from a funny Pound type shop called Hardy’s in Telford
Picture 152 Picture 153
It was just painted black when I got it, but I’ve covered it with oddments of Cosmo Cricket paper that I got from QVC. Altered Calendar Stand
Covering it was fiddly, but it was a useful exercise.
Altered Calendar stand 2
I know it’s nothing special, just a bit of fiddle fart, that will look OK on my desk at work.

Friday, 10 December 2010

Hershey’s Kisses Mouse

Hershey's Kiss Mouse 1
I love Google images, it’s where I always go for inspiration or to double check an idea. Goodness knows what words I put into the search when I found this mouse!   Try Googling Hershey’s Kiss Mouse and see what you get.
kisses
It’s made by sticking two Hershey’s Kisses together. Hershey’s are an American brand of sweet but are not that easy to find here, but now and again Wolverhampton comes up trumps and occasionally you can find - “the hard to find
Hershey's Kiss Mouse 2
All I’ve used are two circles of pink card to make the ears and have just scribbled round the edges, googly eyes, a pink flat backed gem for a nose and some waxed string (because it doesn’t flop) with a bow for the tail.  I have used the tiniest amount of PVA glue to keep them all in place.
Hershey's Kiss Mouse 3
I’ve stuck it on a very small kraft box, I thought I would make a few and put cracker type mottos in them  with a tiny weeny gift, like a  pair of earrings or a pencil sharpener etc. and have them instead of crackers at one of our festive meals.

Thursday, 9 December 2010

Fairydoodler’s Friday Freebie Challenge

fairyd_challenge

Click on picture to find out more about Fairydoodlers Friday Freebie Challenge

My “Nightmare” Work Desk!

I thought I would give you a laugh today …… I admit, I must be a nightmare to work with during the Festive Season ….. my “less is more” mantra goes out of the window ….. and my colleagues are faced with this ……
Desk
I have so many lights plugged into my computer ports, it’s a wonder the thing  doesn’t explode!
Desk 1
Here you see my festive mugs, a jar of chocolate money (that needs topping up ..), for mid typing nibbles and a little bottle of bubbles for when I fancy a spontaneous Yuletide flurry!
Desk 2
I have collection of light up festive pens for taking seasonal minutes, a jewel encrusted computer mouse, calculator and scissors, plus a proper Christmas mouse stuck to my phone (the sticker says “I love answering my phone in a foreign accent” 
My festive desk 2010
It really is  a wonder that I haven’t been given my cards ….. especially considering what you can’t see includes an inflatable Christmas tree and turkey and a singing and dancing snowman! 
My festive desk 2010a
However, despite all this around me …….. I remain professional and supremely efficient at all times!!!!!!!!!!! LOL

Wednesday, 8 December 2010

Christmas Pudding Mints

Christmas Pudding Mint Tree Decorations
I wish I could say this was my idea, but it’s not …it came from a brilliant crafter, who has an equally brilliant blog - http://flourgirlcrafts.blogspot.com/search/label/Mints.  Never would I have thought of Christmas puddings when making decorated Elizabeth Shaw mints with my Stampin’Up punches.  So thank you Karen for such an inspired idea.
Christmas Pudding Mints 
The scalloped and plain circle punches are available from lisa@craftfairies.com.
Stampin' Up circle and scalloped circle punches

My Festive Phone

Since it’s December I’ve decided to change the charms on my phone ….!!  How sad am I?
Picture 135
I’ve used phone charm lariats from Hobbycraft to attach them.  The jingle bells are from a pack of small bells from Paperchase, wonder how long it will take for them to get on my nerves?
Christmas Phone Charms
The snowman was from a pack of small Christmas tree decorations.  They cost far too much in Wolverhampton’s House of Fraser but I have been eyeing them up for ages and finally my patience was rewarded when they were reduced to half price ……
knitted phone sock
And my phone will keep lovely and warm in it’s new sock!  I didn’t make, it was a present from the PE Lady at work (not to be mistaken for the PE Lady’s Mum).  I love it!  She gave me the pattern, so if I have any requests I’ll add it to a post.

Tuesday, 7 December 2010

Marc’s Baubles

I have such lovely, lovely followers and sometimes their kindness takes my breath away.
Decorated Clear Glass Chrismas Baubles
I came home a couple of Fridays ago to find a large  parcel sat sitting on my kitchen table and when I opened it, it was filled of the most wondrous collection of jingle bells, beads and baubles!
decorated clear glass christmas baubles 1
I’d mentioned in a post that I love clear baubles, but they are hard to find and then Marc goes and sends me so many that I was totally overwhelmed ….. I now hope that today he will be thrilled to see what I have done with them.
Decorated Clear Glass Bauble
I’ve simply stuck some jewelled Paper Cellar stickers, that I got in a sale a couple of years ago at 70% off, onto each bauble and then put poured either Twinklets Diamond Dust or small clear gems into them.  I am so pleased with the results.
Picture Picture_043_thumb[2]
I intend (if I can bear to give them away) to put each bauble into an organza bag and give them, instead of a card this year to special people, as I have said before, cards are soon forgotten, but these will hopefully be around for many Christmas’s to come …….
decorated Bauble in Organza bag
Thank you Marc, your baubles have made me one very happy lady!

Hug Mug Pattern - Most Wanted Christmas DIY Challenge 2010

Mug Hug  
I've entered this is the Most Wanted Christmas DIY Challenge http://www.vouchercodes.co.uk/
Materials
1 ball of double knitting yarn, 7 buttons, 1 plain button,  1 pr. 4 mm (UK 8) knitting needles.
Measurements: 23 x 8cm (9 x 3 1/4 ins)
Cast on 7sts
Knit 2 rows
Continue in garter stitch
Inc 1st at each end of next and every alt row until 19 sts on needle.
Proceed in garter stitch and block pattern as follows;
Row 1: knit
Row 2: K3, P6, K to end
Rows 3 – 8: rep rows 1 and 2 three times
Rows 9 – 11: knit
Row 12: knit to last 9 sts, P6, K3
Row 13 – 18: rep rows 11 and 12, 3 times
Rows 19 – 20: knit
Rep rows 1 – 20 twice, then rep rows 1 – 10 once
Continue in GS and shape button hole end:
Dec 1st at each end of next and every alt row until 11sts on needle.
Next row: to make button hole, K2tog, K3, yrn, K2tog, knit to last 2 sts, K2tog
Next row: knit, knitting into yrn of previous row
Continue to dec as before until 7 sts remain
Knit 2 rows
Cast off.
To make up:   Work in all ends neatly.  Sew the buttons into the squares, Sew plain button on to the end of the mug hug to correspond with the button hole at the other end.

Old Crock Recycled Cake Stand - Most Wanted Christmas DIY Challenge

Old Crock recycled Cake Stand 2
I've entered this is the Most Wanted Christmas DIY Challenge http://www.vouchercodes.co.uk/
Someone told me that making cake stands from old mismatched plates was “very on trend” at the moment, so I did a bit of research on Google and got some brilliant results, so naturally I wanted to have a go myself.
 Old Crock Cake Stand
It was therefore very fortuitous that my mum was throwing out some of her old plates, and had three mismatched blue and white plates, in three different sizes, just waiting to go to the Charity Shop, so I pleaded that I was a charity case!
Picture 753
Plates in hand, I needed two small glasses, so I popped into my local charity shop and couldn’t believe my luck when I found two matching pairs, priced at 10p a glass.  (I got both sets, so that I have a spare pair to make another stand later on).  The final item  I needed some strong glue for sticking ceramics and glass which I found on the market.
Old Crock Recycled Cake Stand
I was a bit dubious that it would all stick together, but it did and I am thrilled with the results.  If the idea worked, this was going to be a present, but I don’t think I can let it go! So it looks like me spending a bit of my half term holiday looking for some more plates in the charity shops of Wolverhampton.
Old Crock Recycled Cake Stand 4
In total this stand only cost me £1.70! Bargaintastic.  I was thinking that if I did a stall at a fayre, this would make a lovely display stand for some of my bits and pieces.  I can see this idea getting a bit addictive!!!

Coaster/Beer Mat Desk Calendar - Most Wanted Christmas DIY Challenge

Aggghhhh this drove me nuts to make!
Coaster beer Mat Calendar
I've entered this is the Most Wanted Christmas DIY Challenge http://www.vouchercodes.co.uk/
I’ve seen these calendars on lots of blogs that I thought I would have a go, but I just looked at pictures of the finished products, not the instructions …. as a result  I sort of made it up as I went along with just a basic idea of construction in my head!
Coaster Calender Beet mats
My mistake was using and covering beer mats ….. they proved to be far too heavy, especially when embellished.  In the end I made about 8 stands before I could got the measurements right so that the thing would stand up!  (The sides measure 11cm x 11cm and the base 11cm x 5cm, and I also added a couple of strips of black card to the base to strengthen it)
Picture 155
I covered each mat with DCWV self adhesive papers and then embellished with various punched flowers and butterflies etc.
Picture 092Picture 091
Picture 090  Coaster calendar 1
The calendar pages are from an Anita’s calendar tab that I took apart and backed on silver card.
Coaster calendar 2
The whole thing is kept together using two 1in book rings.Coaster beer mat Calendar 2
Now I have been through the agony of making the first one, any more I make should be a breeze!Desk Coaster Calendar
But I will just use a strong card for the pages ….. not beer mats!

Tutorial for Christmas Sweetie Bags Without The Aid of Fancy Tools and Stuff! Most Wanted Christmas DIY Challenge

I've entered this is the Most Wanted Christmas DIY Challenge http://www.vouchercodes.co.uk/

I’ve had quite a few questions about making sweetie bags recentley (Hark at me, I sound like an Agony Aunt!) I appreciate that not everyone has Big Shots/Cuttlebugs etc. or sets of Nestabilities, so I have put together a very simple tutorial, without using any fancy equipment to show that such stuff is not always necessary.
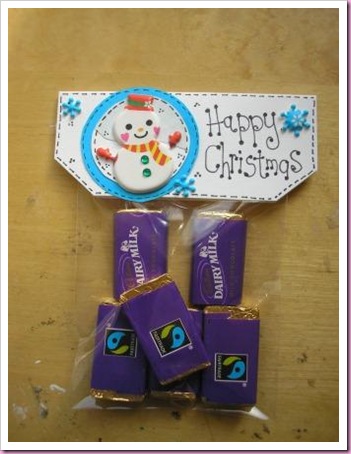
sweetbag tutorial 7
I think its best to start with the cello bags - get the size you want and make your toppers to fit them (much easier that making a topper and then searching for a bag to fit it).
sweetbag tutorial 8
To fit my chosen bag size (HobbyCraft’s own make 76mm x 191mm) and  I have cut a rectangle a little wider than the bags. ….. my apologies, I still measure in inches!!
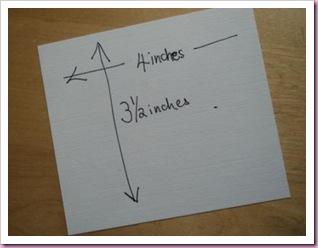
sweetbag tutorial 9
Find the centre of the rectangle and mark each end lightly with pencil.
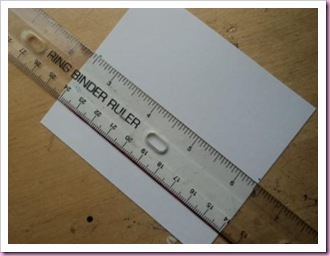
sweetbag tutorial 10
Keep the ruler in position and score from one end to the other with the end of a pair of scissors
sweetbag 11
When scored, fold the topper in half
sweetbag 12
If you want a fancy shape, hold the topper together and cut both edges off the corners of one side.
sweetbag 13
Take one of the cut off corners and put it on the opposite side of the topper and use as a template to make sure both sides are exactly the same
sweetbag 14
The topper should now look like this ....
sweetbag 15
Now for the circle embellishment - find two circles one smaller than the other .... I have used the metal top of this small jam pot for the outer circle and the top of the glass jar as the inner circle. Cut out the circles in two different colours.  I’ve been a bit fancy and cut a bit of sky out to fit as well.
sweetbag 16
Put some little lines using a fine black pen round the edge of both circles. Then add whatever embellishment you fancy. I have used snowman stickers from Accessorize (£1.75 per pack) on mine.
sweetbag 17
Now to put it all together …… put some lines round the topper to match the decorated circle

Cut down the cello bag to a length you are happy with.
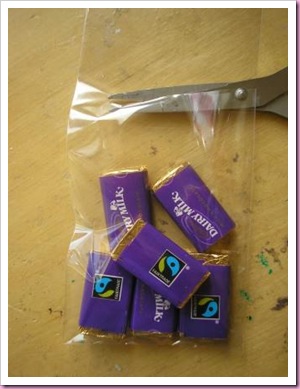
sweetbag tutorial 2
Open up the topper and put double sided tape on each side
sweetbag tutorial 3
Tape tape off one side, and lay the cello bag on top
sweetbag tutorial 4
Bring the other side of the topper down, press down and seal...... nearly finished .....
sweetbag tutorial 5
Stick the decorated circle in position, write a greeting and add a few small stickers/stars etc. and fiddle and twiddle till you are happy
sweetbag tutorial 6
That's all there is to it! Phew !!!! And yes …… my desk could do with a good clean!