At first I was unsure about the combination of grey and the brown Kraft card but it’s grown on me …. The Tatty Teddy topper comes with the 12 x 12 pack of Docrafts “Me To You” papers. To add extra dimension I’ve used Ranger Glossy Accents on the bear’s nose, the parcel tag and the stars on his hat, plus a tiny cream bow and purple flat backed gems.
When I mess about trying to decide where to put the tiniest and most insignificant of flat back gem I call it Fiddle Farting, hence the name of the blog!!!
Thursday, 18 August 2011
Tatty Teddy Kraft Card
This card measures 14.5 x 14.5 cms and is made using a ribbed effect Kraft card.

Wednesday, 17 August 2011
Framed Badges
Please excuse the nail and I apologise for the quality of lighting in my craft room.
After fiddle farting about making badges/buttons yesterday I was wondering what to do with some of the ones I’d made.
Then I remembered this picture frame I had bought as a set of three from a car boot sale for £1.00. A quick spray of cream enamel paint and a piece of ribbed Kraft card as a background ….. and Bob’s your Aunt Fanny!
Tuesday, 16 August 2011
Bandai Badge It
I had an e-mail from Becky asking if I had tried using fabric with my Badge It and not using the plastic covers ….. well the answer is yes, I bought mine for that very reason as I wanted to make badges like I had seen in Accessorize, (but couldn’t afford) that could be worn or put on bags etc.
As you can see from the first picture I have a several materials to demonstrate it’s versatility. First I’ve used a light cotton. All you do is use the template to draw round the material and cut it out.
…. and then pop it into the drawer marked 1, on top of a badge front, slide it all in and turn the winder on the top until it stops, it makes some weird and wonderful noises which almost convinces you that you’ve broken it, but touch wood It hasn’t happened yet!
The next stage is to add the back, which you do in exactly the same way, but using the drawer marked 2. That’s all there is too it ……. but I have to stress this is sold as a toy, not a craft tool, but I have had mine for two years now which isn’t bad going.
This next piece of material is a little thicker and a very small sample obtained (ahhhhem, cough, cough) from a lovely material shop in Shrewsbury, I dread to think how much it was a metre …. but let’s say I couldn’t afford even a fat quarter, but it is exquisite.
The material for this final badge has been cut from an old embroidered table cloth, bought from a car boot sale for 50p, sacrilege I know ….. and perhaps I’ll live to regret it … but at least the beautiful embroidery lives on and can be admired in another guise.
You can buy Badge It’s new for about £20 from many toy shops, or Amazon but it’s worth looking on e-bay first, however charity shops and carboot sales are good hunting grounds too …. I got a spare machine for 20p, including badges because the lady said she didn’t want to take it home again! Badge It refill sets are also available direct from Bandai or Amazon for about £9 for 30.
Again – I stress this is sold as a toy not a craft tool.
Monday, 15 August 2011
Little Monkey Cards.
These cards measure 5ins x 5ins and are made using white linen effect card.
I can’t resist monkey stickers when I see them …
These were from HobbyCraft and I think they cost £1.99 a packet. All I have done is add a pair of googly eyes to each of them to make them just even cuter.
I’ve doodled the leaves and branches and the sentiment is in my own handwriting.
I got four cards from the one pack, but you could make them go an awful lot further if you wanted,
Sunday, 14 August 2011
Displays Using Tim Holtz Dies
I once spent a whole year just doing displays in a school where I worked, it was such hard work! I still do displays in the school where I now work, but not on quite such a grand scale.
A few days ago I showed you the display of Replica Photo Albums I made for my schools centenary celebrations and thought that today I would show you a few of the others I put together.
The display above is the Music Lesson Board and you will see that I have used Tim Holtz Tattered Florals, Tattered Leaves and Caged Bird dies to make up the borders, as well as old musical instrument Christmas decorations, and old sheet music. Some of the music I have used as it was and some I have photocopied onto green paper for the leaves. The music symbols were cut on the office Craft Robbo, (which I asked for not long after I arrived) …. this board was a labour of love!
The next board was also for the Music Department, it was so big that I decided to divide it into two. The one half celebrates the achievements of the girls who gained distinctions in their music exams and the other side is a montage of old photographs from past concerts and productions. I scanned the original pictures (both modern and old) and then re-coloured them in sepia tones to give it a shabby chic /centenary type feel.
Again, I’ve used old sheet music and covers for the background and borders
The next display board for the RS Department is a bit brighter, with a more modern feel to celebrate 400 years of the King James Bible.
I’ve taken a poster for the event, photocopied it to A3 size and then cut out segments to use as a background and as a frame for the information and photographs.
I think I enjoyed doing this display the most! During a sort out of cupboards I found boxes of old sewing paraphernalia and some original smocking, then imagine my surprise when looking through the archives I found photos showing girls actually doing the smocking!
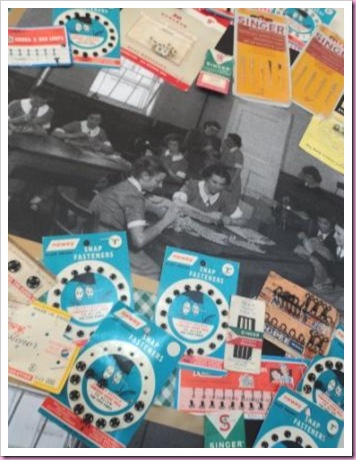
In fact at one of the Open Days an Old Girl actually recognised her own smocking!
Finally a display of pastel drawings done by the girls this year of various views of the school …..
…… intermingled with old photographs of the same views.
Putting up of a display doesn’t take that long, but the preparation ….. oh my life, that can take me days, although it doesn’t really show ….
….. but when I am doing something really special I like to double mount everything ….. I must be mad!
Saturday, 13 August 2011
Two Baby Cards
Both these cards measure 5ins x 5ins and are made using white linen effect card.

The rabbit embellishments were leftover from my none too successful foray into making Easter cards from a kit, I didn’t want to waste them, then I had an Ulrika moment and thought babies ……
I’ve just added ribbons and rattles. The rattles match perfectly and came from a pack of puffy stickers from Hobbycraft. I don’t usually mix plastic stickers with paper embellishments, but with the closeness of the colours I think I’ve got away with it this time.
Friday, 12 August 2011
Birthday Cake Card
This card measures 5ins x 5ins and is made using white linen effect card.
I’ve got quite a few packs of these Anita’s die cut cake toppers so you’ll probably be seeing them in lots of different guises over the next little while. I’ve just mat and layered on a patterned birthday paper, followed by red and then silver card, with flat backed gems for extra bling!
Thursday, 11 August 2011
Papier Mache Key Ring
A bit of an experiment today using a papier mache letter that I got from Hobbycraft a while ago on special offer at 10 letters for £1.
I’ve covered the L with a small print paper on both sides then stuck on a few Accessorize puffy cat stickers (£1.75 per pack) to the front and followed several layers of Anita's 3D clear gloss finish to the front and back to give it a pottery plaque type look. But, if I were to do this project again I would use Range Glossy Accents instead of the Anita's as it is thicker and less prone to bubbles and running.
Wednesday, 10 August 2011
Old Photo Album Display
Recently the school where I work celebrated its Centenary and so there was a lot of activity going on putting up displays and I thought I would show you one of mine as a bit of change from cards etc.
The original albums
The original photo albums, dating back to 1911, were too delicate to have on display, so as this display was for the PE Department I photocopied all PE related pictures from them and then replicated the albums and pages they were in/on as best I could.
My replicas albums …..….. and pages …
I made and covered boxes, and then dated them to put the albums in and people could take them out to look at and handle.
The border of the panel was made from more modern photocopied photos to add a then and now theme.
Finally to add dimension and accentuate the sporting theme I’ve put four plastic trophies that I found in a party shop on little podiums near the top and two sets of the Colours the girls are awarded with at the end of the year at the bottom.
Tuesday, 9 August 2011
My Lucky Holey Stone Bracelet.
Whenever I go away to the sea I have to spend an hour or so each day looking for “holey stones” – I just like stones with holes in them and didn’t realise that there were any magical powers attributed to them until I found a couple of articles while blog hopping …
“Holey stones are old stones carved by nature; water, wind and sun, and have holes that go completely through them. These stones are reputed to have extremely powerful magical properties, the most important of which is protection.”
I have a huge vase filled with them on the windowsill of my Craftroom, the little ones I am starting to make into “charm” bracelets, but as you can see, I need a bit more practice with the findings which I find very fiddly to work with. The large ones I give to friends now and again …. but they have to be “special” friends as I love each and every stone I have ever found.
Monday, 8 August 2011
Thank You Card
This card is A5 in size and made using white linen effect card and pile of old rubbish!!!

I’ve added the bingo cards as they are a reference to our next planned night out …..!

Oh ….. I know how to live!!!!!
I think one of my most irritating habits after a night out is gathering all the little bits and pieces I can find and shoving them into my bag! Sometimes I don’t do anything with them, but this time, after a brilliant night out at “The Dogs”, I wanted to put it all together to make a Thank You card for the friends who organised the evening.
Hopefully it will be a lasting memento of a brilliant time which I know will be very much appreciated.
I’ve added the bingo cards as they are a reference to our next planned night out …..!
Oh ….. I know how to live!!!!!
Sunday, 7 August 2011
Butterfly Card
Subscribe to:
Posts (Atom)