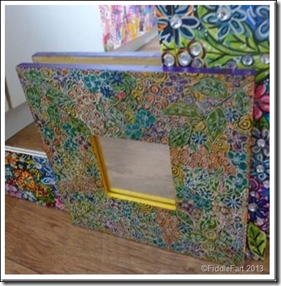
The other day I received a vey special “Thank you” card for some bits and pieces I sent Maisie, who you will remember was the creator of the beautiful embellished pink mirror I featured a couple of weeks ago ….
When I mess about trying to decide where to put the tiniest and most insignificant of flat back gem I call it Fiddle Farting, hence the name of the blog!!!
Sunday, 26 May 2013
Guest Crafter–Maisie
Memory Box–Madeleine Bird Card
This card measures 4ins x 4ins and is made using an hand cut ivory linen card blank.
Can I say I love this card? There is nothing much to it really, I think it is just the colours ….. put together using scraps of paper with patterns that match the dimensions of the bird. To add a little depth I have used self adhesive foam pads behind the birds body and wing.
I’ve used my Stampin Up Bird punch for the branch and a tiny daisy Papermania punch for the flowers, embellished with a few clear flat backed gems and a bit of faux stitching. Done and dusted!
Memory Box Madeleine Bird, Style No. 98424
Thursday, 23 May 2013
It Comes To Him That Waits ……
Do you remember the retro mirror I spotted in a local charity shop window but baulked at the price tag of £10, back at the beginning of March?
Little Wish Bottles.
I made these little wish bottles for the GCSE Food girls at school. Every week for the past two years they have been cooking the most delicious food which they asked me to help evaluate …. it was a hard job …. but someone had to do it!!!
I wanted to give them a little something to say “thank you” and to bring them good luck for their exams in the coming weeks. The bottles came from The Works and cost 99p for a pack of 6, all I added were a few stars and a tiny piece of paper on which I wrote “wish”
Tuesday, 21 May 2013
How Happy Does Maisie Look?
Marc sent Maisie, my guest crafter of a few days ago a mahoooosive collection of flat back gems ……. 100’s and 1,000’s of them!!
I am a great believer of giving children things to create and make things with ….. not just great piles of computer games and dvds and toys that need batteries, they don’t have to be anything expensive …. just a few pens, paper or card, glue, scissors, old magazines and material and interesting bits and pieces. When my kids were small … when the weather was warm I used to unravel a roll of wallpaper in the garden and give them pots of paints, not caring less if they covered themselves as well as the paper ….. they were absorbed for hours and hours!
And then bless her, she sorted them all out into colour and sizes, a job that would have sent me absolutely bonkers!!
They always had a dressing up box too, but not filled with ready made character outfits, I used to give them a bag of pennies and we would go to the Thursday night jumble sales across the road at the church hall where they would buy the clothes and anything else that caught their imagination ….. Happy days!!!
Sunday, 19 May 2013
Brides Keepsake…… Jewelled Lucky Horse Shoe/Heart
Please excuse the glue globs on some of the photographs, it was still wet in my eagerness to get this post written.
I don’t have a clue what to call this ….. when I had the idea I was thinking about the lucky horse shoes you give to a bride outside the church/registry office …. but heart shaped! If that makes any sense at all?????
Like my jewelled mirrors I built up the design, adding gems to the fabric flowers and filling all the gaps with small pearl beads.
I think it is all the fiddle fart, very sticky building up and filling gaps are what makes all the difference when looking at the finished heart. I used a narrow cream ribbon to hold it by, threading it through the existing hole at the top, with the bottom hole being easily covered up by all the embellishments.
I now really want to make a couple of horseshoes for summer weddings, which I think could go down a storm at work. Marc gave me one when I last went to see him ….. now if only I could find it amongst all my bits and pieces …. I can see it in my minds eye, I just cannot remember where I squirrelled it safely away, DOH!!
I saw this string of vintage decorative hearts in Home Bargains for £2.99 and knew immediately what I wanted to do with them, and as there were four hearts altogether, it was a no brainer, as you just can’t even buy one wooden heart of such quality from craft establishments for that price!
I decided to use one of the small hearts, which measured approximately 5.5ins x 5ins for this project and then raided my cupboards for a whole variety of embellishments including paper flowers, cabochons that I had been sent from WholePort, fabric and crocheted flowers, plus flat backed gems and flowers and pearls …. you name it, I used it as my desk proves!
Memory Box–Madeleine Bird Die
This card measures 4.75ins x 4.75ins and is made using a hand cut Kraft card blank.
I love birds on cards, they are so versatile for so many themes and decided to treat myself to this Memory Box Madeleine Bird die No. 98424 (£5.99).
I’ve kept everything very less is more, using old music paper for the background. Although it doesn’t show on the photo, I have mounted the birds and their wings on self adhesive foam pads for extra dimension. A bit of faux stitching and a flat gem eye completes the effect.
I can see me using this die over and over again, I want to try it using felt and delicate patterned fabrics when I have got a little more time to fiddle fart …. I am not the best or most patient of sewers, but I am thinking brooches …. ???
Saturday, 18 May 2013
A Painting For My Mum’s 80th Birthday
Rather can give you an almost daily blow by blow account of the painting I've done for my Mum’s 80th birthday, I thought I would deliver it to you all in a single post as a fait au complet, outlining the stages I went through before the great unveiling !
Because it was much cheaper I ordered two (one and a spare!) 48” x 36” canvases from http://www.canvas-store.co.uk/ which arrived within two days of my ordering them, as did the set of Royal & Langnickel acrylic paints (£5.29) from Amazon http://www.amazon.co.uk/Royal-Langnickel-Colour-Acrylic-Tubes/dp/B001880N9Q/ref=sr_1_1?ie=UTF8&qid=1365961557&sr=8-1&keywords=Royal+and+Langnickel+acrylic+paint
However, when I went into The Works to get a palette, I saw this Boldmere starter pack of much larger tubes of acrylic paints for just £7.99, which was far more economical, and I couldn’t resist, especially as I now had two canvases to paint.
So armed and stocked up ….. I set to work ….. sketching the design out roughly first ….. …. and then gradually filling the design in ….. the above only taking me a couple of very chilled hours while listening to Radio 4 on a Saturday afternoon.
Thursday, 16 May 2013
Mini Canvas and Easel
This mini canvas measures just 7cm x 7cm and came in a pack of 4 from Poundworld.
I used my Whisper Pens first to put down the basic shapes of the flowers, I was worried that the ink might bleed into the canvas, but as you can see it didn’t, however my Stabilo fine liner pen wasn’t too keen on the rough, unyielding material …. but I got there in the end.
….. just a little trinket for my desk at the moment, but I might turn it into a sort of alternative card for someone special when the next birthday comes along.
Wednesday, 15 May 2013
Framed Word Art
I love some of the “Word Art” that is around at the moment, but it’s a bit pricey ….. and with most things that I see, that I like, a little voice in my head says …. “I could do that” …………
So in this case I did!!! I already have piles of old sheet music rescued from a skip so all I had to do was trim some everso slightly to A4 size.
Then using Publisher I set out the words …. nothing fancy …. using Ariel Black in font size 110 …. and printed it onto the sheet music, then all that was left to do was pop it straight into an A4 certificate frame from Poundworld …… and Bob was my Aunt Fanny …. simples!!!
Like most ideas …. one thing tends to lead to another …. and I wondering if I could make a set of notelets along a similar vein ……
Tuesday, 14 May 2013
Altered Hand Painted Mirror
You wouldn’t believe how many reincarnations this mirror has had to go through to get to this completed stage, in fact this is the second version, the first one ended up in the bin!
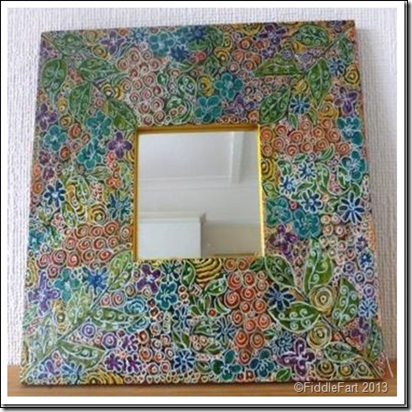
To be honest, at this stage, after a couple of coats of quick drying, gloss varnish the mirror looks pretty OK, but me, being me, just had to fiddlefart some more …. which is where I went wrong with my first mirror, hence the bin!
I really like the effect of adding a white outline, but getting the right pen that stayed put while being varnished was a problem, the first couple of pens I tried dissolved immediately ….. however I found that a white “Pilot Super Colour Permanent Type Ink” held fast …. wooo hooo, but although it is labelled as “extra fine”, I would have really preferred it to be even finer …… but that’s me being very picky!
The final stage was to mix a generous sprinkling of iridescent micro fine glitter to the varnish, which gave the mirror a delicately sparkly fairy type look, which was exactly the effect I wanted, but unfortunately the pictures really don’t pick this up or do justice to it. The white outlines are also much subtler from a distance, giving the mirror a softer effect not looking half as harsh as they do in these pictures. As you can see compared to the first jewelled mirror I did (behind) the detail is much finer, I have also resisted adding any gems at this stage …. for now I am going to leave it as it is and then perhaps revisit it in a couple of months time ……
Monday, 13 May 2013
Altered Poundshop Clock
I cannot believe I didn’t take any pictures of this clock as I was working on it, what am I like?
The clock came from the Poundland Mothers Day range, Marc spotted it on the website and said it would be perfect for altering.
The only thing that needed to be done to prepare it was to remove the wooden motif and then a bit of sanding to smooth over where it had been.
After that I just doodled basic flower and leaf shapes straight onto the clock using Promarker pens, then outlining and adding detail to them in black, as well as filling in any gaps, before applying a couple of coats of quick drying glossy varnish.
When the varnish was dry I couldn’t help myself by just outlining the design again in white using a white Pilot Super Colour pen before a couple more coats of varnish with a little ultra fine iridescent glitter added for a fairy lustre effect.
And finally ……. small, very sparkly flat backed gems round the dial ….. done and dusted and now sitting in one of the partitions of my what not shelf on my desk.
I just wish I had bought a couple more of these clocks ….. because now I can think of lots of other ways to decorate them ….. I am thinking way ahead to Christmas …. and can just see one painted with a blue sky, stars, glittery snow and a couple of cute snowmen standing at the bottom …… !
Sunday, 12 May 2013
Framed Jewelled Heart
This project has been in the making since Christmas when I asked for a deep box frame from Hobbycraft for an idea I had for my newly decorated “guest room”
I had made a friend a small jewelled heart on canvas a while back and always said that I would make myself another bigger version when I had the time …… famous last words as that was at least three years ago!
The first thing I did was to cut the heart out in white card to fit the centre of the frame ……
….. which I then covered with all the clear, turquoise, green and pearl flat backed gems in various shapes that I could muster …. I thought it would take forever but a couple of hours did it …. as I watched Emmerdale, Corrie and Grand Designs …..
I used Crafters Pick “The Ultimate” glue which I found dried pretty quickly, this in turn made me work pretty quick too! The fiddle-farty bit was filling in some of the smaller gaps which were left when I had almost finished, I dropped seed beads into them after I gave up on tiny flat backed gems using a cotton bud as being just too fiddly, even for me!
To add a little more dimension to the heart in the frame I used foam sticky pads to stick it on to the background ….. and really that’s all there was to it …. simples!
I have a four more smaller box/shadow frames from Ikea to use up now, but as of yet haven’t had any other brain waves as to how to fill them …… but that, I expect, is only a matter of time!
Saturday, 11 May 2013
My Doodled Brooch Experiment
This project was a bit of an experiment as I had an idea but wasn’t sure if it would work. As you know, I have been finding doodling very therapeutic and relaxing of late …. and this time thought I would go from the sublime …. the mahooosive doodling that is the base of my paintings to the ridiculous …. a small brooch.
I got these clear glass cabochons from China a couple of years ago, and to my shame have hardly used any of them. I had seen something similar in a UK craft based magazine, but when I saw how much they were for just one, there was no way I was going to pay the price ….. but after a little researching on the internet and I found these for silly money, as I said from China.
Anyway …… I started with a very small doodle using Whisper pens and then stuck the cabochon on top (resisting my usual urge to add a little iridescent micro fine glitter) using a little Ranger Glossy Accents which, when dry, goes completely clear …. and then all I had to do was wait patiently for it all to dry and to see if the colours ran ….. they didn’t, wooo hoo!
However, the ink did run a little into the back of the paper, but as this brooch was for me I added the brooch back using E6000 glue, and when that dried, added a good layer of Ranger Glossy Accents to seal the paper, .…. but when I use this idea again …. I will either colour the back in with a solid colour or cover it with another layer of paper before adding the pin …. to make it look more professional …..
I am planning on making a set of fridge magnets in the next little while, so can then see which idea works best. But for now, this brooch is pinned firmly to my jacket lapel.
Subscribe to:
Posts (Atom)