Sunday, 5 March 2017

Little Wooden Bird Pendant Decoration – A Bit Of An Experiment

I am not sure if this idea works as a hanging decoration, so as I write this post I am still mulling over a couple of ideas ………..
Little wooden bird pendant decoration…… it could all change, before I reach the end ……  The wooden frame part measures approximately 4cms x 2cms.
The Works Wooden Shapes FramesTiny Wooden Bird Tag
I used two bookplate type wooden frames from a pack from The Works.  There were three of each design (aghhh) in the pack, so I am glad I bought two packs so that I have an even number of frames to work with on other ideas.
Tiny Wooden Bird Tag. aI decided to make the pendant double sided, stamping on a handwriting design paper with a birds on a branch clear stamp (sorry, I can’t remember where it came from).  I trimmed the paper to fit the frame and glued it down.
Tiny Wooden Bird Tag Decoration. bI then stuck the two sides together ….. and as  I wasn’t sure about the paleness of the frame, coloured it with a Promarker.
But with hindsight I did things a bit arse over tit, as I then added all the beading and wiring because I was impatient to see if the idea would come together ……. what I SHOULD have done is not glue the frames together until I had flooded each separate side with Glossy Accents and left them to dry completely for at least 24 hours before adding all the twiddly bits.  I think adding an extra layer of card behind the printed design would also have stopped the paper wrinkling evero slightly, but that’s me over thinking things, as it doesn’t really show.
Tiny Wooden Bird Tag Decoration. cOn reaching the end of this post I have decided to leave the pendant as it is,  but I am going to repeat the exercise to see if the ideas will translate into being made into a brooch, so watch this space ………

Saturday, 4 March 2017

Stamped Copper Christmas Tags

These tags measure approximately 11cms x 2cms.
Stamped Copper Christmas TagsI think these copper tags were a charity shop find when Marc and I went “on honeymoon” to Shrewsbury about 3 years ago.  If I were to hazard a guess, I think they may be something to do with gardening, but I will stand corrected if anyone knows any better……
Slim Copper TagsAnyway, Marc and I split what they had between us, paying no more than £1 each …… but it has taken until now for me to do anything with mine ……
alphabet set….. and that being “just” stamping them, but having said that, I am so chuffed with how they have turned out.  I stamped them using letters from a retro vintage alphabet and number set I found on e-bay, for, I think, about £7.
I decided it would be a lot easier to print the letters, using jet black Stazon Ink, in a higgledy piggledy way, rather than try and get them perfectly spaced out and level, but even doing that, I still had to wipe quite a few mistakes away before I was happy.
The finishing touch was to add a wooden bead to the copper wire that came with the tags.

Friday, 3 March 2017

Snowflake Microscope Slide Tree Decoration.

Close Up photography is totally unforgiving, the tiniest amount of residual glue or smallest join just looks horrendous …….. but from a distance, this slide looks pretty OK!!!  The finished slide measures 3ins x 1ins.
snowflake microscope slide christmas tree decoration 1I had a few self adhesive, glittered snowflake stickers from Lldl leftover from last Christmas and I thought I would try to see if they would work on a microscope slide decoration, as the snowflakes are slightly raised I wanted to see if they could be sandwiched and sealed between two slides neatly ……. they could!
Christmas snowflake StickersChristmas Snowflake Miscroscope Slide tree decoration
Although the glitter was only on one side of the stickers, the adhesive side looked just of effective on the reverse of the slide.  There was also a transparent edging round the stickers, but I think I got away with that too, it seemed to add a icy melty look, and from a distance it can’t be seen anyway.  Sometimes working so close to something you are making makes you paranoid about the detail, or is that just me?
Snowflake Christmas Microscope Slide.I am so pleased with the 6mm self adhesive, aluminium foil tape I found on e-bay, without it my microscope and domino tag making days would have been over.  I did “A Marc” and bought copiously, two 40m rolls should last me for absolute ages …….. and when they do run out ……  I reckon I will be in my 70’s and past crafting or at least blogging by then.
I am still practising applying the tape to the slides, I have done it in separate sections, sides then top and bottom, but that gives you four joins, and looks messy up close, in the end I think the best way, if a little fiddly, is to do it all in one go, with a single join at the bottom which can be hidden with a bail.
 Snowflake Christmas Microscope SlideSnowflake Christmas Microscope Slide Decoration. 1
I used the last of my G-S Hypo Cement Glue (more now on order) to glue a few pearls on both sides of the sealed slide and then apply two spring bails to the top and bottom. E6000 is my glue of choice, but the pin head precision of the G-S is much better for such tiny work. And with this done I had to leave the glue to set/cure for 24 hours, without touching, aghhhhhhh the temptation!
snowflake Microscope Slide Christmas Tree DecorationSnowflake Microscope Slide Christmas Decoration
Once dry I was ready to add an acrylic snowflake charm and a hanging wire.  It was fixing the snowflake that the staying power of the G-S glue was well and truly tested, because the acrylic snowflake had a solid loop, so couldn’t be opened to attach to the bail ….. but I managed to open the spring bail, despite my heavy handiness, without a wobble so that the snowflake could lie flat to the slide.
Microscope Slide Christmas Decortion 3This project was another steep learning curve in my microscope slide quest, but I am getting there, by Christmas I am determined to have it fine tuned to almost perfection.  When I pack up a few bits and pieces and ideas to play with when I stay with Marc, sometimes we appear to achieve nothing or are  not that happy with what we have produced but while we are continuously bouncing ideas of each other and Marc telling me how impatient I am, something clicks, to be resurrected somewhere along the line later on.
Marc has just bought a soldering tool and  some solder that we are both desperate to try, as a lot of microscope slides on Pinterest etc. that first caught our eye are soldered …… we’ve also been watching tutorials on You Tube on how to do it …… so who knows what we’ll come up with in the next month or so.

Thursday, 2 March 2017

Patchwork Christmas Card

This card measures 5.5ins x 5.5ins and uses a hand cut, white linen effect card blank.
Patchwork Christmas CardThe card uses a patchwork of Christmas patterned strips cut from various Christmas paper pads and a white Craftwork Cards silver foiled die cut Christmas sentiment.
paper scraps patchwork cardIMG_1061
When making a card like this I like to put the patchwork together on a piece of scrap card and then trim the edges, I am always wary of gluing directly on to a card blank as with my pudgy fingers it’s likely to go askew.Patchwork Christmas Card..Once trimmed, the patchwork panel was centred and stuck onto the card blank. The patchwork stripes were then faux stitched with a black fine liner pen.
I made a band of matching papers to go across the card and then added the sentiment which was also mat and layered. The final touches came from a strip of silver peel off in the middle of the band and five equally spaced red flat back pearls.

Wednesday, 1 March 2017

Christmas Microscope Slide With Wooden Stars.

This idea really didn’t work!  Admittedly it was an experiment, hence only a couple of pictures, my new self adhesive aluminium foil tape had just arrived and I wanted to try it out right away to reassure myself that I hadn’t wasted my money!
Microscope Slide Christmas Tree DecorationLet’s just say the tape is brilliant, but the slide, in my opinion, is wanting! I like the text background, sandwiched between the two slides, but the wooden stars,(Paperchase)  are just far too chunky and look clumsy and completely out of place   I think a microscope slide decoration/ornament should be light and delicate, and this certainly is not!  The wooden stars are, I think, better suited to a domino decoration instead, so there’s another “experiment” in the making
Microscope Slide Christmas Star DecorationIf/when I make another using the same paper, I would also put the stars on the inside of the glass and then find a suitable silver/green/burgundy embellishment to stick on the glass, if just a filigree corner (on order from China), and then add a charm, i.e a Christmas Tree to a bail on the bottom.

Tuesday, 28 February 2017

Patchwork Birthday Card

This card measures 4.5ins x 4.5ins and uses a hand cut, white linen effect card blank.
Patchwork birthday Card with ButterfliesThe card uses papers from my Craftwork Cards Country Charms mini pad and a white Craftwork cards silver foiled birthday sentiment.
patchwork birthday cardWhen making a card like this I like to put the patchwork together on a piece of scrap card and then trim the edges, I am always wary of gluing directly on to a card blank just in case it goes a bit squiffy.
Patchwork birthday card.Once trimmed, the square was mat and layered on a white and then silver foil card and then centred on a card blank.
Patchwork Birthday Card 2Once in place I faux stitched the patchwork squares using a black fine liner pen and added the sentiment.  The final touches came from the small wooden butterfly embellishments, but I think the card works equally well with or without them.

Monday, 27 February 2017

Bird Silhouette Domino Tag/Decoration.

This project uses a 7cm x 3.5cms children's picture domino as it’s base and was very much a FiddleFart experiment.
Domino Craft Domino Bird TagI covered the picture side of the domino with a scrap of handwriting print paper. The bird is a metal embellishment from my trip of a lifetime to Michael's in Las Vegas.  I had to trim the leaves and branch the tiniest, tiniest bit to make it fit across the domino.   By flooding the area with two separate thick layers of gel, so much no touching restraint required, I hoped that the bird would blend in and look embedded in the gloss, a bit like an old tile. Once the gel had hardened I covered the sides with gold (though it looks silver in the pictures)  Inkssentials Memory Foil (possibly no longer available in UK)  and smoothed down with a crease mouse.
Domino Crafts Bird TagI screwed a tiny gold eye hook in the top of the “domino”, using a black jewellery wire and  a large silver bead to make the hanger.  When it was “finished”, there was something missing, but I knew whatever I added had be subtle and not detract from the less is more, peace of the bird ……. (hark at me), in the end I used three very small, cream, gold edged nail art studs I bought online, which were just perfect. 

Sunday, 26 February 2017

Framed Jewelled Christmas Tree Christmas Ornament

Following on from yesterday I decided that the jewelled Christmas tree was a little to heavy and clunky looking for a card, but decided to make them a more permanent Christmas decoration by putting it in a box frame.
Jewelled Christmas Tree in Box Frame Christmas DecorationI decided to try it in a deep box frame from The Range, I’ve had a couple in my cupboard for quite a while, but they still have them in stock. At £1.49 each, they cost less than most shop bought cards.
Framed Jewelled Christmas Tree in Box Frame Christmas DecorationFramed Christmas Tree
The frames measure 10.6 x 10.6 cms. As there was a ugly sticker on the back, that I couldn’t remove I decided to keep with the theme and cover it with a scrap of snowflake printed paper and add a message (talk about being ready for Christmas early!).
Jewelled Christmas Tree in Box Frame Christmas Decoration,1I will give a couple of these instead of cards to special people as a lasting memory of Christmas that can continue to be used in years to come, but will be also keeping a couple for myself for my own festive shelves this year.  When I am next in The Range I will also get a few more to put away, as I am sure I will have a couple more similar ideas in the coming months.

Saturday, 25 February 2017

Jewelled Christmas Tree Card

This card measures 4.5ins x 4.5ins and uses a hand cut, white linen effect card blank as its base.  IMG_1080The jewelled Christmas Trees were a bit of an experiment, the original idea was to make gift tags of them.
Jewelled Christmas Tree Tags 2I used a few of the wooden Ikea tree shaped tags I found in a charity shop and featured a few weeks ago, covering them with a variety of papers and colouring one with a green Sharpie pen, but with hindsight I needn’t have bothered because once covered with the jewels nothing really showed underneath.
Jewelled Christmas Tree Tags.Covering them was a right fiddle fart, almost making my eyes to permanently cross! When the glue was dry I went over the trees a couple more times, filling in the gaps using a variety of small flat backed gems and tiny nail art gems and studs. Once happy I covered the tree with a layer of Aleene’s Pendant Gel to “embed” the jewels.
jewelled Christmas TreeThe trees sat on my work table for a couple of days while I decided what to do with them, then I thought I would see how they would look on a card. 
I kept things as simple as possible, no backing or no faux stitching etc. the only thing I added was a large, square, flat backed gem under the tree.  I have to admit I am not quite sure about it ……perhaps it’s a little too heavy?  I have another five left to play with, so I can think a little longer.

Friday, 24 February 2017

Microscope Slide Christmas Tree Decoration

Marc set me me off on the microscope slide trail in the early days of our friendship, now over 5 years strong.  However, as you know from our many experiments during that time we have had mixed results with them.  Last time we got together just before Christmas I got sooooooooo frustrated and impatient you wouldn’t believe, I think Marc got scared!!!!!  But I won’t be beaten……
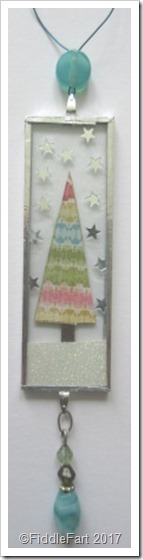
Microscope Slide Christmas Tree DecorationMy frustration has always been wanting to do something that was double sided and finding a delicate, unobtrusive way of fixing a loop of some kind to hang extra twiddly bits from the bottom and a thread/or wire to hang the finished decoration at the top, until now, all my efforts, in my eyes, have just looked too clunky!
fixingsHowever, while searching through the jewellery making listings on e-bay I finally found what I was looking for, spring bail pendant findings! So yesterday, I sat down and tried all over again …….
Microscope Slide Christmas Tree Decoration 1.Christmas tree paperMicroscope Slide Christmas Tree Decoration 1
I decided, to achieve an easy two sided effect I needed to leave some of the microscope slide clear, in this case the sky.  I made a tree template and was originally going to use the green side of the paper, but when I saw the patterned side I thought I would try it instead.  I cut out two trees and stuck them together, with a tiny scrap of brown sandwiched in the middle for the trunk.
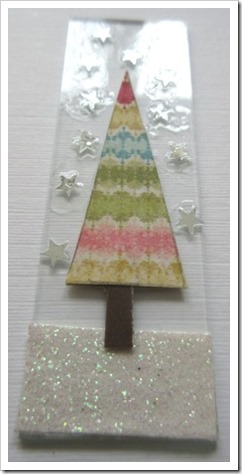
Microscope Slide Christmas Tree Decoration 2I did the same with the glittered paper on the bottom and then added tiny, silver stars to completed the double sided look. 
Microscope Slide Christmas Tree Decoration 4However, that’s when my awful, awful, impatience kicked in ……. I used a tiny amount of Aleene’s Pendant Gel to hold the stars in place, but instead of waiting for it to dry I sealed the two microscope slides together with 6mm adhesive, silver metal tape while it was still wet! Marc would have slapped my hand so hard and told me off something rotten ……..  however, I will justify my actions by saying ….. that it was just an experiment piece!!!! An experiment when I really wanted to see if the spring bails worked!
E6000 glueMicroscope Slide Tree Decoration 5
And this was the moment when I dared glue them, one at the bottom and one at the top with a tiny, tiny amount of E6000 glue.
Microscope Slide Tree Decoration ChristmasI will admit to scrapping off the excess, very carefully with a pin, while the glue was still setting, but I knew if I let it “cure” and then  tried to remove it, disaster would undoubtedly happen, but after that, I left the slide well alone to dry unhindered and unpoked, occupying myself with something else instead.
I managed to leave the slide alone for about four hours when the glue and bails were well and truly stuck, then gingerly added a drop of coordinating beads from a charity shop bracelet I featured a week or so ago to the bottom and another bead on some teal jewellery wire to make a hanger for the top!
Success at last ….. after 4/5 years of trying so hard, I have finally made the microscope slide I have always aspired to!
However:- sealing the slides together before the stars had dried WAS a big no no ….. but as an experiment I discovered that I had used far too much pendant gel anyway …… so when I made another one, almost straight away, the lessons learned paid off.  This time when gluing the stars I used the tiniest spot of pva glue ever, I mean really tiny, gently laying the star on top, with no pressing down, because that would have squeezed glue around the star causing smudging around it, this way the microscope glass remained clean. 
A steep learning curve, but so worth it …… I can now steam ahead and make a huge pile of slides for Christmas 2017 using many variations, knowing that I have finally got the basic technique right!

Thursday, 23 February 2017

Little Wooden Boat On The Sea – Domino Decoration/Gift Tag

There’s been a lot of experimenting with domino tags going on at The Towers this past week or so. This project uses a children’s picture domino as the base which measures 7cms x 3.5cms.
Domino Crafts Little Boat Tag with beads and shellI created background using small, blue paper scraps, tearing the bits on the sea to expose the core to look like waves, with dusting of translucent micro glitter added. The sun was made using a small circle punch.  The wooden boat I have had forever, bought in bulk and used in so many projects. I have used a black, fine liner pen round the edges knowing it would bleed slightly when covered by a  layer of Aleene’s pendant gel. Aleene’s Pendant Gel is best left for at least 24 hours to ensure it’s properly set.
Domino Crafts Little Boat on sea with shell and beadsOne the gel was hardened/set I covered the sides of the domino with adhesive silver Inkssentials Memory Foil (not sure if this is available in UK any more) which I smoothed with a crease mouse.
I screwed a tiny silver eye hook in the top and bottom of the “domino”. In the top one I fastened blue jewellery wire with a matching blue bead to make the hanger and on the bottom added a seashell charm, a pearl and faceted blue bead.