Monday, 24 June 2019

Shadow Box Christmas Picture

I am really, really chuffed with how this Christmas shadow box has worked out.
The little, festive, fabric dolls cost me all of 30p for the two in an Evesham charity shop, in the run up to Christmas last year. As soon as I saw them I imagined them in a box frame and at just 30p it would have been rude not to have bought them.
The Ikea Ribba frame cost me £1.45 from a Tewksbury charity shop.  I picked it up and ummmed and ahhhed before putting it back, only to later think that it could have been a very useful purchase, so I went back the next day to find, thankfully, it was still there.
I created the simple background using a glittery, embossed snowy paper and two layers of white glitter card.  I added a few tiny, clear, flat backed gems to the centres of the snowflakes for little extra but subtle bling.
I faux stitched around the mount with a black fine liner pen.  I wasn't sure about doing it,  but I think it's worked pretty well with the folksy look of the dolls. The dolls were secured to the background using glue gun glue.
I wasn't sure either about adding the snowflakes to the glass front, would it be too much? Again,  I think it's worked, but if I change my mind I only used PVA to attach them, which is easy to remove.  I The white dots were made using a Posca Pen, also easily removed if need be.
I reckon in all this project cost me less than £2 to put together for a complete, never to be repeated, one off. I am not sure at the moment where its going to go, whether I'll keep it for my own festive shelves or give it as a present, but I've got plenty of time to think.

Wednesday, 19 June 2019

Objects Of Desire

Not to everyones taste I know but when I saw this 1950/60's formica drop leaf  table with matching chairs outside an Evesham charity shop a while back I admit to sighing and stroking it longingly.
It was only £10 and had stood the test of time, and no doubt there was an awful lot more life left in in still, there's furniture in my flat that I know will never last that long. 

I always say I need another house (or two) with plenty of nooks and crannies and a few original features  that I could decorate and furnish for the sheer hell of it in my eclectic taste  ...... this would definately have found a space in my retro kitchen!!!

Tuesday, 18 June 2019

Snowman Baubles

I got this idea from a bauble (below) I spotted in Marc's kitchen last time I stayed with him in London.


It made me think about what I'd got squirrelled away in my craft cupboards to make something along the same lines.
I had four open glass baubles that I'd bought from The Range (Christmas 2018) but never used.  I think they cost me about 80p each and the resin snowmen were from Hobbycraft ages ago.
Originally, I was going to use Fimo for the snow, but then found this Martha Stewart paper clay, which I thought would work out to be much lighter.
I moulded four pieces to fit in the bottom of each bauble and then made an indentation with the bottom of one of the snowmen to create a level place on which to secure them when ready.
I dusted the "snow" with translucent micro glitter, which was a bit messy, but looked OK when it had dried.
Fitting the snow in the bottom of the bauble was also more fiddly than I had anticipated, I used PVA glue, but when it dried the stray bits were a bit of a pain to clean from inside of the bauble, but I got their in the end, thank goodness for Sticky Stuff Remover.
Sticking the snowmen into position was a doddle though, as was changing the silver thread hanger for some red ribbon. 
Two of these baubles already have names on, one for Bertie and one for Iris to add to their collection of Nanny made tree decorations, made and given since their very first Christmases. I hope that they will still be in their lives at Christmas long after I have gone and bring back childhood happy memories of all our times together when they were small.

Monday, 17 June 2019

Snowman Shadow Box

This shadow box measures 14.5cms x 11cms,
I found three rather awful looking, frames in a local charity shop for just 50p each, with their  crumbling glued flowers, but as the frames had a bit of depth to them and stood up on their own I thought they had potential, so they were duly purchased, with the worry that perhaps I might not be able to get the backs off in one piece without doing serious damage.  After very carefully prising I did manage it, it was the glue that was keeping the mount in place that presented the problems, but again with a little gentle  prising it too came free.  The frame was ready to embellish.
Unfortunately the snowman brooch I had originally planned on putting in the frame proved to be a little too thick and the frame couldn’t be sealed, however the painted wooden snowman fitted a treat, after adding a little white micro glitter to his hat band, pom pom and stripes on his scarf.
I made the very simple background using a snowy design paper and a scrap of white glitter card.  As I wanted to create several layers to make the most of the frames depth, I added two small snowflakes to two of the mount corners along with a few clusters of little doodled dots. With that, the frame was ready to be put back together.
I added faux stitches using a black permanent fine liner pen around the edges of the frame, however when I come do the other frames I think I might use a white pen instead, the black is perhaps a little too harsh.  Two large wooden snowflakes along with a few more smaller ones complete the look. The white dots were added last using a white Posca pen.  Another Christmas fairing done and dusted.

Wednesday, 12 June 2019

What's He Like?????

As you know it's nigh on impossible to get a picture of  Marc as he prefers to remain a man of mystery and intrigue on tinternet to all but his closest friends .........
....... however, while he was staying with me a couple of weeks back I did manage to take this very relaxed shot completely unbeknownst to him while we were out shopping in Aldi.  What are we like? 

Tuesday, 11 June 2019

Charity Shop Find ............ Yet Another Beaded Lightshade!

I really do need saving from myself, I just cannot resist a “chandelier” or any other type of lamp/lightshade that is made up of clear or coloured beads ….. and at just 80p for this pink one, what’s a girl who can’t walk passed anything that is sparkly to do?
I have an inkling of an idea, but it will have to wait until the school summer holidays when I will have a couple of weeks all to myself, but I am thinking that I could swop the clear chains of beads on the light fitting in my spare bedroom, for the pink (???).  I am pretty sure it will work, especially as “sometimes” the clear beads shout out at me to do something with them to bring the light even more together. We shall see…..

Marc and I also spent an afternoon while he was staying with me before Easter re-jigging the pair of Morrocan style lamps (from The Range) that I had  already had a good play with. I am now thinking that some of the purple and amber beads could be replaced with a few of the pink (????) to lighten it just a little more.

And then ........ after talking to Marc I also have plans to the light fitting (The Range) in my newly refurbished shower room ......
........ so watch this space!

Monday, 10 June 2019

Drawer Advent Calendar

At last, ..... my first Advent Calendar of 2019 is finally finished. Let’s just say it’s taken an awful lot longer than I had anticipated, almost four months, my excuse, I’ve just been too busy with doing other things.

Once all the drawers were done, it was time get the drawer frame decorated.
I used a red Sharpie pen to colour all the dividers and edges, hoping and praying that it would hold out to the very last slat and not dry and fade on me.

To cover the sides and top I used a patchwork of the paper scraps I'd used on the drawers. These were then varnished with a clear gloss varnish about three/four times with faux stitching added using a fine tipped black permanent pen to outline each scrap when the varnish was dry.
The only slight problem I found was with some of paper/card holly leaves I added that were placed slightly over the edges of some of the drawers, they were a little fragile and tore, so when I do make another calendar (????)  I intend to use a stronger, plastic confetti type holly that I have squirrelled away somewhere.
This calendar is going to be put away until 1st December and then given to my neighbours across the hall, who are expecting their first baby in September, hopefully it will be used year after year, becoming part of the babies Christmas traditions.
I have another set of this type of drawer left to do …….. The Works - £15 so not a cheap project. I just need to work out what basic colour to go for and then what embellishments I am going to use, at the moment I am thinking perhaps wood or plastic, as they will definitely be more durable over a period of years.
The Flying Tiger stickers I have left over from this project will most probably used on cards, as Marc said, each drawer is also a card in the making with a few tweaks here and there .......
....... and I am wondering if I could make a tree decoration or two with them, perhaps using a variety of the mini frames I also have left over ....... 

Wednesday, 5 June 2019

When In Doubt .................

Found in B M Bargains for £1 a little while ago ......... well, it would have been rude not to make a considered purchase..........
 ...... and it now sits at the side of my crafting table ....... and if/when I get tired of it .......as Marc's says,  it was worth the 99p for the confetti stars inside it alone!

Tuesday, 4 June 2019

Advent Drawer Tuesday – Santa’s Finally Here

Oh my goodness me  ……. I’ve finally completed  the last drawer on my Advent Calendar for 25th December, Christmas Day and at last Santa is here ……..
…….. with presents to fill the stockings that have been left out for him.  Believe me, it feels like it’s been a long time coming.  Now all I have to do is cover the sides and top of the drawer frame with a patchwork of the papers I have used on the drawers and then my first calendar of 2019 is finished, phew!

Monday, 3 June 2019

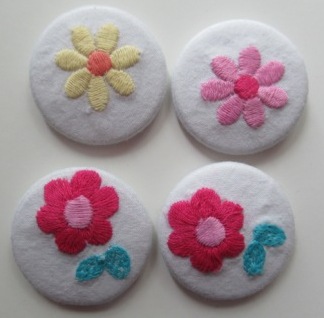
Embroidered Pin Badges

Following on from the Bandai Badge It refills I found on Amazon and posted about …………
…… I then found a lovely single John Lewis embroidered duvet set for just £2. I admit to umming and ahhhing as to whether to buy it, but then used my usual rule of thumb when working out if something is worth buying or not ....... and for just £2 it was at least £1 cheaper than a chai latte, my  beverage of choice when I am out and about.
The flowers with the leaf are the best bits to use as they fill the badge front pretty well, but the single flowers work pretty well too, goodness knows how many I have of each, but it's a lot of badges. I am not sure, at the moment, if there could be a possible use for the strips of embroidery, but they have been put away until inspiration calls.  However,  after removing all the “pretty bits” I do have a box full of  cotton rags to use as dusters etc.
I think I may experiment with fabric pens on the scraps, and perhaps even use iron on transfer sheets to reproduce and suitably re-size some of Iris and Bertie’s pictures to put on badges to give as small gifts for dotting aunties etc.
The refills, as I said, are a far better quality than the original Badge It ones, however, the downsize is that I need to make sure that the badge back and image are put in the machine in such a way that the image is the right way around when worn, with the original badges you just needed to turn the pin around.

Wednesday, 29 May 2019

Found - Poundland Bathroom Wall Plaques/Frames

Wooooo hooooo hoooooo, I am sooooooooooooooooooo flipping chuffed!

You may remember the shadow box I made using a one of the page designs from the Hunkydory Little Book Of Wonderful Wintertime I reviewed and a Poundland bathroom picture frame, well  after seeing how it turned out, with not a lot of effort,  I decided that it really should be my 2019 Christmas fairing keepsake (in lieu of a card which are almost always discarded after the event).  However, making more depended on my finding the frames again. I originally found the three I already had in the Portobello Road (London) branch of Poundland. I did wonder if they were just a one off or the last of range, because in the past it has been a very strange shop for stock despite it's wonderful tourist location.  I looked in Worcester, which has two Poundlands, but they are small and their range not brilliant.  I then worried that by the time I managed to get to a really big Poundland the frames would be gone anyway as is often the way ........ so I began to look at other options, none of which were as good.

So when Marc and Rick suggested a trip over to a retail park in Malvern that had a Poundland during our annual Eurovision Weekend it was a no brainer, although I have to admit I wasn't all that hopeful. 
However ...... BINGO ....... and I will admit unashamedly to clearing the whole shelf, poor Marc!!!  They even had two designs, one including seashells, which I am sure will come in useful for something as they are quite a nice size 
....... and it goes without saying that the ribbon will have to go, but really it's all about the depth of the frame that will allow for a 3D layered design to fit inside.  I now have enough to cover my Christmas needs plus a few extra for other ideas that will undoubedly pop  up ......... thrilled is not the word!

Tuesday, 28 May 2019

Advent Drawer Tuesday – Dear Santa

Another drawer where I haven’t used the Flying Tiger stickers I have favoured throughout this project. Instead I’ve used an letter embellishment from a pack of foiled sentiments from HobbyCraft’s  2018 Christmas range, that I bought in the New Year sale when I finally realised their potential!
Again the proportion of the letter is perfect for the drawers.  All I have done is added a few red, flat backed pearls on the holly.  I think I need to see if I can find a teeny weeny “something” to use as a stamp to add a bit of extra dimension when I go back to the drawer at the end of the project. If I don’t find anything I don’t think it really matters, perhaps just a touch of Glossy Accents would suffice?   I am also thinking that this design might also translate very nicely into a card?

Monday, 27 May 2019

Christmas Shadow Box – Snowman Scene

As you know I like to give my family and other special people a small decoration instead of a Christmas card each year, something that can come out year after year instead of a card that is more often than not discarded after the event. So, following on from my Hunkdory/Poundland Shadow Box idea http://itsallfiddlefart.blogspot.com/2019_04_23_archive.html  I will be giving either a shadow box or three dimensional frame featuring some of the Christmas bits I already have or find in the coming months.
However, that being said,  I think this frame will probably stay with me because of the memories attached to the snowman.  He is “was” a resin brooch that I find found in a very small flea market in Hell’s Kitchen, New York back in March 2018. He was absolutely filthy and goodness know what I paid for him, probably a dollar, certainly no more.
I simply put him in a 10cm x 10cm Hobbycraft shadow box.  In March this year they were selling them at half price from £4 to £2 so I got a few to play with.
I created the background scene using a paper from a 10cm x 10cm Winter Wonderland paper pad I got from The Range (Christmas 2018) and a scrap of white glitter card.  I then added said snowman (with brooch back removed), adding three of the small plastic snowflakes I sourced from AliExpress. (100 for £1.04)
When everything was dry I put the completed scene in the frame and then went completely over the top, adding two wooden snow flakes (charity shop bargain, probably originally from Sainsbury’s) with a plastic snowflake glued on each to give even more dimension, plus three on the glass for snowflake overload.  The tiny doodled white dots were made using a white nail painting pen.
I will apologise now as I think you will be seeing several more versions of this idea as I find more frames and embellishments ……. but at least I will also be ticking off the people on my list to give them to way before Christmas begins, so hopefully no last minute panics this year

Wednesday, 22 May 2019

How Did I Not Know About This?

Is it just me or did the existence of this wonderful little tool just pass me by .......?
I am always wary when I post a card in case it's a little too layered and embellished and subsiquently falls into the "large letter" category. This almost happened  when I was in the post office the other day when one of the assistants took another look at the card I was sending and said ooooo this feels a bit bumpy I'd best double check it, luckily it passed muster.
I then asked, expecting the answer to be in the negative if it was  possible to get my hands on a measure like hers ....... to which she led me over to the shelves and handed me this!
At £3.27 a considered purchase was made. I must have been on planet Fiddle Fart for far too long as I never knew you this existed. DOH
I tend to give really embellished cards in person, but this will definitely keep me on my toes when it comes to cards that I intend to post.  I would hate someone to have to collect and then pay well over the odds for a card that I'd sent that was found to measure a large letter.