Wednesday, 14 August 2019

Iris's Mini Christmas Plaques

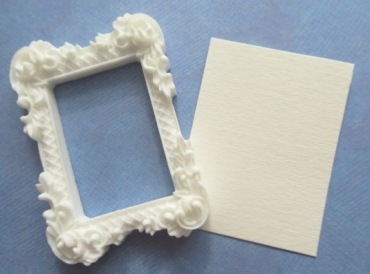
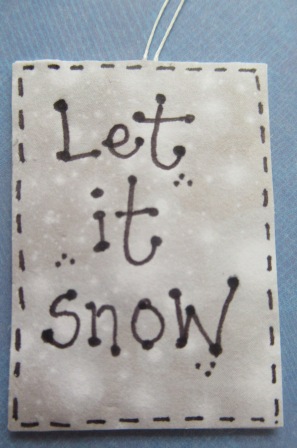
My apologies, I know, I know ...... it's far too early for little ones to be thinking about Christmas, but these are the little plaques Iris made a couple of weeks ago using mini wooden frames from Poundlands craft section ......
........ and some of the snowmen embellishments I found in Michaels in New York a year or so ago.  My own Christmas projects are gathering pace, but I really didn't want to encourage Iris to become embroiled in the festive season so early on in the year. However, during her visit she just happened to stumble upon a wonderful drawer of treasure. For her it was just about wanting to create something using some of it and absolutley nothing to do with the time of year.  So,what's a nan to do, say you've got to wait until November/December before you can use all those lovely tempting bits and pieces? 
I have to admit to being a little reticent when her little eyes settled upon the snowmen, but then I thought, what the heck, what's the point in squirrelling them away, when they were meant to be used, especially as I cleared the shelf in Michaels of all they had anyway, so I had more than enough for my own use as well.
I just love the innocence of everything she has created and it's also given me a few ideas for card designs and a few Christmas tree decorations of my own.

Tuesday, 13 August 2019

Guest Crafter - My Daughter Lucy

As you know Lu and I love a Greek holidays and a Greek church.  I have Greek icons in various forms all round my flat but  then Lu decided to take one step further and ordered this beautiful cross stitch to work on.
It didn't take her long, despite all the fiddly diddly gold thread, which she said was an absolute nightmare as gold thread tends to knot very easily, but the results are stunning.  There are even little jewels to make it pop even more.  I know for one Marc will absolutley love it too.

As you know I loathe sewing with a passion, any attempt I make always results in an acute bout of itchy gums.  The detail of the face, well what can I say. I admit to having a very severe dose of icon envy.
It also gives us a mission when we go out on one of our mooching trips as Lu now needs to find a frame for it.  Me? I think I would go for something secondhand, in brown wood and quite heavy, like the icons we see in the Churches we visit, but Lu wants to go all white.  We shall see ...... and I will report back to you when we have lift off!

And just to make you smile ..........


Monday, 12 August 2019

Tiny Framed Snowman Tree Decoration

This was one of those ideas that got me out of bed at stupid o'clock to see if it's do-able.
I love the packs of snowmen I got from Michaels in New York a year or so ago and really wanted to use then, but they are quite small and can easily get lost on a project, but then as I lay in bed one night I wondered if they would fit in some equally small plastic frames I got China a while ago ........ I couldn't wait until the morning, so at some unseemly hour I could be found going through my craft drawers to find the bits.  As I hoped the snowman and frame were just the right proportions for a perfect marriage.
In the morning I set about gathering suitable materials together.
I started by cutting a small rectangle of card to act as the backing, getting it to the right size was a fiddle as I had to take the irregular outside into consideration.
I covered the front of the card with a blue paper sky and layered white glitter card snow.
....... and glued it to the back of  the frame.  I then added the snowman and on a whim filled the frame with Ranger Glossy Accents 
When the Accents were set I decided to add two snowflakes to the corners of the frame using a E6000 as the bond to keep them in place to be strong. I also used a tiny eye screw from which the frame could be hung. This was a bit of a fiddle using my model makers drill, but I got there in the end.

The final touch was to add a sentiment on the back, so if the frame twizzled on the tree, there would be something to see on both sides.  This was handwritten using a black fine liner pen.  Looking at the pictures now I think I will add three small, clear flat backed gems too, for extra bling and "magic"

I am also wondering I could also turn these frames into brooches if I used a laminated backing?????

Anyway, I think I will be making quite a few of these little things, possibly to give the staff at Bertie's nursery school as fairing gifts.

Friday, 9 August 2019

Flea Fair - Three Counties Showground, Malvern.

Lu I went to the Flea Fair at the Three Counties Showground in Malvern last week as a birthday treat for Lu, it was totally brilliant!
It was like a thousand charity shop bric brac shelf hits in one go but minus an awful lot of other tut and at £5 per head admission it was so well worth it we decided that, for us, a car boot would probably now be pretty much a thing of the past. The gates opened at 7.30am and closed at 3.30pm, the car parking was well ordered and easy to get out of. 
Object of Desire No. 1 ....... just loved these pair of  Art Nouveau (?) style cupboard/shelves. 
I have to admit I am really disappointed by my lack of pictures and to be honest we didn't spend a great deal, it was the mooching that we got the greatest pleasure from.
Object of Desire No. 2 - I would love a dolls house, but it has to be small, sadly this metal one was just a little too big. 
I did however manage to find two retro, fish eye mirrors that were on my list,  I want/need three to go in my revamped bedroom ...... when I can pin my painter down to a date.
I spotted the ivy leaf one first for £5 and the flowery one shortly after for just £4.  The flowery one was disgustingly filthy and had previously been badly sprayed gold ........
........ but hopefully, when cleaned thouroughly and then spray painted white they will enjoy a whole new lease of life.  I am planning on putting two flowered mirrors  (I already had an identical flowered one found in a Rhyl charity shop recently) either side of the ivy one above my bed.  However, Marc says he has yet another one for me, so there may still be a change in order, but which ever one is left over will go in my hall.
I found the smaller of these two hand vases in a box of bits for just £1 plus a little cut glass bottle for 50p both to go on my shower room shelves, which are filling up nicely.

Lu was looking for "select" items to go on a cocktail themed shelf when her new kitchen is finally done later in the year.  Originally priced at £18, we managed to secure this rainbow of shot glasses for £15.  Lu was a very happy bunny indeed.
She also found a small "vintage" Snoopy mirror, for £1, something she has been looking for for ages as this type of mirror reminded her of her childhood bedroom, which had a mirror, I believe, bought by me well over forty five years ago when I was a teenager. 
The original frame was a little dire, so I found a deep frame, from my stash, that I got from Primark (£2.00) which helped bring Snoopy more up to date.
We both fell in love with the retro coffee set (above), it was only £7, however although it was complete and it had no chips etc. it wasn't the most brilliant of quality, it would only have ever been a decorative piece, but Lu decided it was too early to start getting the fiddle farty bits for her kitchen when it was still a couple of months away.
Now ......you know I LOVE a bit of kitsch, and I don't think you can get more kitsch than this piece, originally a lamp, it was just too brilliant for words, so taken aback was I that I even forgot to ask the price ....... it could so easily have been mine, but alas, I just don't have anywhere "safe" to put it.
I am not sure what one of these (above) is called, but I always oooooo and ahhhhh whenever I see one.  I think it's a sort of table centrepiece you put flowers in, but again, alas, I have nowhere in The Towers to put one.  I really do need to move!!!
 And finally, one for Marc, again I never asked the price, but I know Marc would have loved this vintage charity collection box.  I have many memories of putting my pennies in similar boxes when I was a child, a little boy in red seems to spring to mind.  I am not sure that such things are PC these days, but were very common when I was a girl.  I think there were also ones for the RSPCA of dogs and cats, in fact I am pretty sure I saw one about a year ago in a cafe in Exmouth, when I remarked how much Marc would love it.


Thursday, 8 August 2019

Oh No, I Did It Again ......

What am I like? 
LAMP AFTER
I see a mock chandelier in a charity shop and I just can't leave it there .........

LAMP AFTER
This time the shade in question was made up of  turquoise drops, something I admit have been looking for.
The chandalier was duly stripped of beads and then reworked into my two lounge lamps which have been fiddle farted with at least three times now, once with Marc.  I love the results, but I know it's not to everyone's taste. The added beads pick up on the turquoise on my patchwork sofa, so there is a flow, if you know what I mean, but I have promised myself this was the very last time I take the lamps apart.

The remaining drops could possibly be worked into the much added to chandelier in my guest room ..... oh no not again, I hear you cry, but again it should flow with the newly painted turquoise wall.


The frame won't got to waste either, as you know every year I have a Halloween Weekend for Iris and Bertie and my plan is to hang it with lots of glittered spiders and stars etc. if I can find an ample supply in the pound shops when the time comes.

Wednesday, 7 August 2019

Charity Shop Mooching - From the Sublime to the Ridiculous

Firstly an object of great desire .........  a wall light found in a charity shop in Llanduno recently .........
....... not to every ones taste I know, but very me if I had the right house and a spot to put it ....... a pair might have been even nicer.  It was priced at £80, a little on the pricey side for a charity shop and a risk if you didn't know about such fittings, but all the same rather lovely.
......... And in the same shop, this holy monstrosity! Now, you all know how much I love a bit of religious kitsch but even this was a little erm ....... too obscure for me, even with its original sticker. It was priced at £4, where I would have felt happier at the £1.99 mark. I'll leave it there with you, however try as I might I couldn't see it anywhere chez Towers ....... BUT ..... looking at it again with fresh eyes, I can now see it in some sort of grotto hidden in the depths of Marc and Rick's Worcester country cottage garden!!!! Ohhhhhhhh bum ........ perhaps I should have bought it after all!!!!!!

Tuesday, 6 August 2019

Christmas Nativity Tree Decoration

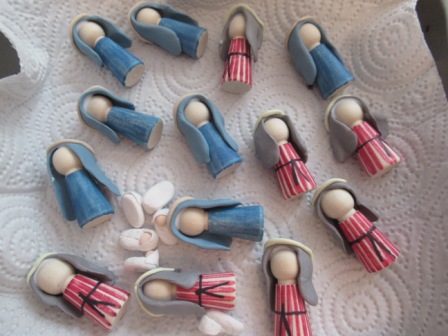
At last,  I have got to put together an idea I have been mulling over since I found a pack of wooden counters in The Works ..... tah dah .......
I am so chuffed with how my idea turned out.
As well as the counters, I also used modelling clay from a set of 12 pastel shades from Das also from The Works  https://www.theworks.co.uk/p/modelling-clay/ads-modelling-clay-pastel-colour-collection---set-of-12/8000144006045
The hardest part was working out how to make a simple piece of scenery that would act as a base for the figures and also to secure a hook to hang it from.
In the end I used old ply domino pieces, a whole one for the background and another cut in two crossways for the base.  It took a bit of cutting, but I got there in the end.  I found in the cutting that where one half of the domino tended to warp, the other side stayed flat and was therefore usable.
I covered the picture part of the domino with a cream linen patterned paper.
I am no modeller, so kept the headdresses for the figures as basic as I could, fitting them individually  to each counter.
I was frightened that the headdress shape might collapse in the oven, so to be on the safe side I "cooked" the figure wearing it as well  (130 degrees for 30 minutes) - however I think next time I would risk it without.

As you can see, my Baby Jesus's were also very basic!
When the figures had cooled down, I carefully removed all the baked clay pretty easily and went on to colour in the bodies using Sharpie pens.
Head dresses were then reapplied with a good dollop of PVA glue and left to dry thoroughly.
It was a conscious decision not to put faces on the figures, my hands are not that steady when working on something so small, and if a face turned out to be a bit dodgy I knew I wouldn't be happy, and it would mither me into starting again.
Next I put the base together.  First I screwed a tiny eye hook in the middle of the full domino piece and added faux stitching using a black fine liner pen round the edges.  
On the back I also added faux stitching and "Away In A Manger" but using a black biro so that the ink wouldn't bleed into the wood.
Using a strong glue I stuck the figures down, again in the centre of the domino, so that it should be pretty much balanced when hung up.  I then stuck on the bottom piece and left it again to dry completely.
The final touches were made by adding a clear flat back star gem which I coloured yellow, a few tiny gold stars and a clusters of three black dots here and there to bring it all together.

Some of the finished decorations are missing their large star, I only had three amongst all my stash, so I have had to order a few more from e-bay.  They also need a hanging thread, probably blue, but I can put that on nearer Christmas when I know who they will be going to.

On closer inspection I think I need to gently sand the part of the bottom domino where it was cut.  Only I would probably notice that it is a little rough, but it's one of thoses things that I would also mither over. 

Monday, 5 August 2019

Simple Striped Birthday Card

This card measures approximately 7ins x 5ins and is made using a hand cut linen effect card blank.
This card was made for my nephew, however, it was put together with undue haste because, as per usual, I had left things to the very last minute, so no excuses, no great fiddle farty skills were used in it's construction!
I simply cut 1.5cm stripes using paper from a Works origami paper stack which I stuck in a random fashion down the centre of the card.  I then added the blue, glittered sentiment, again in a higgedly piggedly random type way because it was an awful less time consuming than trying to get the letters perfectly level and spaced out. The self adhesive alphabet pack came from B M Bargains.

If I were to repeat this card again I would almost certainly add a scattering of differing sized silver stars for a little extra bling and help fill in a more of the "empty" space ........
........ I was just in such a rush I'd already stuck down the envelope before I thought about it!  Bum!