Tuesday, 22 October 2019

Quick, No Frills Halloween Lanterns

It was Bertie who gave me this idea .........
I had left a pop bottle on the radiator in the hall to take out to the bins when he looked at me with his serious face and said "Nanny, you could craft with that!" ....... which got me thinking!
It's nothing fancy or particulaly inventive, I have simply cut the bottom off a bottle, very crudely  covered it with a layer of green/orange tissue paper, using PVA glue ........
...... and then added a very basic Halloween type face, followed by a couple more coats of watered down PVA before being left to dry.
When all the lanterns were dry I punched a hole on either side of them to tie a string handle which I think I will probably hang the lanterns from on the back fence, in the garden, with perhaps the help of a plastic tie.
I thought I should try them out in darkened surroundings i.e my windowless bathroom, to see how they would look in the dark .......
I think they will be fine, I just need to get some new battery tea lights as the ones I used in the try out were quite old.

All these lanterns and any more I make or find, plus glow sticks etc. will form part of a trail in the back garden creating a spooky "Midnight Walk" for Iris and Bertie during our special Halloween Sleepover  I am just praying for a dry night as I am not sure how long the PVA glue will last in wet/damp conditions!

Monday, 21 October 2019

Christmas Is Coming - so I am hoping to add a couple more posts on a Thursday & Friday now & again 'till then.

Halloween Favour Bags

It seems like years since I have made any festive favours using Elizabeth Shaw mints, but decided Halloween would be the perfect opportunity to "revise the art" by making something for Bertie to give all his "Chestnut" staff before they broke up for half term. 
In doing so I discovered that my trusty scallop and plain Stampin Up punches are beginning to show their age, they do seems to punch as crisply as they used to do and are fussy about what papers I use with them.  
I have tried to "sharpen" them using aluminium foil and some metal sheet I had, but I am not convinced that they will last for that much longer. I have totally lost touch with Stampin Up but perhaps, after Christmas would be a good time to see what they are doing now and if possible replace these much used and loved punches.
I have also discovered that finding good Halloween (and Christmas) stickers, particularly of the 3D, puffy or bubble variety is getting harder and harder (when I think now of what the pound shops used to sell, I should have bought them by the box load!).  The ones above came from Morrisons (3 sheets for £1) Hobbycraft (a waterfall pack for £2, including puffy, foil and paper stickers, so excellent value, and Flying Tiger (£1 for 1 sheet of approximately 20 foiled stickers, five design packs available).
I simply punched out scalloped and plain circles in Halloween colours, putting a sticker in the middle and then added a little faux stitching round the inner circle and dots on each scallop, using a fine liner pen, before sandwiching a mint between two circles using double sided tape to secure them.  There are 24 chocolates in each box of Elizabeth Shaw mints, so I was able to make up twelve packs in all.
I put four chocolates in a small cello bag accompanied by a few plastic spiders to give the favours an extra creepy trick or treat twist.  I also added a matching scallop circle sentiment to the corner of each bag just to say they were from Bertie. 
I just love the colours of Halloween ...... I really must think of a way of incorporating them into one or two Christmas cards or tags this year if I get the time.

Thursday, 17 October 2019

Dunelm Cushion Covers ...... My Bedroom Frou Frou Is Finally Complete!

Thank you for all your kind comments last week about my re-vamped boudoir and the vintage 50's - 60's metal framed mirrors I updated to go with it, it was more or less done but that something missing in the bed department (...... apart from Alister Campbell who makes me I go weak at the knees whenever he's on TV!!!!).
I knew I needed cushions but wasn't sure about the colour or material to go for  ....... until Lu and I took a trip to Dunelm on Saturday afternoon  ........ and there they were, I believe I might have squealed!
I bought two turquoise chenille and one embellished antique white lace. However when we first put them on the bed I wasn't sure, something still wasn't right, another turquoise cushion would have been too much, but I needed something in the middle ...... then after wracking my brain for most of the evening  I suddenly remembered the silver, sequined cushion cover I usually put in the guest room at Christmas ........ bingo!  Michelle you were bang on!  
I was so inspired with the all of the colours in the chenille range that I decided to order a few more online as I have never quite got the colours for additional cushions right for my patchwork sofa, but Dunelm's turquoise, plum and fuchsia were a perfect match, you would have thought they had come with it!

So that's it after three and a half years I have finally got all the fiddle farty things in my little flat just as I want them ....... now I feel quite lost, what on earth am I going to plan and scheme about now???? 

Wednesday, 16 October 2019

Halloween Crackers

Iris and Bertie love a cracker .............
........ however I didn't think I would be able to find anything that wasn't stupidly expensive until  I found these for 50p a box in Flying Tiger in Birmingham, (last years stock evidently), and at just under 16p each it was a no  brainer (below).
Sold as confetti crackers, but not exactly sure what that meant I still thought they were worth a punt to save the fiddle fart of making my own, as all I would need to do was simply pop a little something inside them. This too was made all the more easy as Marc had given me a whole pile of Ty Mini Boos (Poundland - £1 each), which Iris and Bertie also adore, and when taken out of their box were a perfect fit for the crackers.
When I opened the crackers, they contained a wad of shredded tissue paper and about 6/7 happy Halloween sentiments, I have to admit, had I bought them solely on that premise I would have been sorely disappointed ......
..... however for my needs they were perfect.
I put mini boos in four of the crackers and four Halloween chocolate coins in each of the other two with one of the sentiments.  I replaced the elastic ties with bows using the ribbons left over from Tom and Laura's wedding (seven years ago now!) ....... boy have they lasted! I then put them back in the boxes to prevent them getting squashed.  I kept the left over sentiments as I am sure I can  use them on a card or something and the eleastic ties are squirreled away to use on another project sometime.
I have these other cracker shaped gift boxes (above) from last years Flying Tiger Christmas sale, they are smaller than the Halloween ones, but my next shopping mission is to find some bits and pieces to put in them and then add a few embellishments to the boxes ready for this years festive table.  
Staying with Flying Tiger, Marc and I are both eagerly waiting for them to get these dolls plant pots in (£2), sometime after 27th September, I hope.  Yes, they are a bit creepy but very Marc and me!

Tuesday, 15 October 2019

Simple Anniversary Card - Birds On A Branch

This card measures 5ins x 5ins and is made using a hand cut, white linen effect card blank.

Not fancy shakes today, just a quick and very simple card made on the hoof at the last minute for the first wedding anniversary of my lovely neighbours Kata and Laci across the hall way.
The branch was punched using an old Stampin'Up punch and the wooden birds, I think, were possibly from a mixed pack from The Works some time ago now.

A few clusters of three dots using a black, fine liner pen finishes the design.

Monday, 14 October 2019

First Day Back At School Card -Using Lily of The Vally Back To School Girl Stamp

This card measures 6ins x 6ins and used a pre-scored, manufactured card blank.
Who would have thought that when I bought this Lily of The Valley Back To School Girl stamp all those years ago at the NEC Hobbycraft Show that one day I would have my very own little blonde dot to make a card using it!  
Iris started Year 1 in September and there was no doubt in my mind as to what I would put on her card to celebrate the day. It was also an opportunity to use my Tim Holtz Travel Stamp Platform.  Now, you know how just the idea of stamping has made my gums itch uncontrollably in the past, well, this little beaut has totally changed all that, I LOVE it ....... bought to help me emulate Marc's very clean and simple Christmas cards of the past couple of years. It's perfect.  I still don't stamp an awful lot, but with this I know I am getting to get a perfect print every time and no frustration!
After colouring the image I added the sentiment by hand using a black fine liner pen and then mat and layered it on red and silver card with a little faux stitching, again, using a fine liner pen. I added the red strip to break up some of the empty white space as well as reflecting the school colours.

I believe this stamp is available in digital form on Etsy.

Thursday, 10 October 2019

Heads Up - Small Dolls For Crafting?

Just a heads up today featuring some tiny little dolls I found on Amazon that am particularly chuffed with. As soon as I saw them I thought they would be so cute for simple Christmas makes including putting one or two together in a shadow box/frame, with a suitably festive background scene.  Whether I will get round to it this year I don't know, but I think they're an "interesting" find/addition to my craft stash. 
They cost just £1.69 for 5 dolls, plus 50p P & P (from China), which works out at approx. 44p each, and unbelievably they arrived within 13 days of my ordering them when, to be honest, I wasn't expecting them for a month or so.
They came with a cell phone cord attachment embedded in their heads (painful) but these were very easily removed as their hats are only attached at the back.  I think when I eventually come to craft with them I will glue said hats completely to their heads using  PVA, to make sure they don't come off in the passage of time.
Obviously I can't/won't recommend them as toys ........
........ but thinking of Christmas crafting I can already see them in a diorama .......
........ inside a bauble or stuck on a decorated wooden shape to hang on the tree ........ we shall see.  

I am also waiting for some tiny teddy bears (e-bay) that I am hoping will fit in a matchbox,  as another Christmas tree decoration or present tag.

Wednesday, 9 October 2019

First Day Back At Nursery Card

This card measures 6ins x 6ins and uses a pre-scored, manufactured card blank.
I made this card to mark Bertie's first day in his new nursery class in September. which, as you would have it, is called "Chestnuts".
As chestnut embellishments are a little hard, if nigh on impossible to find I thought adding busy bees  instead would be acceptable, especially as he is a busy little bee!  The bees came from a pack of 3D, self adhesive embellishments from Poundland,  I pimped them up by giving them googly eyes, glittery wings and a touch of Ranger Glossy Accents on their bodies.
The centre panel is mat and layered on green and silver card with a little faux stitching using a black fine liner pen. The letters are self adhesive card, which I believe came from B & M Bargains.

Tuesday, 8 October 2019

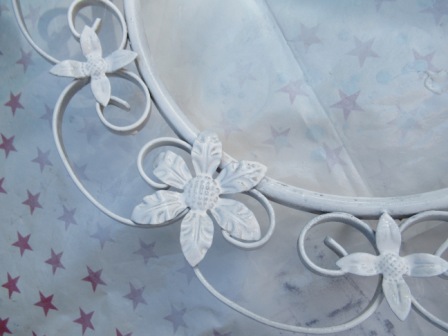
Doing Up My Vintage 50's 60s Convex Metal Mirrors

As you know I have always had a thing about 50/60's decorative convex metal mirrors, goodness only knows why. 
I know nothing of their history but reckon they were a cheap and cheerful Woolies sort of thing in their day, but I could be wrong????
Anyway, I found a black and gold ivy leaf one (above) at the Malvern Flea Event a couple of months back for just £4.50 ........
....... quickly followed by, at the same event, by the one above for £3.50.  It was in a filthy condition, originally cream, it had been painted, very badly with some sort of gold paint, but I thought it was worth a punt at the price.  The asking price for similar mirrors on-line is way out of my league, especially when, due to their weight and size, they are generally sold as collect only, so I was a happy bunny. 
This final black mirror was another £10 from a Heart Foundation charity shop in Llandudno, in excellent condition and still a pretty reasonable price, in my head I have always said I would never go over the £12 mark, unless it was something I thought was exceptional like a multi-coloured version.
Once home, with the mirrors carefully removed from the frames, the first thing that hit me was that the chains and hanging fixings were all in different positions, therefore in order for them to hang level in a line, said fixings would have to be removed and replaced with U shaped staples, using a staple gun. I spent ages carefully measuring and prayed I have got them just about right.  Then I attached the picture hanging wire which should be pretty secure.
Then came the time to start spray painting them in white .......
...... this took quite a few coats, so what I saved on the actual mirrors, I spent in paint! 
The mirror that was painted gold was the hardest to cover because, to start with, the spray paint simply ran off it, but I got there in the end.
When I'd done all I could do I then had to wait awhile for Trevor, my gentleman painter to work his magic, turning a my boudoir from boring beige to a wonderful Mediterranean blue!
The boy done good ........ and within minutes of his leaving I was putting doze dem dare mirrors up. You wouldn't believe how much I'd been fretting that I wouldn't be able to get them all level and evenly placed along the wall only for the wires to snap within seconds of me hanging them.
Let's just say that the wall is now peppered with one or two extra nail holes ........ BUT all told, I reckon it took me about forty minutes to get the mirrors in line ....... and I am feeling pretty chuffed.  On the bed I have new, quite fancy layered Broderie Anglaise bedding, but to be honest it all looks rather flat and uninspiring in the pictures. I think I need another three smaller cushions to add another layer and fill things out/up, I just don't know what on earth to look for ...... more Broderie Anglais?   

Monday, 7 October 2019

Further Adventures into Making A Christmas Snowman Diorama

This is my second exploration into the world of making Christmas diorama's with a few small changes following on from the original one I posted last week.
After discovering that I only had two trays (originally used as packaging for small wooden embellishments) with which to make any more (I could have sworn I had at least ten in my box) I needed to think on my feet, so I looked in the box again and had a think about these divided ones....... 
...... far too big to be cute, but, what if I tried cutting them, it would mean sacrificing two compartments, but in turn would give me two more complete diorama trays? I tried, it worked and now gave me the potential to make another ten dioramas, which is probably more than enough for this year, so win win I guess.
My idea was to use the shorter sides of the tray as the top and bottom of the scene, the opposite of my original diorama, this, I reasoned, would alleviate the need for so much fiddle fart when creating the  background scene between the tree and the snowman. I made a new fatter and taller snowman, again using Das oven baked clay as the new tray was also slightly bigger than the original. With this version I again used twisted black wire for his arms, however, I plan, with my next version (??) to use some small dried twigs that I'd forgotten I had, to make the snowmen look a more realistic (??).  

Then, I discovered that I also fewer larger trees than I thought ...... doh! However, a quick search on The Works website bought up these packs of two 10cm bottle brush trees.
When they arrived they were taller than the original one I used, but by removing the base, and sinking the bare wire into the foam dough snow it just about fit the frame and I thought I could simply add the star to the top of the snowy "pelmet" instead of the actual tree.
I lined the back of the tray with a scrap of Christmas design paper, to be honest the design didn't really matter as it would be pretty much covered in the finished diorama.
I covered the bottom with Martha Stewart craft clay, that has a foam type consistency. However, my supply is also liable to run out too (when I go into mass production) so I ordered a huge tub of White Air Magic Soft Modelling Dough from e-bay, as I know I will definitely find other Christmas projects to use it with, as well as being an lovely medium for Iris and Bertie to play/create with.
I added the tree, fixing it in position securely with E600 glue. I didn't fix the snowman in position until I was sure that the "Let It Snow" wording, using Tim Holtz Idea-ology label letters, would be clearly visible between the two, this took a little fiddly jiggery pokery.
The "Believe" plaque was a wooden embellishment I trimmed down and used the back to write on, but in my next version of the idea I intend to use the scraps from the cut up tray instead and use a black Biro on it so that the lettering won't bleed into the wood.

I originally used Dovecraft 3D pearl on the "pelmet" and around the edges and bottom of my first diorama but swopped it for 3D Effect Snow which  I found online, it doesn't flow as smoothly as the Dovecraft and has a weird gritty type texture, but it does look more realistic.
All that was then left to do was add all the fiddle farty bits, stars, baubles, eyes and buttons etc., however  I decided to replace the small snowflakes in the corners for holly and berries because amongst the snow they seemed to disappear.
Again, I am pretty happy with the results, I think I am now ready to go into mass production ..... so watch this space!