Tuesday, 21 January 2020

Iris's Stickman Family

Just before Christmas Iris had to make a stick man as part of her family "Cool Time" (homework), she was really looking forward to doing it but wanted Nanny specifically to help her, she being, in her mind, the lady what has got all the exciting stuff with which to do it!
Well, as you can see one stick man rapidly became a whole family and I will admit to cheating a bit, because we were really meant to go out and gather sticks for the project, but after all the rain we'd had they were really quite sodden and therefore not all that receptive to being glued and embellishmentised...... so I got some Christmas twigs from Wilko instead  ....... Lord forgive me!
However, said gluing still didn't turn out to be as easy a planned with such small, uneven areas to work on, so in the end I opted to use my glue gun, with Iris telling me exactly where she wanted me to blob it and then, after allowing the glue to cool a little, she popped on whatever embellishments she had chosen, rifled from my drawers.
The eyes were first stuck on to a small piece of cardboard as they were impossible to attach to such a narrow piece of twig. The tiny moustache, tie and dickie bow on the gentlemen were stickers from Paperchase, something I seem to have had forever. I also particularly like the way everyone, except Dad, has a strategically place leaf (The Works) to cover their erm, dignity .........
....... and Mum has an acorn cup for a handbag!
I thought that was it until Madam decided she wanted to make a scene for them to stand in ...... so an Amazon box was rescued from the bin and some air dry foam clay put at the back of it to hold a small copse of trees. Iris was in full creative flow now, as was the glue, with more bits and pieces filtched from my drawers to create the very wonderful woodland floor and snowy background.  The acorns have been sat  sitting in a box for two/three years now, collected during a weekend in Dawlish, but I knew one day they would come in useful!
My favourite part has to be the little wooden plaque on which Iris has written "family". A totally priceless and whimsical cold and wet winters afternoon that you can never repeat, but where memories were made. I expect she got a star for her efforts, but just doing it together was worth much, much more ..........

Monday, 20 January 2020

Measuring Ruler Birthday Card

This card measures 6ins x 6ins and uses a pre-scored, manufactured card blank from Hobbycraft.
I am not sure about this card, it looks a bit bitty and too spread out for me!  It's a birthday card for my eldest niece, who has just put the deposit down for her first house, so it's all VERY exciting and I wanted to make a card that would reflect the wonderful (??) times to come.
The rulers are from DoCrafts Bare Basics range , they are currently £6.19 for one pack on Amazon (what???), but I got them at a  rock bottom from e-bay, something like £1.99 for 6 packs a while ago now. The wooden Bits and Bobs hearts are from East Of India, bought a million years ago, that have hung on in there among my stash until they eventually got used!
The background paper came a Happy design paper pad from The Works (£1).
Owing to by my current lack of mojo I just set things out very basically on my table and then left it all there to come back to the following day, when I finally decided to use the Dymo label maker to write the sentiment......
........ printing and cutting the words out separately before backing them on to shimmery silver mirror card.
As a finishing touch I added tiny, silver nail art hearts and clusters of three black dots here and there to bring the design all together .......
It's OK, but it's not my finest hour ............ I had such a looooooooooong creative break throughout December and into the start of  January that my mojo is well and truly befuddled ...... and I desperately need it back! 

Wednesday, 15 January 2020

Halloween Charity Shop Bargains For Marc

Not to everyone's taste I know, but how I missed these in one of the charity shops in Evesham is a mystery to me. they lady said that they'd had them all over Halloween but hadn't sold very well.
I was very restrained as I wanted to but them all, but in the end I got one pack of each.


Tuesday, 14 January 2020

Missing Mojo ........

At the start of the new year I was really hoping to post three times a week, but at the moment I seem to be experiencing a really bad case of apres Christmas crafting mojo fatigue! I spent a whole day cleaning and sorting out my craft drawers and cupboards, putting a whole pile of bits and pieces aside for Bertie's nursery and gradually becoming more and more overwhelmed by the amount of stuff I actually have ...... and by my total lack of inspiration, especially after my really productive high before the holiday!  BUT ......... I know we've all been there!
So, if there's only one fiddle fart post in a week so be it and if it's a bit of a hodge podge of charity shop finds, objects of desire etc. bear with me ...... I know my mojo will be back, what with Valentines Day and Easter ............  when I will be away with two old friends from work, in Italy, in a villa on Lake Lugano with my Victoria Hislop!
A serene scene of the Italian shore of Lake Lugano
However, surrounded by all this stash I have now made it my mission (....... yet again!!) to have a 2020 absolute minimum crafty spend.  I could craft 24 hours a day, 354 days a year and you wouldn't even see a dent in my stuff, yet I still buy more.  There's the initial rush of excitement as something is bagged, but then it's put away when I get home and that's where most things tend to stay.  
Therefore, I am going to do my best to avoid the likes of The Works and Poundland (for crafty things) and be a bit more circumspect in charity shops, going with a list of things I want to look out for ...... I am not sure if it'll work ......... but Lu and I want to go to the US again next year, not sure where exactly, perhaps New England or off the tourist path in Florida.  We have a travel lady who has got our list of specifications and we are waiting to see what she comes up with ........ 
So that's my incentive, do I really need yet another pad of paper patterned, even if it is a real bargain,  when I have at least ten unused ones at home or would I prefer to put the money towards a wonderful  adventure in the US ...... and be happy with taking a few pictures for a heads up type post!  
As for my mojo ........ I just need to spend a little more time on Pinterest looking for inspiration instead of wasting it playing Candy Crush Saga type games!!!  Please bear with me ........... 

Monday, 13 January 2020

Re-Sprayed - Re-Vamped Vintage Mirror

Warning, warning ...........
I've been spray painting mirrors again .......aghhhhhhh!
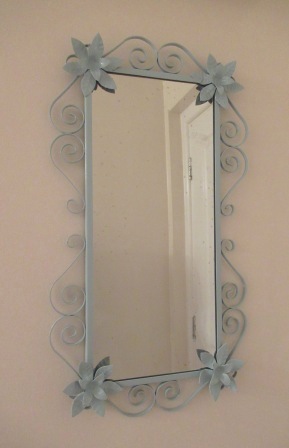
Now, I don't often quibble the price of anything that takes my fancy in a charity shop, but when I saw the state of this retro, metal framed mirror it really wasn't worth the £5 they were asking. The black metal finish (?) was no longer visible, it was to be honest pure rust. However, as I have been looking for this style of mirror to go next to my front door so that I could check that I look presentable before I go out, I wondered if, like the three similar round mirrors in my bedroom, it could be rescued with a coat or two of spray paint.  
I reckon it dates back to the 60'/70's, but although I have seen plenty of round ones and one or two oval ones, this is the first oblong one I have found/seen ..... and as all the other similar mirrors I have in the flat are round, I thought it would be a nice contrast.
When I pointed out the condition to the boss lady of the shop and asked what her "best on it" was, she said £2.50, well at that price I was willing to give it a punt and I carried it off home, pleased as punch, but when I got it home and really looked at it, it was pretty horrific. I suspect originally it may have had gold highlights, it's hard to tell ....... and it took me a good few weeks before finally deciding to tackle it.
I already had two cans of Wilkos pale turquoise spray gloss from when I was experimenting with the mirrors in my bedroom (before deciding the colour wasn't right) plus some leftover white, so  I started by giving the frame three good coats of the white which I hoped would not only cover the majority of black/rust, but also provide an easier colour base for the turquoise to go over, if that makes sense?   It worked!
The mirror itself had also seen betters days and showed some age with a few spots here and there, but that just adds to it's character and again needed a beeping good clean.
The cord on the back of the mirror had also seen better days crumbling in my fingers and the ring fasteners were also well and truly rusted, but the brass and steel fittings were OK, so I just tightened them up and put a new cord through to hang it.  It also became apparent from the other holes in the back that the mirror can be hung either in portrait or landscape, with me opting for portrait for the time being.
After a day of spraying and fiddling the re-vamped mirror hangs resplendent in my hall .....
........ whether the rust will come through given time, who's to know.  I am sort of tempted to add a small jeweled flower from an old necklace to the centre of each of the four flowers, but I don't want to cheapen or over gild it,  so for the moment I am really trying to resist the urge.  It's  sooooooo me and am dead chuffed with how it's turn out  ....... and my patience!

Wednesday, 8 January 2020

Halloween Pumpkin Baubles

I can't believe I am already doing Halloween in January! I know Halloween is long way away, but I still found myself mooching in the baskets of odd Christmas decorations in various charity shops, while the opportunity was there, looking for orange baubles to make bits for my Halloween tree next year  (..... that's me always planning ahead)
Sadly, no matter how hard I have tried these very sparkly orange baubles, which cost me 25p each just look pants in every picture I have taken,  but, in my humble opinion, they look much better in "real life" than they do in this post, so my apologies.
I simply took the baubles and stuck Hema pumpkin face stickers on them ........ (£1 per pack from Hema, a shop very similar to Flying Tiger)
..... however, I didn't like the white bits, so coloured over them using a black Sharpie pen.
I also added black lines using the same pen to represent the ridges on the pumpkin.
On the back I put the word "Boo" and a few more lines.
If I find any more orange baubles on my travels I think I might miss out the stickers and simply draw a face or whatever straight on to them.  I was also on the look out for a few white, navy and black baubles as I have a few ideas for them too .......

Tuesday, 7 January 2020

My Fiddle Farted Kettle

This is a bit of a daft idea, that I didn't want to post until I was absolutely certain it worked ..........
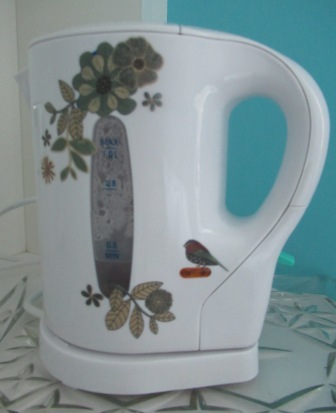
I bought a small 1 litre kettle for my bedroom back in July as I like to have at least one coffee before I get out of bed in the morning, at just £8.79 it was a no brainer, but when it arrived I wasn't keen on the logo that was on it 
Then I remembered some very robust plastic stickers I have had forever from Hobbycraft but never used, with a bit of manoeuvring I was able to successfully cover up the logo plus add a little extra frou frou so the design flowed.  I love the positioning of the little bird particularly. 
However, how long would they actually last with a repeated change of temperature and wiping over, well it's now mid December and they are still going strong, not a single sign of them beginning to peel, in fact I think if I tried to remove them now, they would probably take the offending original logo with them.  Dead chuffed!

Monday, 6 January 2020

New House Card

This card measures 6ins x 6ins and uses a pre-scored, manufactured card as it's base.
Another very simple card today for a friend who has just moved to a new house.
I found the idea on Pinterest and then thought how I could put my own spin on it using some of the long lost embellishments I have squirrelled away.

I started with a self adhesive, 3D house sticker from a pack I must have had for at least ten years, I then matched it with a pink polka dot paper, which I used to cover the front of a pre-scored card.
I coloured the wooden letters (The Works) with a mid blue Sharpie pen and then applied a layer of Ranger Glossy Accents to them.
I also added Glossy Accents to the roof, windows, door and smoke on the house.  Glossy Accents has to be one of my top 10 "can't do withouts" when crafting, just adding a layer or a couple of dots here and there makes such a difference to any project, embellishments just pop and look much more professional and less handmade, if you know what I mean?
I positioned the house first and then added the letters on either side to make sure everything was pretty much centred and that was it ................simples.

Looking at the card in the pictures now I am thinking that it would look really lovely in an Ikea Ribba box frame ......... perhaps another idea for another day.

Friday, 3 January 2020

The One That Got Away .......

Before Christmas I was collecting various bits of silly "tut" for Marc and Rick to open on Christmas morning to give them a laugh .....  but I bitterly regret now leaving this prize beauty behind in a charity shop in Malvern .......... I could kick myself!
They are going to be doing some work on the cottage in Worcester ....... and this to an interior designer of Rick's calibre would have been the Holy Grail in downstairs bathroom accessories and at just £3 what must have I been thinking? And the chances of my finding another one ......... pretty slim ....... doh!!!!

Thursday, 2 January 2020

First Christmas Post Of 2020 - Simple Stamped Sentiment Christmas Card

This card measures 6ins x 6ins and uses a bought, pre-scored smooth card blank.

Is this card toooooooo early?  
Well, I think have a reasonably good excuse, despite my making Christmas cards more or less all the year round, when I finally sat down to write them I found that I was a few short! Since I bought my letter "pricing in proportion ruler" from the Post Office I have been wary of making cards with too many layers which would be classed as a large letter and so be even more expensive to post. My multi layered and much embellished cards are generally reserved to be given personally or included in a parcel.
Anyway, it was the thinner cards that I was short of.  To begin with I was all for just buying a couple of packs of cards just to get it done with .......  but then I thought that would be ridiculous, I was just being lazy ....... so I got to thinking.  I already had several packs of pre-score cards, so that was a start and I had a decent sized Docrafts sentiment stamp .........
..... plus, on the couple of occasions when I have actually used it, I have been very impressed by my Tim Holtz stamping platform.......
I had no excuse, I could run up a whole pile of cards in a matter of hours, jump to it girl ..... and yes, using the stamping platform was, again, an absolute dream.
I was simply going to stamp the sentiment, then I got all caught up in my wayward ideas and decided to emboss it using a clear embossing powder, something I haven't done for years!  I loved it, watching the powder "turn" still holds a fascination ...... but, and all answers/solutions gratefully received, the process did warp the red card, what am I doing wrong/how can I stop this?  If I hadn't been in such a hurry I would have put them under a book for a couple of days to flatten them.  However, in a rush, I simply got out my tape gun and although no one else would probably notice the "topper" didn't lie perfectly flat on the silver backing ..... it annoyed me, but not enough to put them all in the bin, as I would have done in the past!
Using a white gel pen I then doodled some stars in a formation that looked roughly symmetrical, although the temptation was to just fill up all the space.
I then added my signature scattering of clusters of three little dots, again I had to restrain myself from going overboard.
The final touch was putting a cross eye inducingly tiny silver flat back gem in the centre of each star.

I think the card has a bit of a retro flavour to it and was really chuffed with how they all turned out.  I love my Tim Holtz stamping platform, as a long time stampaphobic it's completely turned my frustrations with stamping around and as such I have decided to invest in a couple of new ink pads as my original ones are a now little old and not quite as juicy as they should be, so that I can continue my renewed interest ...... but if I also want to continue to emboss I need to learn how to stop the warping!