Tuesday, 6 August 2019

Christmas Nativity Tree Decoration

At last,  I have got to put together an idea I have been mulling over since I found a pack of wooden counters in The Works ..... tah dah .......
I am so chuffed with how my idea turned out.
As well as the counters, I also used modelling clay from a set of 12 pastel shades from Das also from The Works  https://www.theworks.co.uk/p/modelling-clay/ads-modelling-clay-pastel-colour-collection---set-of-12/8000144006045
The hardest part was working out how to make a simple piece of scenery that would act as a base for the figures and also to secure a hook to hang it from.
In the end I used old ply domino pieces, a whole one for the background and another cut in two crossways for the base.  It took a bit of cutting, but I got there in the end.  I found in the cutting that where one half of the domino tended to warp, the other side stayed flat and was therefore usable.
I covered the picture part of the domino with a cream linen patterned paper.
I am no modeller, so kept the headdresses for the figures as basic as I could, fitting them individually  to each counter.
I was frightened that the headdress shape might collapse in the oven, so to be on the safe side I "cooked" the figure wearing it as well  (130 degrees for 30 minutes) - however I think next time I would risk it without.

As you can see, my Baby Jesus's were also very basic!
When the figures had cooled down, I carefully removed all the baked clay pretty easily and went on to colour in the bodies using Sharpie pens.
Head dresses were then reapplied with a good dollop of PVA glue and left to dry thoroughly.
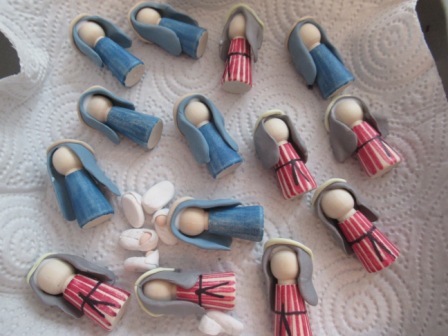
It was a conscious decision not to put faces on the figures, my hands are not that steady when working on something so small, and if a face turned out to be a bit dodgy I knew I wouldn't be happy, and it would mither me into starting again.
Next I put the base together.  First I screwed a tiny eye hook in the middle of the full domino piece and added faux stitching using a black fine liner pen round the edges.  
On the back I also added faux stitching and "Away In A Manger" but using a black biro so that the ink wouldn't bleed into the wood.
Using a strong glue I stuck the figures down, again in the centre of the domino, so that it should be pretty much balanced when hung up.  I then stuck on the bottom piece and left it again to dry completely.
The final touches were made by adding a clear flat back star gem which I coloured yellow, a few tiny gold stars and a clusters of three black dots here and there to bring it all together.

Some of the finished decorations are missing their large star, I only had three amongst all my stash, so I have had to order a few more from e-bay.  They also need a hanging thread, probably blue, but I can put that on nearer Christmas when I know who they will be going to.

On closer inspection I think I need to gently sand the part of the bottom domino where it was cut.  Only I would probably notice that it is a little rough, but it's one of thoses things that I would also mither over. 

Monday, 5 August 2019

Simple Striped Birthday Card

This card measures approximately 7ins x 5ins and is made using a hand cut linen effect card blank.
This card was made for my nephew, however, it was put together with undue haste because, as per usual, I had left things to the very last minute, so no excuses, no great fiddle farty skills were used in it's construction!
I simply cut 1.5cm stripes using paper from a Works origami paper stack which I stuck in a random fashion down the centre of the card.  I then added the blue, glittered sentiment, again in a higgedly piggedly random type way because it was an awful less time consuming than trying to get the letters perfectly level and spaced out. The self adhesive alphabet pack came from B M Bargains.

If I were to repeat this card again I would almost certainly add a scattering of differing sized silver stars for a little extra bling and help fill in a more of the "empty" space ........
........ I was just in such a rush I'd already stuck down the envelope before I thought about it!  Bum!

Thursday, 1 August 2019

Painted Seashell Necklace

This little seashell pendant was made as a potential summer craft  for Iris and Bertie to do over the holidays. I had seen the most beautiful painted shells on Pinterest and thought it might especially appeal to Iris, but I wanted to see how easy they would be first before presenting the activity.
The first thing I needed to check was to see how easy it would be to drill a hole in the shell, I started by drilling the top of the shell from the outside, the drill head just slid off, I couldn't even get a hole started, I was so disappointed, however I then wondered if I could drill from the inside ......... result, it worked, like a knife through butter.  In turn adding a jump ring and a pearl was a doddle

I used Sharpie pens to colour the outside of the shell, as an adult the nibs were too thick to accurately follow the delicate lines of shell but  Iris and Bertie will undoubtedly put their own spin on their designs anyway which will be far more wonderful than anything I can do. The dots were made using nail art pens but again  I think it may be a little too advanced for either of them.
I am certain that Iris will want to copy the idea of edging the shell with flat back gems, but I will put much larger ones out on the crafting table and see where she goes with them.  The final touch was a little glitter using a Spectrum Noir sparkle pen, all very subtle, but do-able.

Anyway, if Iris and Bertie are so inspired I will certainly be posting the results here.  The summer holidays is a perfect time to get a few "Christmas presents" made for doting family, it's just wrestling them from the proud little maker I might have difficulty with! Happy Days!

Wednesday, 31 July 2019

More Greek Treasures

As you know from a couple of years back I have "had a thing" about Greek Tamata's after seeing them hung around the pictures of saints in the various churches Lucy and I have visited.

The rectangular shaped tamatas are made from tin, silver or gold and feature a variety of stamped images with multiple interpretations. A heart symbolises a prayer for love or a heart problem, eyes may indicate an eye affliction, hands or legs problems with limbs, a pair of wedding crowns happy marriage, a torso for afflictions of the body etc. They are then hung on a ribbon on a pole or hooks near an icon or shrine of a saint, an act usually accompanied by a prayer, and/or the lighting of a candle.
Lu managed to find me one with an eye after some degree of searching on eBay one Christmas which I framed (above), but we've always looked for more on other holidays but to no avail until we went to Rethyminmon. On the off chance I looked in a jewellers window which contained various icons and just decided to go in and then saw them on the shelves for 2 euros each.  I couldn't believe it .........
....... and then as we continued down the road we found what we called "a funeral shop" (below), another first. It has to be one of the most fascinating shops I have ever been in, filled with so many religious tranquelments for funerals, memorials and leaving on at the graveside.  
The tamatas here cost just 1 euro so on a roll I bought another one ...........
........ as well as a couple of other things including this small locket (below)
At present the tamatas are safe in a drawer while I have my bedroom "done", but as I am going for a sort of Mediterranean feel, I don't think they should be framed as before, but simply hung from one of the candle scones on my mirror, on a ribbon as intended, with the locket on one of the shelves.
Not everyone's cup of tea I know, but very me ........... 

Tuesday, 30 July 2019

Greek Treasures

I have just got back from our annual Greek Odyssey, again to Crete, as we loved it so much last year,  but this time we stayed in Georgioupolis between Rethymno and Chania.  As per usual we went on couple of trips and as such had a couple of new experiences, both in Rethymno.
We found an antique/second hand shop in a back street, I was in second heaven, although I have to confess, no considered purchases were made!

Naturally the first thing I oohed and ahhhed over were the light fittings, having a huge thing about chandeliers and over the top type lights.
There was such a weird mixture of stuff, some classy and some downright tat ............
...... and it was amongst the tat where I was most tempted. You may just be able to pick out a Christmas house on the back row of the top shelf (above), it was so kitsch and I think there was some age to it as it had the sort of metallic finish that reminded me of childhood Christmas's, I wish I had got a better picture of it. However, I was too frightened to ask how much it was and I really, really regret it now ..... it would have been such a perfect holiday souvenir, something that would have come out year after year, with the memories that went with it, I can be such a ninny at times!
We also found a craft shop ........  lots of mdf wooden embellishments, but really nothing I can't get here, plus ribbons, buttons, lots of silk flowers and lots and lots of findings for making jewellery, but again I didn't get my holiday money out.
I thought Marc would have loved these purses made from old fashioned flowery swimming hats, but thinking about it again, I think he would prefer to model/wear one rather than put "his bits" in one!!!!!
And last, but not least, something I searched everywhere for after I spotted it, but to no avail, a little shrine for holy water that was in the foyer of our hotel ..........
........ every time we went past it poor Lu had to listen to me going on and on about how much I wanted it ...... oh well, perhaps a challenge for next years Greek Odyssey?

Monday, 29 July 2019

Random Letter Birthday Card

This card measures approximately 5ins x 5ins and uses a handcut red corrugated card blank as it's base.

A card for a gentleman (my lovely and very helpful next door neighbour Laci) a theme I always struggle with, hence the random letter theme once again. 
I have to admit that I think the corrugated card may have been just a touch on the thick side to fold, and crease but in the end it worked really well and was probably something only I would really pick up on.

I've simply put together a selection of my ever growing collection of alphabet stickers for the sentiment on a ready made Kraft tag, which probably came from The Works.
Due of the light, the stars look white, but are actually silver.  A little faux stitching round the tag and scattered groups of three dots pull the tag together, but if I were to repeat the idea I think I would use a white gel pen instead of a black fine liner for the twiddly bits to help the card to "pop" more.

Thursday, 25 July 2019

Toilet Roll Covers by Pat Ashforth and Steve Plummer

Well, what can I say except that Christmas is well and covered as far as I am concerned this year ..... and I am sooooooo excited.
I found this book reduced to £1 in The Works and just couldn't not buy it as I was mesmerised by its contents.  I haven't knitted since I moved to Evesham, I actually gave all my knitting needles to the charity shop. All only thing I'd been knitting in the past six/seven years were my a much requested cotton, garter stitch dish clothes.
However, I now have an urgent need to get some new needles (I know just the right charity shop where I can get them for 20p a pair) and then some wool (pink to get me started) as I am really fired up! Marc sprang immediately to mind as he absolutely loves all things knitted ...... he's definitely, if you'll pardon the expression, going to get the pig!
At festive family get togethers it's my job to fill the TUT sack, (a sack of usually pretty rubbish presents, tut, costing no more than £1 each) so I think a few choice knitted items are going to find their way into said sack!
Knitting will also be a way to, hopefully, stop me snacking while I am watching television, a terrible, terrible habit I know. We have booked to go to Disneyland, Paris next summer and am definitely not going to be the fat nanny who is banned from or who can't go on any of the rides!
As soon as I have finished my first effort you can all be assured that you will be there for the first great reveal. 
How exciting ........  something new ....... happy days!

Wednesday, 24 July 2019

Iris - A Million Dreams

This litle scrap of paper never fails to bring a tear to my eye whenever I see or read it ............
It was written by Iris within a few months of her learning to read and write at school and is something that she just sat down to write when the mood took her in all its innocence.

It's the first few lines of "A Million Dreams" from The Greatest Showman.


'"..... every night I lie in bed

The brightest colours fill my head
A million dreams are keeping me awake
I think of what the world could be"

I also have both Iris and Bertie singing their own versions of the song on my phone to listen to whenever I want to fill my heart with joy  ......... pure magic, what more could any woman need!

Tuesday, 23 July 2019

Snowman Box Frames

Just a quick catch up today, as you know I made the first of these snowmen box frames as part of a Hunkydory review using a frame I found with Marc in the Portobello Road branch of Poundland.  It was only when I started to use the glass fronted frame that I began to realise their potential, and I knew then that I wanted use the idea as my Christmas "card"/fairing gift for family and friends this year, but it all relied on my finding more of the frames ...........  and we all know the golden rule of Poundshop shopping, you've got to get it there and then when you see it as you might never see them again!  As it was, when Marc and I visited a retail park in Malvern with very good and large Poundland a little while later they had them and I cleared the shelves ..... and then bought a few more in Wolverhampton recently, just in case!!!!!

Snowman Shadow BOx
I was then able to get really cracking, even managing to make a few spare to give as last minute gifts or even, I am not sure, to sell  ...... and this in June ....... I have never been so organised!
The only thing I have added extra was to cover the backs of the frames with Christmas papers where the patterns are not of a proportion that I would use on my cards. They also make the frame look "properly" finished off.  When I am ready to start posting them out I will add a mat and layered label to the back with my Christmas wishes and the year it was given. What can I say? Christmas is well and truly on the way to being done and dusted!

Monday, 22 July 2019

Congratulations Perscription Card For My Pharmacist Niece

This card measures approximately 7ins x 5ins and is made using a hand cut white linen blank.

My niece recently got a big promotion at the hospital where she works as a Pharmacist and we were all so proud of her. It was also another excuse for me to rack my brains and come up with an original (I think) and suitable congratulations card for her to express our pride.
I used an image of a NHS prescription,  printed it off and then filled it in with my own handwriting. I then mat and layered it on silver to help it pop just a little more.
To be honest, I think I may have gone way overboard on the stars and clusters of dots, they would be a little more toned down if I were repeat the idea again, but who cares, it was for Emily and more than likely a complete one off .........  and she really is our star!