Wednesday 31 March 2021

What Do I Do Now …………..?

Well, that’s Easter done and dusted craft wise at least ……….

IMG_9909

……….. it’s now time to sit back and enjoy the chocolate!

IMG_9910

I’ve put a shelf together using the few festive bits and pieces I had, but had been really hoping, before lockdown struck, to find a few more Easter tranklements in the local charity shops to bulk things out ……

IMG_9911

……… a few more bunnies and chickens would have been nice, but hey ho!  I have noticed that a few of the charity shops in town are gearing up to hopefully re-open on 12th April, so who knows what treasures I will find after that.  

IMG_9913

However, one thing in means one thing out. I have a pile of stuff that needs to go back to the charity shops from whence it came, I know where it all is, but I daren’t start putting it together, because there’s no where in The Towers to put a pile of bags without it starting to look incredibly untidy. I really need to cull a lot of my Christmas stuff, some I think I will try to eBay to help finance my “craft habit” ……. but the rest has to go, my yen to create a Christmas Grotto each year has to be seriously curtailed.

IMG_9912[6]

But I digress, after a month or so of non stop Easter crafting it's all suddenly over …...... and I just don't know where to go from here, HELP!

The mail box in my block of flats all decorated for the holiday.

I don't enjoy making cards at the moment, however I need to get a wriggle on as I have a few I need to get done for birthdays this month ….....

IMG_9893IMG_9894

So I guess I am sort of back to Halloween and Christmas again, although to be honest it seems a bit soon and I am not even sure I am in the mood, but  with more than a lifetimes f Christmas and Halloween embellishments  I just need to rev myself up and rack my brain for new and different ideas on how to use them, so please bear with me.

Tuesday 30 March 2021

Tiny Easter Bunny Pin Badge Brooches

I think these will be my last Easter pin badge/brooches of the year.  I can’t believe how many I have managed to put together.

These are all really tiny, the MDF squares measure 1ins x 1ins and the oblongs 1.5ins x .45ins. and were sourced from e-Bay.

They came about after I also ordered some MDF bunnies from eBay, I knew they were 2cms tall, but even so, when they arrived they were tiny, and difficult to place on any other project (for the moment) other than on a badge/brooch.

IMG_9870IMG_9854IMG_9855

Made just like all my other badge/brooches by creating a scene using scraps of gingham papers and edged with a black fine liner pen …….

IMG_9856IMG_9857

…… and then placing the bunnies, covered with Ranger Enamel Accents in position on top, giving them a tiny pearl flat back gem for a tail.  I experimented by adding some tiny Fimo nail art flowers around the single rabbit, but it didn’t work, it was a proportion thing!

I then added two tiny punched flowers with a gold flat back gem and a sun in the corner, but the sun didn’t look right either, so in the end I simply added some doodled birds in the sky, less is more.

IMG_9919

Finally a pin fastening on the back and a little more edging finish off the badges, simples!

Monday 29 March 2021

Egg Shaped Hanging Easter Bunny Decorations.

This is what I did with all the middle sized eggs from a pack of 30 wooden slice type shapes I got from Hobbycraft (£3) https://www.hobbycraft.co.uk/wooden-egg-shapes-30-pack/647358-1001

I started by covering the egg shape with scraps of blue and green gingham print paper and adding a little faux stitching using a black fine liner pen.

IMG_9776IMG_9777

The MDF rabbits came from eBay, I have posted the link in a previous post.

IMG_9705

I covered the rabbits with white Ranger Glossy Enamel, adding googly eyes, a black flat back gem nose and whiskers drawn using a fine black permanent pen.  I did try having a pink nose, but it didn’t quite look right.

IMG_9841

When the E8000 glue on the rabbit had dried I added small punched daisies with tiny weeny button centres, adding a few three dot clusters in between, here and there just to fill in any empty space.  I used tiny, silver screw eye hooks in the top to hang the decoration by.

IMG_9847IMG_9848

The back was covered with more blue gingham paper, a hand written Happy Easter and two more flowers, so when hung there would be two decorated sides to see at different angles.

Thursday 25 March 2021

Easter Bunny Door Wreath Mark 2 - With Added Carrots!

I have made another Easter wreath, this time for one of my lovely neighbours upstairs.

It’s funny I bought the white wicker wreaths from the Poundland Christmas range back in December 2018 and this was the last one to be used, sometimes things are slow burners craft wise.

When I made the first wreath the flower base was already done, having made it for my door last spring, with this one I had to start from scratch, and I will admit to not being as fussy about the punched flowers and leaves as before, this time I didn’t layer them or put any gems to the middles and, to be honest it didn’t look that good …… however ……

0b1f7831-8933-4ae5-ab28-9e3b0f8e0431IMG_9778

Compare and contrast, original on the left, second make on the right.

I used a glue gun for the whole of the project as I needed an instant fix. The bunny’s (China eBay) went on first, followed by the plush carrots (Home Bargains 79p pack of six). The eggs I got from Amazon (£2.99), the bumpf said there were 80 eggs per pack, but I was sent a pack of 100 which was a bonus!  However, it’s times like these that I really miss being able to go into a Poundland or The Works and buy more or less the same for £1, but hey ho!

IMG_9779

It’s hard to believe I put around 90 eggs on the wreath in total, every time I found a gap I filled it much more tightly than the original one, probably because of the standard of my flowers which really needed to be hidden.

IMG_9780

The underside didn’t look too bad. 

I have to say that I think I now prefer Mark 2 for all it’s fullness, I was much too restrained on No.1 but as I have another bag of eggs going spare I might just have another dabble!

Wednesday 24 March 2021

Small Easter Pin Badge Brooches

Sorry, more badges today ………..

IMG_9743

…… these are a little smaller than most of the others I have made, mainly because I wanted to use the last of some puffy Easter stickers I have had for a million years, originally bought from Paperchase, no sadly gone, in the middle of lockdown, from the High Street

IMG_9751

The badges were made using small wooden Christmas dominoes measuring 14.6 x 5 x 2.8 cm, which I covered, on the picture side, with scraps of patterned paper.

IMG_9725IMG_9727

The paper I used was a bit thin and wrinkled a bit when glued, but since most of it was going to be covered anyway it didn’t really matter.

IMG_9731IMG_9732

Once trimmed and dry I was able to add the stickers, which although they were already adhesive, I still stuck them down with E8000 so I could be sure that they couldn’t be pulled off easily.  I then added a little faux stitching, using a black fine liner pen, round any of the edges that were still visible.

IMG_9746

I did the same on the back of each badge, before finally adding the badge/brooch fitting.

I think these badge/brooches are destined to go to my cousin Christine who works in a dementia care home, to share and wear on her uniform, because she says the residents love to look and touch new and different things and hopefully they will inspire and stimulate conversation and perhaps even memories.

Tuesday 23 March 2021

Very Simple Mum – Gingham Mothers Day/Birthday Card

This 5ins x 5ins card uses a plain, white pre-scored blank originally bought as a bulk pack from Hobbycraft.

This card is no great shakes, made by covering a plain white card with a red gingham patterned paper,  with black faux stitching, using a black fine liner pen doodled round the edges.

IMG_9737

The wooden red letters came from an alphabet pack from The Works, I couldn't believe the letters I needed were all the same colour for once, so no jiggling about with workable combinations was required.

IMG_9738

The flowers (and leaves) were punched and put together in three layers, with a red pearl flat back gem in the middle and then fluffed up.  A few clusters of three black dots are scattered here and there finish the look.  Simples!

Monday 22 March 2021

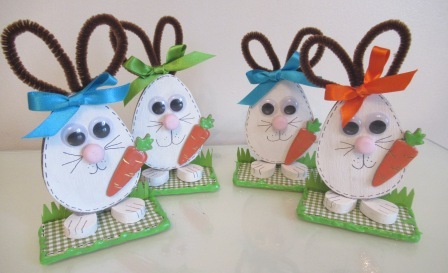
Standing Easter Bunny Decorations

These funny little things came about because I bought a pack of assorted size, wooden egg shapes that were bigger and much thicker than I first thought.

https://www.hobbycraft.co.uk/wooden-egg-shapes-30-pack/647358-1001

To begin with I didn’t have a clue what to do with the largest ones measuring 8 x 6cm (3.1 x 2.4 inches), then I thought bunnies ………

IMG_9790IMG_9794

…….. so I painted one side of the largest and smallest sizes, thinking body and feet and when dry added the ears using brown pipe cleaners using a glue gun.  Ideally the ears should have been white, but since brown was all I had, they had to do!  However, as the sides of the shapes are quite thick and brown the overall effect doesn't actually look that random.

IMG_9789IMG_9801

The rabbit then needed something to stand on, to wit a children’s domino piece covered in green gingham paper, to which I added the painted feet.

IMG_9798IMG_9800

The rabbits were then given googly eyes, a pink (baked) Fimo nose, doodled whiskers and mouth, plus faux stitching around the edge using a black fine liner pen.

IMG_9796IMG_9797

On the back I added a Happy Easter sentiment, but for the life of me I don’t know why I added the ladybirds instead of a white pom pom tail ....... doh?!?!

IMG_9807

The bunny body was then attached to the base using a glue gun, as I wanted an instant fix, followed by a bow and card carrot sticker.

I then left it there, I knew it needed something else, but wasn’t too sure what.  I added a fence, but that was too much and served no purpose, however I think the grass fringe at the back works OK.  

When I saw that the fringe worked, the green Sharpie pen coloured edges of the base then started to wrankled with me, so that’s when I threw caution to the wind by adding the green Dovecraft Enamel Effects round the bottom and on the carrot stalk, which then helped to bring everything together and before I knew it out came the Range Glossy Accents on the carrot itself, so even more texture.

I’ll be honest, I don’t know really what service these perform, if I had thought about it more, I would have made the base bigger (square) and then added a small cup/basket/open box  (?) to accommodate a cream egg or something  and then use them an Easter place setting.   

I will have another think, otherwise they can just sit festively scattered here and there on my many shelves....... just because it's Easter!