Sunday, 12 May 2013

Framed Jewelled Heart

This project has been in the making since Christmas when I asked for a deep box frame from Hobbycraft for an idea I had for my newly decorated “guest room”
Framed Jewelled Heart
1a
I had made a friend a small jewelled heart on canvas a while back and always said that I would make myself another bigger version when I had the time ……  famous last words as that was at least three years ago!
The first thing I did was to cut the heart out in white card to fit the centre of the frame ……
Picture55Picture56
….. which I then covered with all the clear, turquoise, green and pearl flat backed gems in various shapes that  I could muster …. I thought it would take forever but a couple of hours did it …. as I watched Emmerdale, Corrie and Grand Designs …..
Framed Jewelled Heart 1
I used Crafters Pick “The Ultimate” glue which I found dried pretty quickly, this in turn made me work pretty quick too!  The fiddle-farty bit was filling in some of the smaller gaps which were left when I had almost finished, I dropped seed beads into them after I gave up on tiny flat backed gems using a cotton bud as being just too fiddly, even for me!
Framed Jewelled Heart 2
To add a little more dimension to the heart in the frame I used foam sticky pads to stick it on to the background ….. and really that’s all there was to it …. simples!
I have a four more smaller box/shadow frames from Ikea to use up now, but as of yet haven’t had any other brain waves as to how to fill them …… but that, I expect, is only a matter of time!

Saturday, 11 May 2013

My Doodled Brooch Experiment

This project was a bit of an experiment as I had an idea but wasn’t sure if it would work.  As you know,  I have been finding doodling very therapeutic and relaxing of late  …. and this time thought I would go from the sublime  …. the mahooosive doodling that is the base of my paintings to the ridiculous …. a small brooch.
Doodled brooch
I got these clear glass cabochons from China a couple of years ago, and to my shame have hardly used any of them. I had seen something similar in a UK craft based magazine,  but when I saw how much they were for just one,  there was no way I was going to pay the price ….. but after a little researching on the internet and I found these for silly money,  as I said from China.
Picture60
Anyway …… I started with a very small doodle using Whisper pens and then stuck the cabochon on top (resisting my usual urge to add a little iridescent micro fine glitter) using a little Ranger Glossy Accents which, when dry,  goes completely clear …. and then all I had to do was wait patiently for it all to dry and to see if the colours ran ….. they didn’t, wooo hoo!
Picture61
However, the ink did run a little into the back of the paper, but as this brooch was for me I added the brooch back using E6000 glue, and when that dried, added a good layer of Ranger Glossy Accents to seal the paper, .…. but when I use this idea again …. I will either colour the back in with a solid colour or cover it with another layer of paper before adding the pin …. to make it look more professional …..
Picture62
I am planning on making a set of fridge magnets in the next little while, so can then see which idea works best.  But for now,  this brooch is pinned firmly to my jacket lapel.

Friday, 10 May 2013

Saucer Crackers

A friend mentioned that she was planning a vintage tea party and I remembered some saucer crackers I has seen in a magazine a while back and got to wondering if it was something I could cut on my Silhouette using a small pattern paper ….. and this is what I came up with ……
saucer crackers
I managed to get six crackers from one sheet of A4 sized paper using these dimensions.
saucer crackers. 1
I believe “the real thing” has a snap and a motto inside ….
Picture65
…… I don’t know about the snap …. but I am sure I could type out a few mottos or jokes and then find a pair of stud earrings, a bracelet or necklace to pop in!
saucer crackers 2
And just think about Christmas …… you could use Christmas colours and papers and put in Christmas earrings …… the world is your festive lobster!!!
The ribbon I have used is 4mm wide.
saucer crackers 3

Thursday, 9 May 2013

Today ….. Guest Crafter Maisie And Her Wonderful, Wonderful Pink Mirror.

Oh my life ……  someone is trying to make me look like a right amateur ……
….. this gorgeous mirror was made by Maisie who,  can you believe,  is only six!!!  She and her Gran Anita  are followers of FiddleFart …. and this is what Gran Anita  told me via Facebook …….
Picture68Anita : Helen my six year old granddaughter has been collecting bits and pieces since she saw this (*my first boudoir mirror) and wants to start her mirror this weekend. What did you stick the bits on with?
Me: I used E6000 glue Anita ......it's like a very strong bostik
Anita: Thanks Helen. My granddaughter loves to see what you have made. She loves all the sweetie bags etc. and has done some for the school fair and Christmas fair. She always makes all the teachers presents as well.
Me: Say a huge hello from me .... and send me a picture of her mirror and I will make her my guest crafter xxxxx
Anita: She would be thrilled with that Helen. She is very into pink and purple and says that's what she is doing it in.
Anita: “ …… Maisie's mirror that she has made for her bedroom. Done all by herself. Hope you approve Helen. She sat all Saturday whilst we were busy in the garden. She never had as many bits as we thought but had painted it pink so she doesn't mind. She loves it and is really pleased with it.
How can I compete with this sort of talent???? 
Picture69
Well done Maisie, I know how proud your Gran is of you …..  your mirror is WONDERFUL ….. and very, very special because you made it all on your own ….. and to be honest … it’s better than mine, so I think I had better practice a bit more to get as good as you! …… Lots of Love …. Helen

Wednesday, 8 May 2013

My Love/Hate Silhouette Relationship And Cheese Wedge Favour Boxes!

Agghhh ….. as you know I have recently taken my much neglected, under used Silhouette machine out from the back of the cupboard to make wedding favour bags/boxes for Tom and Laura’s “Wedding of the Year”!
Picture70
Lured by how easy I found the cutting after such a long time, sparked off lots ideas for other projects in my head,  so much so that as Silhouette Online was having a “sale”  where all the shapes were just 33p each,  I splurged and downloaded about 40 new box designs,  as making boxes/bags was what I originally bought my Silhouette for.  I used to have a subscription several years ago, but found,  after several months, that I was just downloading shapes for downloading sake and my choices were not really that considered.
While I was at it,  I also downloaded the latest Silhouette Studio Software …. and that’s  where I started to get confused.  I know I am not the most technical of people …. but the original programme that came with my Silhouette all those years ago was very simple and basic (like my good self)  and I could understand and use it.  However,  with designs getting more complex the software seems to have gone the same way too …….  offering the option of Print and Cut (among others)….. a very wonderful option, but I have only used it once (several years ago) for an order I agreed to  do ….. it took me two solid days to sort out and I vowed never to do it again!  
Picture71
So,  when I tried to “just” cut some plain triangle boxes to make “cheese wedges” to put Tom and Laura’s crocheted wedding favour mice in …. I found myself completely flummoxed by “Registration Marks,  which are to do with Print and Cut process.  I found that I couldn’t cut anything without going through a whole rigmarole of options, but at the back of my mind  I knew I had probably checked a box that had caused this to happen …. I just couldn’t find/remember which one,  so after several hours of frustration …. I gave up, knowing that it was going to be something simple …. and then all of a sudden it dawned on me …… I needed to uncheck the “Show Reg Marks box” …..
Picture73
…… which was making the programme think I wanted to Print and Cut ….. doh!! But it’s all sorted now and I can cut away like there’s no tomorrow …. as you can see from the pictures in this post …….
Picture72
However, it’s ironic that after all that fiddle-farting when I’ve totally dismissed the Print and Cut option I’ve only gone and drawn my own “holey cheese” ….. what am I like?
Picture75

Monday, 6 May 2013

Altered Heart Shaped Mirror

Dunelm Altered Mirror
I have always been very proud of my “Favourite Blog of Dunelm Banner”, it felt very special to be “found” by a company not usually associated for their craft products ….. however,  it’s always been one of my favourite mooching grounds when looking for things to alter ….. and more recently, as I have been gradually “doing” Castle Greysquirrel up room by room,  the source for new curtains, bedding, lighting and several mirrors …..
Picture77
………as my boudoir dressing table will confirm! …… The mirrored drawers and boxes (not from Dunelm) were gifts from Marc ….. who I blame for my ever growing ….. “London Style” !!!!!!!!!!!Sadly, in recent months,  because my blogging had not been as regular as it had been, I had lost touch with my contact Laura who is part the Dunelm  “blogging programme” …. but we are now back in touch ….. and as such on Friday, at the start of the Bank Holiday weekend I received a parcel ……
Dunelm Altered Mirror1Dunelm Altered Mirror 2
…… containing a mirror that I had had my eye on to alter and some very useful crafty bits and pieces…… THANK YOU LAURA.
Picture80Picture83
It’s hard to measure a heart, but the mirror is approximately 8.5ins at its widest and about 7.5ins tall, and a nice size to alter.  The vision in my head was to make something “magical” using the dyed broken abalone shells and sea glass I had bought a couple of years ago from Devon Driftwood Designs in Brixham http://www.devondriftwooddesigns.com/ and some of the sea glass I had collected from beaches from various holidays over the years.
Picture84But, as with a lot of my ideas/projects in their early stages, after adding just one row of glass and shell round the edge of the mirror, using E6000 glue (as recommended by Marc) I was unhappy with the results.   I added a few pearls,  but it just looked bitty and uncoordinated, if that makes sense, so in the end I decided to stop fiddle-farting and to go back to it on Saturday morning.…. And in the morning my fresh eyes told me that I needed to make the edge wider by adding another row of bigger pieces of glass/shell and then build up that bottom layer with smaller pieces….. at the same time changing to Crafter’s Pick The Ultimate glue ….
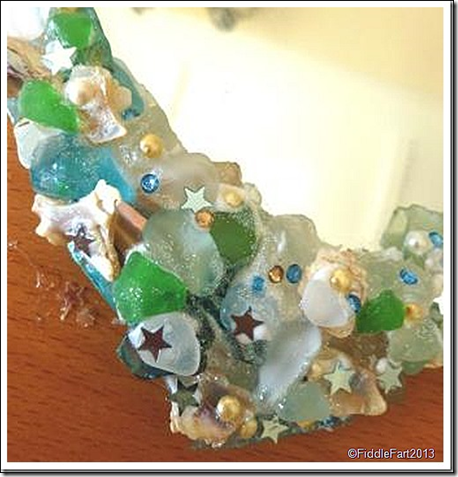
Picture86……….. which is rather like an extra thick PVA that stick all sorts of things including glass/metal/ceramics and importantly dries clear ….. It’s a glue I don’t have much experience with and so just had to keep my fingers crossed that it did what it says on the bottle ….. as my gluing always tends to be on the thick, blobby side …… as these pictures contest!
Dunelm Altered Mirror 4Dunelm Altered Mirror 5
As the layers built up ….. it was started to come together more, but was lacking on the magical look ….. so I started to added a few flat back pearls, and pale blue and beige gems …. and a few pale blue stars …… and then I had to pull myself away again …. to wait for the glue to dry clear ….. because this time I was afraid I was in danger of over egging the pudding!!!
On returning to the mirror once more the stars were removed, but more pieces of glass were added and lots more fiddling and twiddling …. as I just couldn’t seem to get it looking “pretty” enough …… in the end I added blobs of glue and poured tiny iridescent beads all over it (to look like underwater bubbles) ….. and then knew I had to stop or it would have ended up being consigned to the bin ….. I brushed over it to removed the excess of beads …. and that was it!!  The last thing to do was thread three strands of soft string through the holes and to hang it ……. on my craft room door

Saturday, 4 May 2013

Home Sweet Home Card

This card measures 5.25ins x 5.25ins and used a hand cut blank made from Kraft card.
Home Sweet Home Kraft CardThis card is typical FiddleFart less is more! The letters used came from a game bought at the village Easter Fair for just 50p, if the price is right, I can not resist an old game at car boots, charity shops etc. that contain letters,   I can always find a  use for them.
Picture88
I love the “shabby chic”  naivety of the letters, not being centred and the buff colour of the card …. which, for me screamed  “Home Sweet Home”. 
Most of my time was spent getting the letters centred and balanced,  then all that was needed were two punched house shapes to finish the whole effect.  I was tempted to cover the letters with Ranger Glossy Accents but resisted in the end for a more “natural” look.

Thursday, 2 May 2013

Wednesday Night is Wedding Crafting Night At Castle Greysquirrel–With Guest Crafter!!!

q
As you know,  Wednesday nights are Wedding Craft Nights chez moi! Until we started having these evenings I had only met the Lovely Laura’s mum,  The Equally Lovely Denise at Tom and Laura’s graduation and that is a good few years ago now, so it’s been lovely for all of us;  Sarah (the Duke’s Sister), my nieces Emily and Daisy and my Lucy to all get together ahead of THE BIG DAY,  as well as “doing our bit” towards the celebrations.
e
Last night we finished the last of the “after dinner mints” for the tables, which complement the invitations and the place cards ……
w
I am sure everyone was right royally cussing me as they were quite fiddly,  but in the end we’ve manged to get over 200 done, which should be enough for every guest to eat two and take one home as a memento!
Picture29Picture30
And this week The Equally Lovely Denise bought all the wedding mice she had crocheted while on holiday,  that will be given as wedding favours to all the gentlemen ……
Picture31
Oh my life, they are sooooooooooooooooo cute,  I don’t think I can let them go! I am determined to find a “gentlemen” at the wedding who will willingly give me theirs if I look plaintive enough!!!!
Picture32
Denise is putting a little strip of self adhesive magnet on their underneaths so that they can be used as fridge magnets …… but “mine” is going on my dressing table. 
We are also contemplating whether to use my Silhouette machine to cut out tiny wedge shaped boxes to look like cheese to put them in …………. aghhhh more fiddlefart!!!!

Wednesday, 1 May 2013

Home Sweet Home Frame

I had this small photo frame for Christmas, but have been undecided about what to put it ever since, as I wasn’t sure if I actually wanted to put a photograph in it ……
House shaped photo frame…… then I had a brain wave …..
Home sweet home house shaped frame….. a couple of scraps of blue gingham paper, a bit of neat writing and faux stitching and a little wooden bird embellishment with a flat backed gem for an eye …. done and dusted!

Tuesday, 30 April 2013

Such Exciting News …….

I have been keeping a really big secret for such a long time, but couldn’t say a dickie bird until a certain envelope had officially plopped onto my sister Jan’s door mat!!!!
Picture18
………. We’re only off to a Garden Party at Buckingham Palace !!!! The invite has come about through Jan’s work with the British Olympic Association last year ….. and my goodness what a year she’s had;  helping to kit Team GB out before The Games, followed by working at both the Olympic and Paralympic Games in the summer, then meeting Prince Charles and Camilla at Clarence House, and David Cameron at 10 Downing Street,  when we thought it was all over and now this …… (Although, you will remember I had my own Olympic moment too when I met chased after Alistair Campbell shamelessly at the Olympic Park!)……… Anyway, I am thrilled to have been invited as Jan’s guest and am sooooooooooooooo excited …. I think I might burst!
Picture19
We have a lot of bumf to read through ….. but unfortunately,  as you can see, it clearly states that cameras cannot be taken in …. and as a blogger that’s like having my arm chopped off, however,  I cannot risk been flung into the Tower of London and I am sure there will be lots of other photo opportunities outside the Palace and while we are in London that will help fill a post when the time comes to write about our adventures.We have both had our outfits for a few weeks now  ….. although I need to get some strappy shoes and a handbag (big enough for a very small monkey!!!!)
Picture20
……. It will be a day when I know we will both drink in every single second,  because days like this don’t come along very often ….. and I appreciate just how honoured I am to be part of it.

Monday, 29 April 2013

Bird On Wire Tags

I haven’t treated myself to anything of a crafty type nature for ages,  but recently decided to have a bit of a splurge …… the first thing I bought was the Martha Stewart “Bird on Wire” edge punch
Birds on a wite tags
At the moment I am rubbish at punching a long edge, but there again, I am not very patient.  A single punchie is small, but perfect for tags and small cards …. but I know it will be a punch that will be used over and over again, I am already thinking Christmas …. and punching them out in brown for robins!
Picture16
Which brings me to the tags, made using Kraft card and scraps of Papermania Bookprint papers  …… I know I am very guilty of wasting a lot of card when I cut card blanks ……
Picture17
…… but,  I am now keeping my much under used Cropodile permanently on my desk,  and making a concerted effort to get at least two tags from the remnants of each card I make …. and then when I have a whole pile of them will send them to the local charity shop or RNLI.

Sunday, 28 April 2013

Mr and Mrs Wedding Card

This card measures 5ins x 5ins and used a hand cut blank made from Kraft card.
Mr and Mrs Wedding CardToday is another FiddleFart less is more card! The letters came from a game bought at the village Easter Fair for just 50p, for 648 letters that’s brilliant value for money.I like that the letters give the card a naive “shabby chic”, natural look.
Picture22Once they were centred and balanced, all I needed to do then was add a few small punched hearts and a layer of Ranger Glossy Accents to add dimension and a little glitz, simples!
Mr and Mrs Wedding Card 1