Saturday, 22 November 2014

Wooden Heart Tree Decoration

This was an experiment,  but I think it’s an experiment I won’t repeat as I feel that I may have over egged the pudding ……
Christmas Heart Tree Decorations I just wondered what it would look like if I took the original, plainer heart and coloured in the flowers and swirls and added a few flat backed gems and pearls …. and then a gingham ribbon ……
004I should have left the original as it was, less is more!!!

Friday, 21 November 2014

Chocolate Sprouts Christmas Tree Decoration

Do you remember the nets of chocolate sprouts I found in M & S a few weeks ago, well, I have finally used them!!!
M--S-Chocolate-Sprouts_thumb2I put them in matchboxes to hang on the Christmas tree.
I used my Stampin’Up matchbox die to cut the boxes and have finally found a way of folding and putting them together without driving myself demented, with thanks to YouTube!!!
I found an image of a Christmas sprout, copied and pasted it, so I had enough to put on nine boxes (enough for the number of sprouts I had) and then further embellished them by adding glossy 3D paint to the hats and bobble, googly eyes and a smiley mouth, and left for 24hrs for the paint to set.
While they were drying I put the matchbox covers together trying to use as many of the odd bits and pieces I have in an effort to use up stuff, rather than buy any more!
I also decided to go the whole hog and added holly confetti and berry flat backed gems to the sprouts hats, plus a few gold peel off corners here and there.  The gold foil, sentiment circles come from Craftwork Cards.
I secured the ribbon hanger using an eyelet set with my cropodile and then added a bead for extra detail and colour.
The matchboxes are big enough hold eight sprouts.  I have lot’s of “pretty” papers and stickers to make matchboxes for the ladies …. but I think these are a perfect alternative for the boys.

Thursday, 20 November 2014

Robin Christmas Tree Card

This card measures 6ins x 6ins and is made using a hand cut blank of PaperCellar Christmas patterned card.
As soon as I saw these Paperchase robin stickers (£1) I knew they would be brilliant for making a robin Christmas tree, because the pack included robins that faced both left and right, which doesn’t happen very often in packs of stickers.
The ones wearing the scarves in particular were perfect for using at each end of the bottom row.
All I have had to add to the design was the tub using small, square, flat backed gems, a red flat back gem star on the top and a few dots here and there to fill in the spaces.

Wednesday, 19 November 2014

Fimo Snowman Pendant Tray

I think this is a posh version of my bottle cap ideas!!!!
Marc reminded me about the 1in pendant trays he sent me a while back, saying that as they are a ready made pendant, there would be no fiddle farting about punching holes and attaching jump rings as with a bottle cap.
So I had a go ….. the snowman ….. agh, as well as working on such a tiny scale, working with white fimo is a nightmare, trying to keep it white, especially when adding other colours. And, this is my second snowman, after getting the first one just right …. I only went and put him in a oven that was too hot and burnt him!!!  Can you burn snowmen?
However, while this second version was cooking, I prepared the pendant tray, making a background of plain blue and glittered paper and doodling a few snowflakes.
When the snowman had cooled I glued him into the tray using E6000 glue, which is really strong and then filled the tray with Anita’s 3D clear gloss finish to add a bit of depth and dimension.
I am particularly proud of the snowman’s arms …. boy were they fiddly!!

Tuesday, 18 November 2014

The Duch Does A Bit Of Poundland Shopping ……

I couldn’t resist these Christmas friendship bracelets I found in Poundland this week ……..
I had been looking at something very similar in an accessories shop that I have also been known to frequent in the past for their stickers (sadly, not such good value or as inspiring these days) but their bracelet set was £6, (which I see are now reduced to £1.80) and believe me they are identical!!!!  I feel I need to purchase a few more sets just for fun fairing gifts for my friends to start Advent season with ……at 20p each, it’s a no brainer!!!!!
 http://uk.accessorize.com/view/product/uk_catalog/acc_2,acc_2.2/4841919900#

Monday, 17 November 2014

Tiny I’m Dreaming Of A White Christmas Bottle Tree Decoration

Oh my life, if you only knew how many times I fiddled and farted with this idea to get it right!!!!!  Nothing I tried looked right.
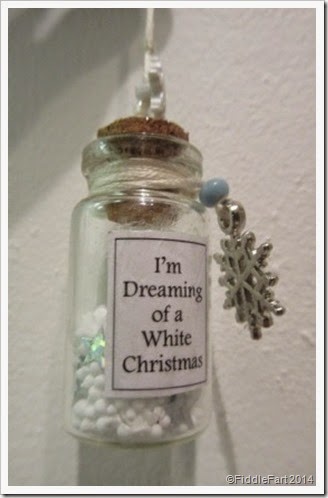
The corked bottle came from The Works and is approximately 4cms tall (pack of 6 for 99p). The first thing I made was label, but forgive me, I don’t have the file on this computer and so cannot remember the name of the font or size, but believe me it’s small! I made a whole sheet of them, just in case I want to make some more bottles.
On the cork I used a small silver spacer bead cap with a silver screw eyelet for the thread, and then added a tiny, white snowflake button. I tried all sorts of thread, but in the end the only one that was soft and pliable enough for the hanger and round the top of the bottle was white embroidery cotton.
Round the top of the bottle I wound more cotton and then attached a small metal snowflake charm and tiny blue bead to add a touch of colour.
I filled the bottle about half way with tiny polystyrene balls that I have had for years and a few hologram stars.
Now that I have the first one made and the formula to do it sorted I am planning on making a few more …….
But ……  what I am really desperate to make is something like this (below)  ……. using what I believe are called bottle brush trees and which are impossible to find in UK.
IMG_7475confessionsofaholidayjunkie.blogspot.co.uk/2014/07/christmas-in-july-day-7-magical-holiday.html
I finally found some from US on Etsy where not only was the price reasonable but so was the postage and anxiously await their arrival  …… On one occasion, thinking I had found what I was looking for by the shed load I blithely filled my basket, only to find at the checkout that the postage was $36 …… double the cost of my shopping!!!!
I think I may have start a campaign to bring the miniature bottle brush tree to British crafting …… you watch next year they will be everywhere!!!!

Sunday, 16 November 2014

Nine Square Robin Christmas Card

This card measures 6ins x 6ins and is made using a hand cut, white linen effect card blank.
Well, it was a no brainer, these Paperchase robin stickers (£1 per pack) were made to go on a nine square card.
Lots of mat and layering, and nine punchies using my Xcut small scalloped square punch, plus a bit of faux stiches and a few dots here and there. Simples!

Message for goodthings

In answer to your comment – e-mail me and I will see what I can do!

Saturday, 15 November 2014

W.E Interiors Theatrical Live Window Event

OMG .......  I have excelled myself, it may have taken me over 5 hours, but I finally worked out how to bring you the short video that was made for W.E. Interiors Theatrical Live Window Event last Saturday 8th November   ……. so that you could just get a flavour of what a brilliant evening it was. Seeing it now from the other side of the window, I can't get over how brilliant it all looked and I reckon as an ad it could rival John Lewis any day!!!
https://www.facebook.com/weinteriors

Friday, 14 November 2014

Wayfair UK

downloadExciting news Chez Fiddle Fart, I received an e-mail from Marne representing a company called Wayfair UK (http://www.wayfair.co.uk/), a company that has "a zillion things for the home", and new to me, saying that she had seen some of my up-cycling projects and wondered if I might like to peruse the Wayfair site to see if there were any products that might inspire me to produce a tutorial exclusive to their site ........  are Maltesers my confectionery of choice?????? Well, I had to say yes didn't I?
To be honest at the start  I struggled, all the items are lovely, so lovely that in my mind fiddle-farting with them would have been like gilding the lily!
However, prompted and persuaded by Marne I have settled for something very, very simple and which will work to a festive theme ...... but that is all I am allowed to divulge.  If all goes well I am hoping that my tutorial will "go live" at the end of November and then I will reveal all through a link to Wayfair ......
In the meantime have a look for yourselves, I have soooooooo many new objects of desire now it’s impossible!!

Thursday, 13 November 2014

Patchwork Christmas Card

This card measures 6ins  x 6ins and is made using a hand cut white linen effect card blank.
Patchwork Christmas CardThis year I am aiming to make cards that are very quick and simple in an effort to use up a lot of the stuff I have had for years, and as such have been taking a closer look at all my 8” x 8” Christmas pads, in particular looking for papers that have a patchwork pattern that can be used as a whole or papers that have a small pattern that can be up cut into squares or stripes to create a patchwork effect.
Gemmed patchwork Christmas CardThis paper falls into the “using whole category”, which just needed mat and layering on white and then red.  All I had to do then was add a Craftwork card Christmas sentiment circle on a strip across the top of the card with a few large, flat backed gems.
glittered patchwork Christmas CardI have to admit adding tiny gems and micro glitter to the pattern isn’t that quick, to be honest it’s down right fiddle-farty, especially as my eyesight isn’t what it used to be and as a result I have had to buy a pair of 3.00 readers from Poundland to wear over my contact lenses especially for the task.!!!

Wednesday, 12 November 2014

Christmas Nativity – Angel in A Bottle Cap

Last bottle cap today …..
A little angel with a decidedly dodgy hair cut. Her original hair colour was blonde but it didn’t show up very well.  I think if I dare, looking at this picture,  I need to add just a tiny weeny bit more glitter to her halo.
Now …… no I try to do a snowman in a bottle cap? ….. Might tap me a few days, but I’ve dared myself now!!!

Tuesday, 11 November 2014

Christmas Nativity–Shepherd And His Sheep in A Bottle Cap

Today ….. my shepherd and his sheep ……
My favourite bit ? His crook …… it’s sooooooo tiny and this time last year I wouldn’t have had a clue how to go about making it …. but thanks to Marc and all his expert jewellery making technique tutorage and patience (none of which he say I have!!!!!!),  it was a doddle …. thank you Marc, you taught me gud and proper!!!

Monday, 10 November 2014

Christmas Nativity - Three Kings In A Bottle Cap

Following on from my Mary, Joseph and Baby Jesus in a bottle cap, I decided to challenge myself to make a complete set of Nativity characters…… in bottle caps
….. and ta dah …… these are my tiny weeny three kings!  Their crowns are made from small jump rings …… and the Star of Bethlehem and their presents……..????
I knew that Poundland nail art kit would come in very useful this Christmas!!

Sunday, 9 November 2014

Tiny Bottle Cap Nativity Scene

My goodness this was so tiny to make  ….. and my eyes ain’t that good!
It’s not my own original idea, I found another tiny nativity in a bottle cap while browsing Google and wondered if I could put my own spin on it using Fimo.
So first of all I made up all the very basic figures, sculpture not being my thing,  the largest of which measures about 15mm. Then when I had a Mary, Joseph and Baby Jesus made I sort of pushed them together to make a group and then baked them in the oven until hard.
While they were cooking I put a hole in a bottle cap with my Crop-o-Dile, and punched dark blue circles for the background which I then glued in.  I added a  few white dots for stars and then varnished the background lightly with Anita’s 3D Clear Gloss Finish. 
When the figures had cooled I added hair and eyes using Sharpie pens and then stuck them onto the background of the bottle cap using E6000 glue. When the glue was dry I added a tiny hologram star to the background and then applied several light coats of gloss finish which seemed to deepen the colours and give the whole look a rustic affect, if you know what I mean.
Through the hole I fastened a jump ring and then attached a length of cord and a wooden bead. 
I think this is my most favourite Christmas project ever …. in total I plan to make another twenty and then break the mould.  I then fancy having a go at a snowman and a Christmas Tree ……. that is if I don’t go doubly cross eyed first!

Saturday, 8 November 2014

Robins On A Branch Christmas Card

This card measures 6ins x 6ins and is made using a hand cut blank in white linen effect card.
This is the card I came up with using the pack of Paperchase robin stickers (£1) from yesterdays shopping. Sorry the large photo isn’t too brilliant.
I also used my Memory Box Woodland Branch die (MB98187), which just lends itself to so many Christmas cards with different things hanging from it.
98187All I have done is add a tiny sprinkling of Hunkydory Diamond Sparkles, Angel Wishes to the branch and in a swirl round the lone robin at the bottom.  All done in no more five minutes!
I think these little finger print robins are so versatile and have set myself a little sort of challenge to see how many card designs I can come up with using them, so watch this space!
As Marc has a few packs of them too I can’t wait to see what he come up with.

Friday, 7 November 2014

Shopping With The Duchess …..

Well…… at last the Christmas fiddly farty bits and pieces are finally finding their way to the shelves  …… and I know I am making a valiant effort in trying to use up as much of the stuff I already have left over from Christmases past ….. but it’s still good to mooch! 
I have a feeling, like Halloween, it’s going to be a poor Christmas for stickers, but I did find these robins in Paperchase (£1) which are just too cute, I also bought a few packets for Marc because one of his themes this year is robins for a school he “makes for”, and these I hope will be perfect.
Also from Paperchase this assorted box of coloured wooden stars, at £5 a little out of my comfort zone ….. however there are a lot in a box and stars are not just for Christmas, so I think/hope they are going to come in useful all through next year.
Moving on to Poundland, this card wreath …. not for hanging cards but for taking apart for the 24 green pegs, which are a really useful size, which I have found hard to find, and the 24 red wooden beads, which are also useful at this time of year on tags etc..
I think this nail art set is also going to come in very handy, they are all made from metal and look like tiny studs, a useful embellishment on stamped Christmas trees and baubles and for filling the odd gap, etc..
Likewise this pack of 36 self adhesive strips of gems, which of course can also be cut up. I love the colour combinations and have a few ideas for cards just using them more or less on their own.  They could also be used to bling up a parcel or a tag without costing the earth and because of the colours, not just for Christmas …. in fact they look quite Eastery!
And finally, for today …..these houses were a bit of an impulse buy, but hope I can get around to doing something with them this Christmas ….. I was thinking that all they need is a little snowy glitter on the roof and round the bottom, a few gems round the eaves and perhaps a little Santa Stop Here sign???? We shall see.

Thursday, 6 November 2014

I’m Not Here, I Am In London

If your comments aren’t posted over the weekend don’t worry, it’s not you, it’s me  ….. I will be in London ….. again ….. with Marc doing something a little bit different….. because on Saturday night Matthew…… I will be in the window of W.E. Interiors being part of a theatrical live window event!!!weinte2Ian, Marc’s partner and his sister Lynn Llewellyn-Jones came up with the brilliant idea of bringing live theatre to the shop window using the furniture on show, to promote the shop, on one of the busiest nights of the year in Battersea, when several thousand people, more or less, have to pass the shop as they return from the Battersea Park Fireworks.
My part, which I intend to big up as much as I can, will be in the bedroom section  ….. sitting at the dressing table, doing the full beauty routine including face pack …. and then moving onto the bed to lounge, tweet, read a few magazines and eat copiously from a hopefully mahoooosive box of Thorntons chocolates  …… with three monkeys (special guest stars) sat on the end of the bed having their own party!
I hope to be able to bring you lots of photos of the evening upon my return, no one can ever say my life is boring!!!!!
If you are passing give us (or The Monkeys) a wave ……..

Wednesday, 5 November 2014

Jewelled Christmas Tree Cards

These cards use a 6ins x 6ins 130gsm. Kraft card blank from Craft UK Ltd.
Jewelled Christmas Tree Card.These cards use the bumper bargain boxes of flat backed gems that Marc and I bought from HobbyCraft for £3 during his stay with me. I just love the colours, as there is an unusual dusty blue in with the turquoise pack and gold, black and grey in the other pack which again are a bit different.
flat back gemsWhen I looked at the gems I immediately thought jewelled Christmas trees as they came in varying sizes and there were so many I knew didn’t have to be stingy when using them.  I could bling to my hearts content!
Jewelled Christmas Tree CardSo,  all I did was cut a triangle shape out for the tree with each side measuring 3.5ins and then I embellished it generously with the gems. The tree was then placed on some very simple mat and layering, first using a contracting colour (teal and black) which was then matted on silver mirri card.  The final touches were made with a little faux stitching and doodling using a white gel pen.

Tuesday, 4 November 2014

Skating Penguins Christmas Card

This card measures 6ins x 6ins and I got the self adhesive penguins from Michaels in Las Vegas last year.
Penguin Christmas CardI think this card is too much!  I started off making a scene with the penguins in a frame (the frame was part of a pack of a Winter Woodland laser cut frames from Hobbycraft and is patterned on one side, but I chose to flip it over and colour the blank side with a Pro Marker Pen).
Penguin Christmas Card.But after that …… I lost my way, adding six layers of matting!!!! I know it looks OK, but does it really need so many layers?
I think what I would rather do with the framed scene, is to back it on a matching piece of card,  drill a hole in the corner, add some blue and white bakers twine and make a gift tag with it ….. which could then be put on the tree as a decoration.
Watch this space for when I make Penguin Skating Scene, Mark 2!!