This is an idea not to everyone's taste I know, but it's been an inkling of an idea after I first saw similar projects on Pinterest, however it's been kept on hold for quite a while because actually finding suitable small plastic skeletons for the project has been a huge stumbling block.
 A few years back Poundland sold skeletons on strung garlands (from memory, having about 8 skeletons on one). Marc and I did buy a few over the years, but then they disappeared, never to be seen again, along with the nets of skeleton hands that I also loved using. My memory is also that they had movable joints, but here, I think, my memory may be playing tricks (??). Anyway, we've been looking ever since, but the only ones we have found were mostly available in the US with stupidly expensive P &P.
 But then ...... when I met up with Marc in Worcester in October he was sooooooo chuffed as he'd managed to find these packs of two in Tesco for £1, and Marc, being Marc, had got me several packs, I was thrilled! They measure 15cms long.


I'll be honest, with Christmas fast approaching I really didn't think I'd be able to do anything with said skelliebobs until the new year, but then found these glittery wing tree decorations (2 for £1 in gold, silver) in Poundland.
 Now, when I first saw them I wasn't thinking skeletons, instead my mind thought "winged hearts", something like the one below, putting a tin heart that I already had in the middle, but when I got home the hearts were just a little bit too big (.......so still a project for another day) .........
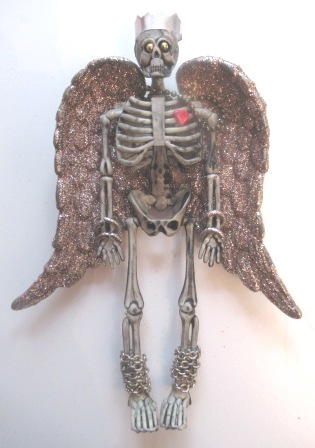
........ however, all was not entirely lost because when I put a skeleton with one instead the proportions were perfect, my only doubt was that being grey the skeleton disappeared a little into the silver, if you know what I mean? Then, while mooching in Home Bargains I saw that they also had winged decorations, not only in gold and silver, but also white, pink and blue and were only 49p each they were a no brainer ......
 ......... and when I got home the colours were perfect next to the grey ....... which means I now need to go back and get a few more.


........ however, all was not entirely lost because when I put a skeleton with one instead the proportions were perfect, my only doubt was that being grey the skeleton disappeared a little into the silver, if you know what I mean? Then, while mooching in Home Bargains I saw that they also had winged decorations, not only in gold and silver, but also white, pink and blue and were only 49p each they were a no brainer ......


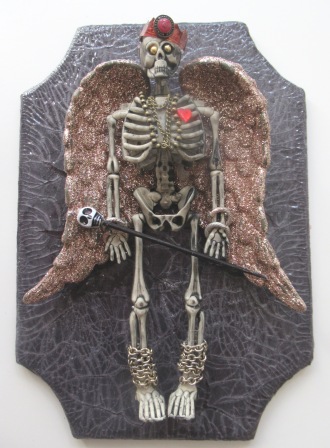
Wrapping the chains round the bottom of the skeletons legs proved fiddly and needed Super Glue, the kind that not only sticks your project but almost instantly to your fingers.

The bracelets, fancy jump rings from an old necklace, were a nightmare to open and close, but I got there in the end.

The three necklaces were also sections of thin chain from old jewellery, however they kept disappearing down behind his ribcage, so in the end I had to glue them in position down his front.
 I also gave the skeleton a red flat back gem heart and gold, flat back eyes.


The crown was made using a thin piece of aluminium foil and coloured later with a brown Sharpie pen to give a more aged grungy look.
I then decided the skeleton needed a scepter, made using a skull bead (The Works) and a cocktail stick coloured black.

I can't tell you how thrilled I was with how it all turned out, everything just seemed to come together as I went along..

I prepared the background using a wooden plaque (The Works £1) which I covered with black tissue and some crackle glaze that I have had forever, again to give the illusion of age.
 The plaque was necessary because due to the angle of the skeleton's feet and the weight of the wings he can't stand up alone.
 After completing this first idea I have some thoughts ...... to get other projects to stand I need to get some 4mm or 5mm dowel, colouring it to blend in and then either glue it along the spine at the back or inside under the rib-cage. Then I need to think about bases, I have seen some on Pinterest that use a wooden cotton reel for this. Although it wouldn't work with these sort of wings, as they are too heavy, I think it's worth a try.
 I also think they would look really good just hanging, it wouldn't take much to put a small screw eye hook in the top of a skull, and Bob's your uncle!
From what I have read other crafters have been able to change the position of skeletons arms and legs by holding them in very hot water and bending them gently before putting them quickly into ice cold water, however I am thinking heat gun (as in stamping and embossing) ..... I need to try it, and if the skeleton melts a bit, it really could add to an idea!
There's a lot of ideas whirling in my head I need to try out ..... and as I have a good supply of skeletons I guess it's going to be a case of watch this space over the next few months once Christmas and the New Year are over. Happy Days.


From what I have read other crafters have been able to change the position of skeletons arms and legs by holding them in very hot water and bending them gently before putting them quickly into ice cold water, however I am thinking heat gun (as in stamping and embossing) ..... I need to try it, and if the skeleton melts a bit, it really could add to an idea!
There's a lot of ideas whirling in my head I need to try out ..... and as I have a good supply of skeletons I guess it's going to be a case of watch this space over the next few months once Christmas and the New Year are over. Happy Days.


