Monday, 25 October 2021

Happy Halloween Marc …….

Sorry, only this one tiny post this week, all my recent projects have been pretty big and have each largely taken up the best part of a week to complete and so I’ve not been able to build up a bank of scheduled posts (something I generally try to do) to tide me over the times I am away  ………

IMG_4072

……because this week I am with Marc at the cottage! It’s probably the last time I’ll see him and Rick now, until goodness knows when in the New Year, so I’ve come armed for Halloween plus two bulging red pillowcases full of Christmas tut, which I’ve told them to put away safe, not to forget and NO peeping ………

IMG_4073

I’m not sure if we’ll be doing any crafting, but I have also bought along another box of wooden Jenga type blocks (they cost me 50p for a box of 57!), so we can at least busy ourselves painting them, while we gossip and Marc inspires me with new ideas etc.  The blocks will then hopefully be ready to turn into more snowman decorations to randomly drop off around Evesham during December.  

And the pumpkin pictures? Well, you know Marc loves anything of a knitted persuasion and we both desperately miss my old colleague, the PE Lady and her knitting, from my school working days, so when I saw these pumpkins in the Cancer Research shop in Worcester (£1 each) I knew exactly who would love one!

Hopefully there’ll be a post next week, if only to tell you what Marc and I got up to, but I also have Iris and Bertie’s traditional Halloween sleepover as soon as I get back, so again it might only be a very short post …….. my apologies again.

Wednesday, 20 October 2021

Guest Crafters – Iris, Her Dad & “Their” School Homework

Iris had to make some sea creatures as part of a school homework project and I thought Tom’s comment on Facebook might make you smile ……

IMG_4218

…….. helping to fill what would otherwise have been a “nothing to post” day.

Picture1

I tell you what, that girl can rock a flat back gem ………..

IMG_4221

As for the dolphins (?) faces ………

IMG_4220IMG_4219

They just make me beam!  And, I wonder who taught her to use two different sized googly eyes for comical effect?  That’s my girl!

Tuesday, 19 October 2021

Mini Christmas Gonk Brooches/Badges

I can’t exactly say I like “gonks”, there’s been a craze, bordering on an obsession for them on one or two of the Facebook store pages I follow that I just don’t get, however when I saw this pack of 4 tree decoration gonks  in Poundstretcher (£3.49 per box) I thought I would get a pack for Marc and I as a joke ………

Poundstretchers Gonk Tree Decorations

Then I got to thinking …….. could I make little brooches/badges with them? They would look so cute on Iris and Bertie’s coats in the run up to Christmas.

Christmas Gonk Badges

No great shakes here, all I did was glue gun (sewing didn’t really work) a 25mm brooch bar finding on the back of the gonks  ……….

Gonk Troll Christmas Brooches

…… and a tiny silver nail art heart on their hats and they were good to go. Needless to say I was back up to Poundstretcher the next day, I wanted to make some more and Marc thought he could make a small, festive something for his “girls” to make them smile.

To “present” them I would simply attach them to a white card square, adding a little doodling round the edges and pop them in a small cello bag....... voila!

Monday, 18 October 2021

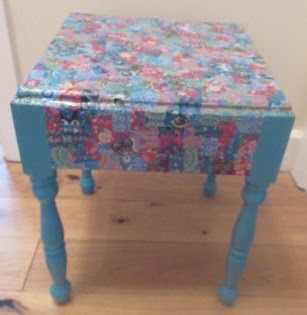
New Decopatch Coffee Table

I have been looking for a small coffee type table for a while now after deciding that I would like to change where I put my Halloween and Christmas tree this year, however I am mean and my budget was no more than £5 - £7 especially after I found my beautiful computer/console table for £3.  I was having no luck at all …….

IMG_3797

….. when low and behold I spotted this, going free outside a house on the school run, well it was a no-brainer, with Iris and Bertie now well versed in Nanny’s strange ways!

IMG_4034

To be honest there was not an awful lot to it.  I simply painted the table all over with the same emulsion paint that I had used on my desk and shelf unit, to give  a sort of symmetry going to the room.  I painted the legs three times, but didn’t bother with the sides and top again as they would be the parts that were going to be Decopatched.  I already had all the Decopatch papers from a while back.

The Decopatching didn’t take that long, perhaps an hour and a half at the most, and as always it felt enormously relaxing.

Then followed goodness knows how many coats on the top, sides and legs of Wilko Quick Drying Clear Gloss Varnish, which really does dry really quickly and then it was done.

It looks pretty good, if I might say so in its new spot and the colours, spookily enough, are more or less the same as my Christmas baubles ……….. happy days!

Tuesday, 12 October 2021

Whimsical Painted Whatnot Stand

I need help ...... having only just recovered from finally finishing my turquoise shelves and finding a small table for free (for my Christmas tree), why do I then go out and get yet piece of furniture for yet another fiddly diddly project ............

Marc will throttle me, because I looked at this little stand twice, and twice left it in the shop for a couple more weeks, only to start thinking about it again before finally deciding that at only £1.99 (I know ......) it was a good buy! 

IMG_3799

When I returned to the charity shop for the third time, I couldn’t see it and thought well, that served you right, but then I saw it had been used to display some shoes …….. but was still for sale, so a considered purchase was made.
IMG_3839

When I got home I immediately started to get to work. I wanted to turn it into something really different and as far out of my comfort zone as I could go.  First I had to dismantle it into a pile of bits which was really easy, but then I realised that this was going to be quite a fiddly project!

IMG_3824

The stand was a really dark faux wood which meant that it needed to be painted white, before I could really add any colour.  I applied two coats of white emulsion.  I guess I should have used a primer, but I was impatient (...... and I didn’t have any!).

IMG_3826

The top shelf had a faux leather insert which made it easy to work out where to place thin strips of black paper all the way around.

IMG_3827IMG_3828

I didn’t want to go down my usual Decopatch route, instead I chose to use patterned papers from these Origami stacks (The Works)  as the paper is quite thin and the colours are bright, although they don’t look it in these pictures.

IMG_3832

Then I went the whole hog, and added the dots, made using a hole punch so that they would all be the same size.

IMG_3830IMG_3833

It was then that I started to wonder where the inspiration for this idea had come from, I must have seen something, somewhere, probably Pinterest, to trigger it all.  I did quite a few Google searches using different words then stumbled upon “whimsical painted furniture” by accident and then it all became clear, that’s what I was trying to “do” in my own way.  Oh my goodness, some is just absolutely stunning …….. would that I had a steady hand to do all the intricate patterns of some examples.

IMG_3836

The bottom shelf didn’t have a differentiated centre like the top, so I just carefully measured and then drew some lines so I could do the same thing all over again, but this time with an orange patterned paper.

IMG_4014

Once this was done I could start on the legs of the stand …….

IMG_3841IMG_3843

……. using black Sharpie pens to do a very rough checkboard pattern on bits here and there. I had to use Sharpie pens as my hands are not steady enough to paint anything as small as this.  

Wilko emulsion tester

I only had a spot of turquoise emulsion paint to start colouring the legs so had to sit back for a day or two while I waited for a selection of brightly coloured tester pots to arrive from Wilko online.

IMG_3962

Using the new set of colours, I began to paint the legs in small sections, making the combinations up as I went along, waiting for each coat to dry.  It took two coats (on top of the two coats of white) to get an even colour.

IMG_3964

I found I was getting more confident and adventurous as I went along, however as I just couldn’t be exact with my line levels, I varied the length of each colour stripe in an effort to hid my failings.  I also found that a black Sharpie pen line also hid the same failings. When all the painting was done there followed another break, as my supply of “juicy” Sharpies ran to a screaming halt ……. so a trip to the shops of Worcester (as a huge treat to myself ensued).

In the meantime I applied two coats of varnish to the spindles as it made using a Sharpie pen on the paintwork a lot easier. However, when the pens arrived things began to go a bit wrong, I over embellished, getting carried away by adding too many doodles, that offered nothing, other than looking  bitty and totally unconnected.

However despite this I decided to carry on and put the stand back together to really access the damage ........


It's not right ..................

......... I am going to live with it for a week or two, as I have other things on the go ..........


......... but then the squiggles, diddles will be covered over with bolder black lines and spaces filled in, which will hopefully fix it ....... if not, it's back to the drawing board!

So two days later ..................


I am so much happier, repainting most of the parts was a pain, but well worth it I think. 


The legs need varnishing again now, but that really helps make the colours pop and it won't take that long using quick drying varnish.

Upcycled Shelves …….. Finally Done!

Oh my goodness me, I never thought this flipping shelving unit would ever get finished, in fact after going off the boil with it, I eventually dragged myself back, only then to think that it would end up in a skip.

IMG_3816

I bought the unit for £30 from a “junk shop” back in June ……… it all started off so well and then I decided to go all fancy by painting sides and back on the inside a different shade of turquoise ……..

IMG_3794

……… but you know I am such an impatient crafter and all the masking off really got on my ample bosom, only to find that I didn’t really like what I had done and only wanted the back board in the paler shade ………. and then, I didn’t want to be bothered!

IMG_3818

Another six or so weeks went by and I had another bash at it, I was on the final furlong, putting the shelves back into the carcass when I found they didn’t fit anymore because of all the layers of paint on the side of them. Let’s just say it got turfed into the bathroom (that I don’t use), a case of out of sight, out of mind.

IMG_3819IMG_3821

However, not to be beaten I treated myself to a mouse sander (always a useful bit of kit), OK, it took me two weeks to use it, but it worked a treat and after only about 40/45 minutes the shelves fit back again without any bother! It’s not the best paint work, but then I know I am always hard on myself. It’s fine and hides the side of the fridge which I hate, I no longer feel I am sitting in the kitchen when I am sat sitting watching the TV.

IMG_3823

At the moment the unit is housing a few of my Halloween bits and bobs, some things I’ve made, like the Halloween truck and the picture frames, some things have come from Poundland over the years and others found in various charity shops …… my latest and currently favourite piece is the plate below, at £2.50, a bit pricey for me ……….

IMG_3822

……. but it just made me smile, it’s so kitsch and Grannyish - Scaredy Cats by Bill Bell for Franklin Mint no less!

IMG_3797

However, I never learn, I have another project on the go now.  I wanted a small table for my Halloween/Christmas tree to go this year, but my absolute limit was £5 …… well imagine how I felt when I saw this fine specimen, for free, outside a house on the school run, well it would have been rude not to avail myself of it!  I am going to do it up to match my upcycled, £3, turquoise Decopatched desk …….. well that’s the theory, just hope it doesn’t take as long as this unit.

Wednesday, 6 October 2021

An inkling Of An Idea For A Christmas Village Wreath

Following on from Monday's wreath ........... when I’d all but finished Marc’s wreath I remembered that I’d got some houses in a little wooden village that I hadn’t used, doh …….. and that set off an inkling of an idea ……….

wreath

https://www.marthastewart.com/1095678/it-makes-village

I’d always liked the idea of a snowy village type wreath like the one above by Martha Stewart ………. what if I used the little wooden buildings on something like that?

The Works Wooden Cristmas Wreath

Then, I also remembered the wooden wreaths they’d had reduced (from £6 to £3) for a couple of months now in The Works that I’d picked up, pondered and then put down again on several occasions ….. they would be perfect for the idea that was manifesting in my brain, but had I left it too late, after all this time had they finally gone?  My heart leapt when I saw they still had them and promptly bought two (perhaps I should have even bought a couple more?)

The Works Wooden Christmas Wreath 1

The next hurdle was whether I could prize (with my best kitchen knife) the pieces of wood that made up the bow off the main body of the wreath …….. I could!

The Works Wooden Christmas Wreath 3

Soooooooo, my idea is to cover the embossed design with a textured white paint and then add little ledges all the way round, made from wooden dominoes and then use the various wooden buildings I have to create little scenes, a bit like the ones I made last year as tree decorations …………. that’s the theory, I don’t think it’s going to be as easy as it is in my head, but we shall see.