Wednesday 29 January 2020

Thank You Marc ........ Just What I Wanted!

Marc sent me two wonderful foodie hampers for Christmas, one was a pretty cardboard one with a magnetic fastening which is now safely put away, housing all my Christmas lights.  The other one was this rather lovely wicker one, which was just what I wanted ...........  
Having just a lounge/diner to work in, it really doesn't take much to make it look like a bomb has hit it and if I start something and don't finish it before I go off on the nursery/school run I don't really like coming home (knackered) to the "mess", but putting everything back before I leave just creates more work and less time to actually craft, if you see what I mean.  So more often than not I don't tend to craft on "work" days ....... but this is hamper is perfect.  I simply put everything I was using away in it ........
...... and put it to the side of my work table for the next day.  After I have finished a project I can then take everything back to my cupboards/drawers in one go to put back (usually at the weekend). Yes, I have used plastic boxes before, but they look too practical and workman like ..... this is decorative and doesn't rub up my sensibilities like a plastic box does ..... I know ....... I can be a bit strange at times!  

Tuesday 28 January 2020

Seaside Bucket and Spade Gift Cards

Iris and Bertie are off to Ladrum Bay in Devon for Easter, it's Bertie's most favourite place in all the whole wide world and I decided to make them a little card each to put their ice-cream money in.
The cards measure 10cms x 7cms and are pre-scored from Papermill Direct (pack of 50 with envelopes, but don't quote me!)  I don't usually gravitate to making this shape or even size of card, but on this occasion they lent themselves perfectly to the Jolees stickers that I must have had for a million years, they are real blast from the past as I started off my card making "career" using them or similar, until they got stupidly expensive online, but hey ho, I have finally used them!
I created the background creating a basic beach scene.  I tore strips of the blue papers to give a ragged white line effect that  looked like waves, which I then accentuated with a white gel pen.
The sentiment was hand written to make it more personal, but if I were to do something similar again, I might perhaps be tempted to use my Dymo label maker.  Goodness knows where the metallic effect seaside embellishments originally came from, another pack of something I have had forever, but when I dug them out they were in perfect proportion to the buckets.  I just love the crab!
The little boats in the distance were from Paperchase, again, in perfect proportion for the scene.  A few doodled seagulls here and there and clusters of three dots, using a black fine liner pen complete the design. Now to find two crisp £5 notes to put in with them! 

Monday 27 January 2020

An Idea For Clear Christmas Baubles

Aghhhhhhhhh, my apologies for bringing you such a stupidly simple project, my mojo is still very much somewhere else at the moment and I find myself only able to come up with the most basic of ideas ....... but I am still valiantly trying to find it and keep the blog going ......  so for today may I present to you my first festive baubles of 2020 ....... I have to be honest, the pictures don't really do the actual baubles justice, they really are an awful lot prettier and ethereal in real life than they look here, in the pictures the wire seems to come to the fore which is such a pity.
I had seen this sort of idea on Pinterest a while ago, a clear bauble with a wire of beads inside, I loved how pretty and delicate they looked, but I could never find the right wire to use .......
....... until I spotted this 5m wired bead garland in my local Salvation Army shop for just £1.50, it was a no brainer, I could finally put the idea into action and it really didn't need any mojo!
I already had a box of medium sized, iridescent, clear baubles from Paperchase from a good few years ago, just waiting for a suitable project.
I simply cut an 80cm length of wire  from the garland and curled it roughly round my fingers to give it a little shape .........
....... before gently feeding it into the bauble, hoping that it would not only distribute itself fairly evenly inside the bauble, but also, being wire, continue to hold it's chosen shape ....... it worked!!
 I can't tell you how chuffed I was ....... simple things!
I have kept a four baubles and about another 160cm of wire aside, just in case inspiration strikes again!

Wednesday 22 January 2020

Vintage Christmas Bauble Charity Shop Finds.

With all my festive charity shop mooching I saw this glass basket for a number of weeks priced at £3, a bit too much for me (cheapskate!) but when it was reduced to £1.50 it was a no brainer, perfect for my grapes!!!
I also picked up a few vintage, glass tree baubles for about £1, I think, in the Oxfam shop in Malvern.  They are so delicate and took me right back to my childhood Christmas's in the 60's!!
I just left them as they were in the basket for the holiday, but this year (Christmas 2020) I am hoping to find a few more to go with them and then either hopefully stumble upon a small bare branch Christmas/Easter tree ....... or cobble together a few twigs, paint them white and then hang said baubles on it as a centrepiece for my dining table.   We shall see ........
I also found me a really long, black wool and cashmere coat for just £10 in Worcester, it's wonderful and perfect for cold, wet the nursery/school runs!
The maker/designers label, for some reason had been cut out, but my sister-in-law, who only ever buys posh and very expensive, took one look at it and said now that's one very, very, very expensive coat!! 

Tuesday 21 January 2020

Iris's Stickman Family

Just before Christmas Iris had to make a stick man as part of her family "Cool Time" (homework), she was really looking forward to doing it but wanted Nanny specifically to help her, she being, in her mind, the lady what has got all the exciting stuff with which to do it!
Well, as you can see one stick man rapidly became a whole family and I will admit to cheating a bit, because we were really meant to go out and gather sticks for the project, but after all the rain we'd had they were really quite sodden and therefore not all that receptive to being glued and embellishmentised...... so I got some Christmas twigs from Wilko instead  ....... Lord forgive me!
However, said gluing still didn't turn out to be as easy a planned with such small, uneven areas to work on, so in the end I opted to use my glue gun, with Iris telling me exactly where she wanted me to blob it and then, after allowing the glue to cool a little, she popped on whatever embellishments she had chosen, rifled from my drawers.
The eyes were first stuck on to a small piece of cardboard as they were impossible to attach to such a narrow piece of twig. The tiny moustache, tie and dickie bow on the gentlemen were stickers from Paperchase, something I seem to have had forever. I also particularly like the way everyone, except Dad, has a strategically place leaf (The Works) to cover their erm, dignity .........
....... and Mum has an acorn cup for a handbag!
I thought that was it until Madam decided she wanted to make a scene for them to stand in ...... so an Amazon box was rescued from the bin and some air dry foam clay put at the back of it to hold a small copse of trees. Iris was in full creative flow now, as was the glue, with more bits and pieces filtched from my drawers to create the very wonderful woodland floor and snowy background.  The acorns have been sat  sitting in a box for two/three years now, collected during a weekend in Dawlish, but I knew one day they would come in useful!
My favourite part has to be the little wooden plaque on which Iris has written "family". A totally priceless and whimsical cold and wet winters afternoon that you can never repeat, but where memories were made. I expect she got a star for her efforts, but just doing it together was worth much, much more ..........

Monday 20 January 2020

Measuring Ruler Birthday Card

This card measures 6ins x 6ins and uses a pre-scored, manufactured card blank from Hobbycraft.
I am not sure about this card, it looks a bit bitty and too spread out for me!  It's a birthday card for my eldest niece, who has just put the deposit down for her first house, so it's all VERY exciting and I wanted to make a card that would reflect the wonderful (??) times to come.
The rulers are from DoCrafts Bare Basics range , they are currently £6.19 for one pack on Amazon (what???), but I got them at a  rock bottom from e-bay, something like £1.99 for 6 packs a while ago now. The wooden Bits and Bobs hearts are from East Of India, bought a million years ago, that have hung on in there among my stash until they eventually got used!
The background paper came a Happy design paper pad from The Works (£1).
Owing to by my current lack of mojo I just set things out very basically on my table and then left it all there to come back to the following day, when I finally decided to use the Dymo label maker to write the sentiment......
........ printing and cutting the words out separately before backing them on to shimmery silver mirror card.
As a finishing touch I added tiny, silver nail art hearts and clusters of three black dots here and there to bring the design all together .......
It's OK, but it's not my finest hour ............ I had such a looooooooooong creative break throughout December and into the start of  January that my mojo is well and truly befuddled ...... and I desperately need it back! 

Wednesday 15 January 2020

Halloween Charity Shop Bargains For Marc

Not to everyone's taste I know, but how I missed these in one of the charity shops in Evesham is a mystery to me. they lady said that they'd had them all over Halloween but hadn't sold very well.
I was very restrained as I wanted to but them all, but in the end I got one pack of each.


Tuesday 14 January 2020

Missing Mojo ........

At the start of the new year I was really hoping to post three times a week, but at the moment I seem to be experiencing a really bad case of apres Christmas crafting mojo fatigue! I spent a whole day cleaning and sorting out my craft drawers and cupboards, putting a whole pile of bits and pieces aside for Bertie's nursery and gradually becoming more and more overwhelmed by the amount of stuff I actually have ...... and by my total lack of inspiration, especially after my really productive high before the holiday!  BUT ......... I know we've all been there!
So, if there's only one fiddle fart post in a week so be it and if it's a bit of a hodge podge of charity shop finds, objects of desire etc. bear with me ...... I know my mojo will be back, what with Valentines Day and Easter ............  when I will be away with two old friends from work, in Italy, in a villa on Lake Lugano with my Victoria Hislop!
A serene scene of the Italian shore of Lake Lugano
However, surrounded by all this stash I have now made it my mission (....... yet again!!) to have a 2020 absolute minimum crafty spend.  I could craft 24 hours a day, 354 days a year and you wouldn't even see a dent in my stuff, yet I still buy more.  There's the initial rush of excitement as something is bagged, but then it's put away when I get home and that's where most things tend to stay.  
Therefore, I am going to do my best to avoid the likes of The Works and Poundland (for crafty things) and be a bit more circumspect in charity shops, going with a list of things I want to look out for ...... I am not sure if it'll work ......... but Lu and I want to go to the US again next year, not sure where exactly, perhaps New England or off the tourist path in Florida.  We have a travel lady who has got our list of specifications and we are waiting to see what she comes up with ........ 
So that's my incentive, do I really need yet another pad of paper patterned, even if it is a real bargain,  when I have at least ten unused ones at home or would I prefer to put the money towards a wonderful  adventure in the US ...... and be happy with taking a few pictures for a heads up type post!  
As for my mojo ........ I just need to spend a little more time on Pinterest looking for inspiration instead of wasting it playing Candy Crush Saga type games!!!  Please bear with me ........... 

Monday 13 January 2020

Re-Sprayed - Re-Vamped Vintage Mirror

Warning, warning ...........
I've been spray painting mirrors again .......aghhhhhhh!
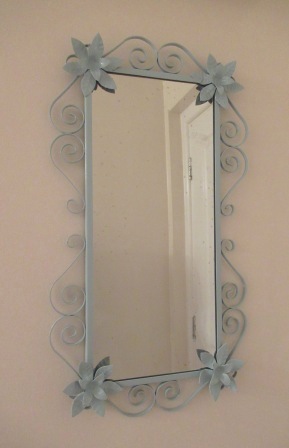
Now, I don't often quibble the price of anything that takes my fancy in a charity shop, but when I saw the state of this retro, metal framed mirror it really wasn't worth the £5 they were asking. The black metal finish (?) was no longer visible, it was to be honest pure rust. However, as I have been looking for this style of mirror to go next to my front door so that I could check that I look presentable before I go out, I wondered if, like the three similar round mirrors in my bedroom, it could be rescued with a coat or two of spray paint.  
I reckon it dates back to the 60'/70's, but although I have seen plenty of round ones and one or two oval ones, this is the first oblong one I have found/seen ..... and as all the other similar mirrors I have in the flat are round, I thought it would be a nice contrast.
When I pointed out the condition to the boss lady of the shop and asked what her "best on it" was, she said £2.50, well at that price I was willing to give it a punt and I carried it off home, pleased as punch, but when I got it home and really looked at it, it was pretty horrific. I suspect originally it may have had gold highlights, it's hard to tell ....... and it took me a good few weeks before finally deciding to tackle it.
I already had two cans of Wilkos pale turquoise spray gloss from when I was experimenting with the mirrors in my bedroom (before deciding the colour wasn't right) plus some leftover white, so  I started by giving the frame three good coats of the white which I hoped would not only cover the majority of black/rust, but also provide an easier colour base for the turquoise to go over, if that makes sense?   It worked!
The mirror itself had also seen betters days and showed some age with a few spots here and there, but that just adds to it's character and again needed a beeping good clean.
The cord on the back of the mirror had also seen better days crumbling in my fingers and the ring fasteners were also well and truly rusted, but the brass and steel fittings were OK, so I just tightened them up and put a new cord through to hang it.  It also became apparent from the other holes in the back that the mirror can be hung either in portrait or landscape, with me opting for portrait for the time being.
After a day of spraying and fiddling the re-vamped mirror hangs resplendent in my hall .....
........ whether the rust will come through given time, who's to know.  I am sort of tempted to add a small jeweled flower from an old necklace to the centre of each of the four flowers, but I don't want to cheapen or over gild it,  so for the moment I am really trying to resist the urge.  It's  sooooooo me and am dead chuffed with how it's turn out  ....... and my patience!