Tuesday 28 April 2020

Sam’s Study

OMG, never have my eyes been so crossed or my fingers so stuck together!
IMG_4968
Please, please, please don’t look at all the strands of glue I’ve left,  I know they need cleaning off, but after putting this tiny cabinet together, I was in no mood to start scrapping them off. I absolutely hated every single minute of making it, but on the other hand I was a little bit chuffed that I had seen it through to the bitter end ……
Sam's Study
I know all the way through this project Sam’s Study is going to be a total love/hate relationship, but I won’t be beat, it just might take a very long time time to complete ……….
IMG_4969
…….. especially when summoning up the courage to go back to an item when it is completely dry to tidy it up ……… all I am saying is aghhhhhhhhhhh

Monday 27 April 2020

Halloween Truck–All The Drawer Fronts Are Completed

Woo hoo hoo, all twenty-four of my Halloween truck drawers are now completed …….
Halloween Truck with Drawers.
…… and despite my initial misgivings, I am well chuffed.
Halloween Drawers.
I coloured the sides and edges of each drawer in black and let them dry properly to prevent any murky fingerprints, before adding the plain background papers as mentioned last week, this time everything came together much better than my first few drawers.
Halloween Drawers
It also came as quite a relief that each drawer front took a fraction of the time that my previous Advent calendar drawers have taken me in the past, it was pretty much wham bam, thank you Mam once I got going.
Spooky Halloween Drawers
Seeing how all now looks has helped me decide, more or less, how to decorate the rest of the truck.  My original idea was to be quite grown up and gothic, but now it’s going to be much cuter, more colourful and child orientated ………..
Halloween Truck with DrawersIMG_4934
…….. using the Halloween patterned papers that didn’t suit the drawers on the roof, back and perhaps the panels on the sides …….. well, that’s the theory anyway, so, again, watch this space!

Thursday 23 April 2020

Using Open Live Writer with Blogger

First of all, my apologies to all total no techies (of which count myself of being one) for this post, but it is a tale of tentative persistence!!!!
images
As you know, until last year I always used Open Live Writer to create my blog posts as it was such an easy program to use, allowing me to size pictures to fit the text and place exactly where I wanted,  as well as adding frames, watermarks and effects to them. Then around March 2019 things went pear shaped, it’s too complicated to go into, but Live Writer was abandoned by its developers, so that when there was a glitch there were no updates to fix it. So when a problem arose with Google pictures, millions of bloggers all over the world were left high and dry, up  the river without a paddle!  At first I kept posting questions on various forums and progress was made when developers on Git Hub took it up, but soon it all got too technical for me and I just gave up!

The future of both Fiddle Fart and Mums Monkey, you may remember, was in the balance, but even though I have always found the Blogger interface a absolute “beeping” nightmare to use, I persevered and after over a year I have just about got into the swing of things, the presentation of both blogs had to change slightly, but I just had to live with it in order to continue.
list of jobs
Then, under lockdown, something made me think about looking at Open Live Writer again, just in case any progress had been made, but girding my loins for whatever frustrations that could bring ……… however after about half an hour of following links I happened upon this post ………..


……. and very, very tentatively decided to download the program it included, which, unbelievably, then opened up my old familiar Open Live Writer editing page, I was now terrified that as I started to put a test post together it was too good to be true as ……. it was! The pictures wouldn’t publish as before, but remembering what I had read many times before, I went into Google pictures and changed the name of every single album I had from Open Live Writer to a random selection of four letters just for speed.  This still didn’t work, I now got a new error code “error:"invalid_grant", Description:"Bad Request", Uri:" ………..

What happened next is a bit of a blur, but after trying to publish again I think I got a Google request to allow access to Fiddle Fart (????)  I was reticent, but went for it …….. OMG it worked, I did several test posts and all went straight to the blog.  I then repeated it, still in a haze, with Mums Monkey, I just don’t believe it, still dont!!!

The only tiny issue I have is that it doesn’t open straight into Blogger as it did before, I now have to open Blogger separately, but the posts are there large as life in the drafts folder and just need scheduling.

How long this will last, goodness only knows ……… but what I do know is that my Open Live Writer editing skills are now a bit rusty, so I need to relearn one or two things, but no way am I grumbling ……… HAPPY DAYS HERE AGAIN.

Wednesday 22 April 2020

Chalk and Cheese

As I have said before, unlike Iris, Bertie just isn't interested in drawing other than drain pipes and writing his name ....... 
...... however, the other day he proudly announced that he had drawn the cylinder in the airing cupboard in his bedroom, including all the wires and pipes!!! This masterpiece was duly mounted for display on the kitchen wall. 
Although he was born four years after Grandy Andy died, Bertie is indeed his Granddad's Grandson, with plumbing undeniably his DNA, bless him!!! 

Tuesday 21 April 2020

Halloween Truck Continued .......

I think you all know me pretty well by now and that if I get frustrated with a project it often takes me an awful lot of effort to return to it ....... and that is so true of my Halloween truck.  I got smudge marks on the fronts of some of the drawers and that was it ........ but now I have bitten the bullet and returned to it.
Although I only had half of the drawers covered I decided I needed to start embellishing these before I went any further so that I could work out which way I was going to go and boy was I glad, in the end that I hadn't covered the rest, because lesson learned, using such highly patterned paper was a BIG mistake!!!!
So ...... the next lot of drawers I cover (for the opposite side of the truck) will be coloured with a black pen first, to prevent smudging and then the fronts covered with plain papers after.
 The original patterned papers, though lovely, just distracted and failed to make the embellishments stand out leaving the drawer fronts in danger of looking a total mish mash, however there was no way I going to start all over again, so I persevered with what I had and I think I may have got away with it, to my satisfaction, at least.

I used a variety of Halloween stickers left over from last year, however I quickly discovered that my favourite  plastic ones let the patterned paper underneath show through, so another lesson learned and another reason for using plain paper on the rest of the drawers.
After a few successful drawer fronts were basically embellished I decided to repeat the designs again, giving me two similar, but not exactly the same designs, for each side of the truck, so that I could get away with the change to plain papers, giving me a half and half mix, which I think should work out OK.

To help break up the pattern round the drawer front edges I used white and/or black pens to go round them, which I think also worked.  I then went over each front with Modge Podge Gloss Lustre to set everything and then when that was dry added googly eyes to any faces, a few 3D stars here and there before applying a good layer of  Ranger Glossy Accents to each embellishment, like the skulls and pumpkins to add extra dimension.
That's as far as I have got, with eleven drawers now completed ...... I am pretty pleased with how they have turned out so am not as disgruntled as I was when I first started, which also means I am pretty eager now to complete the rest of the drawers ........... so watch this space!

Monday 20 April 2020

Star Studded Birthday Card

This card is made using a 6ins x 6ins, pre-scored, manufactured card blank from a Hobbycraft pack.
This card was embarrassingly simple to put together, I know with us being in lockdown I really do have all the time in the world to fiddle fart, but at the moment I just haven't got the spark to get me going.  However, I had two cards to make for April birthdays ....... so I had no choice other than knuckle down.

The paper and self adhesive letters both came from the So Cool Christmas range from Hobbycraft from about two years ago, but I found that they could also work just as well for birthdays.  I am pretty sure that the gold glitter frame was also from Hobbycraft.
I covered the front of the card blank with the star patterned paper and then glued a piece of white card behind the frame before adding the letters and a scattering of tiny silver stars and groups of three dots using a black fine liner pen. Simples, but I wish I had also taken a picture of the bombsite created in my lounge while I was trying to come up with the idea ...... now that's it would tell a very different story!

Thursday 16 April 2020

Clapping For Our Carers ....... And In Particular Someone Very Special.

Tonight I will be outside at 8 o'clock with my saucepan lid and wooden spoon making as much noise as possible to thank all the carers and key workers during this awful time we find ourselves in.
There is one very special young lady who will be very much in my mind and heart, my beautiful niece Emily who is working at the Royal Stoke University Hospital as a Pharmacist.
She is currently working all hours god sends, taking on goodness knows how many extra shifts and then returning home totally exhausted, to start again the next day. I just don't know how these very special, selfless people do it, running into the face of danger, praying that the rest of us are following the direction to stay at home, protecting them from the unthinkable.  
STAY HOME- STAY SAFE - 
PROTECT THE NHS

Wednesday 15 April 2020

London Window Dressing

Please excuse Nigel's "star" appearance in these pictures, but in all my excitement of being in London with Marc just before Christmas (yes, it's taken me this long to get this post sorted) that I forgot to take any proper photos of the window on it's own ....... doh! 
But isn't it just beautiful? I think this must be a "London" thing to dress the outsides of shop windows, and to be honest, in other areas of the country something like this might not last too long.  When I saw it I was just stuck in my tracks ........
........ and if there was a hairdressers in Evesham that went to all this trouble I think I would probably have to be a client!
https://www.victoriahair.co.uk/

Tuesday 14 April 2020

Staying Home - Staying Safe

Faced with another three weeks in lockdown means another three weeks without being able to squeeze Iris and Bertie to an inch of their lives and smell their little heads!!!! I get new pictures and/or a film every day and we also video call, but it still isn't the same, BUT we are all STAYING AT HOME AND STAYING SAFE, and that's all that's really most important at the moment ........
......... BUT I still have my beautiful, beautiful mug, a Christmas present from my sister-in-law Sarah last year .......
........ to cradle in my hands, while enjoying my favourite drink of choice, a Kruger Chai Latte. Each picture tells a story and holds a wonderfully happy memory.
Even after using it every day since I've had it, it still never fails to make me beam from ear to ear and whenever I make a drink ........ again, knowing "my precious babies" are safe and that there are so many more happy days and memories to make in the future.

Monday 13 April 2020

Bertie's Birthday Popcorn Frame.

Young Master Bertie is obsessed with popcorn machines, bless him, so I decided to make him a little picture frame for his birthday, which hopefully "might" last a little longer than a card.
This was a MAHOOOOOOSIVE learning curve for me, because although, once upon a time, I was really adept when using Publisher 2003 to create a lot of my cards, I don't use it that often now, and as such I found that I had forgotten how to do even the most basic of things on it ....... agghhhh ......
....... however, with a great deal of perseverance (and swearing) I finally got there in the end, creating a very basic decoupage sheet using a free image, downloaded from the internet.
I simply cut all the pieces out and then layered them using Poundland foam pads, before adding 3D Pearl Effects (also Poundland) on the popcorn to give it some extra dimension plus Glossy Accents on the popcorn box label.
I then put it in a Poundland shadow type box frame (bought in bulk a little while ago when I realised their crafting potential), on a plain white background.

Adding the real popcorn was an afterthought and to be honest I am not sure if it will last. I am wondering if the grease from it might get absorbed into the card/paper and the whole thing go all yukky, I guess only time will tell.  Perhaps, if I were to repeat the idea, I should consider cutting up polysterene packing pieces instead?

Friday 10 April 2020

Easter Favours

Every year  I usually have a big family Easter lunch followed by an Easter egg hunt and lots of fun and games in the garden, this year, because of lockdown, it will be a very different affair, with just me and Lu. My lovely neighbour Kata and I are planning a little surprise in our communal garden, with, hopefully, a couple of pictures on a quick Easter Sunday post.
However, I decided that the Easter Bunny needed to pop a little something outside my neighbours doors on the big day, before ringing their doorbells on the panel outside the building to let them know they hadn't been forgotten.
No great shakes on the crafty stakes I know, but I wanted to keep any touching to an absolute minimum.  I found the packs of 6 box/baskets in The Range (£1) and just filled them with a few sweets from an Easter selection box (£12) I ordered from an Evesham sweetshop Gummy Gumdrops.  I used latex gloves to transfer the sweets into cello bags that I then put inside the boxes.
Marc gave me a huge box  of Easter chicks when I last saw him in February, so I thought I might as well add one to the top of each box, attaching them with a glue gun. ....... et voila!  I know I have been scrupulous with my hygiene and as I have been at home for over three weeks now I should be virus free, but if the sweeties enclosed aren't actually eaten it doesn't really matter, they were  just a fairing gift  to just say "Happy Easter" ......... we're all in this together, Stay Safe.

Thursday 9 April 2020

Easter Chick Brooches

I was just beginning to get of a few ideas for Easter, when lockdown happened and since then, they and my enthusiasm have all but fizzled out, resulting my doing more or less zilch.
However, while I was rummaging about in my craft drawers I found these wooden Easter chicks that I got from Hobbycraft (pack of 6 for £1) in, what must have been early February so I decided they really ought to have a little moment this year........
As soon as I saw the pack I immediately thought Easter brooches, so I've made one for me and one for Lu, my daughter, who is staying with me through lockdown.  I like the sideways on chicks but the other design, I have to say, are wanting, the paintwork is poor to say the least. but since I've got another year now to go, I am sure I will come up with a way to use them by then.
To make the very simple Easter brooches, I've just added a googly eye and put amber coloured flat back gems over the spots, I resisted adding gold glitter to their crowns.  The brooch backs were attached using super strength glue. I've run out of E6000, but getting any more will just have to wait until things are back to normal, whenever that is!

Wednesday 8 April 2020

Easter Door Wreaths.

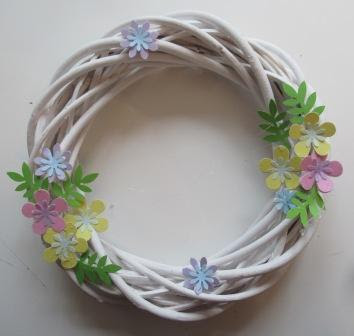
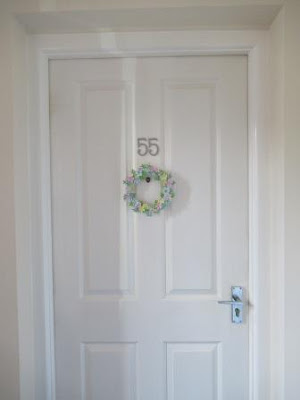
This is my Easter door wreath for this year. I was sure I had put the wreath that I made last year somewhere safe, but for the life of me can't find it, so I decided to make a new one for me and another for my lovely neighbour Kata.  
I used two rattan wreaths from last years Poundland festive collection, bought because I could see that they had more potential than just for Christmas.  
I got out all my assorted flower and leaf punches and decided for swiftness sake the resulting flowers would be best attached to the wreath by using a glue gun.
Initially I thought I wouldn't cover the wreath entirely with flowers and leaves, but then I got carried away, as per usual .......
....... adding more and more, until the rattan was barely visible ........
....... before adding small pearl, clear and amber coloured flat back gems to the centres ........
......... then all that was left to do was fluff everything up and remove all the annoying glue gun threads, et voila!
Later when I made Kata's I decided it would be easier and less fiddly in the long run to add the gems to the flowers before I glued them to the wreath.
I am really pleased with the result, they are certainly are pretty and spring like, but if I was being hyper critical I wished they were just a little bit bigger and more in proportion to the door, but then again that's me! After Easter I am hoping to find a small space where mine can be on show all the year round ..... I'm just not sure where at the moment.

Tuesday 7 April 2020

My Easter Shelves.

It's beginning to look at lot like Easter at The Towers .........
...... I have to admit to being a bit disappointed with the overall effect as, to me it is screaming for  a few more pieces of varying size to add more of a height differential .......
 ...... but I had only just started mooching around the charity and poundshops for some extra bits and pieces that could add to the Easter theme when lockdown hit..........
..........end of that story, but hey ho, we are all safe and sound at home .......
........ and that's all that really counts at the moment ...... but it will give me something to look for when we eventually get back to normal ..........
..........whatever normal will mean by then!