Monday, 9 May 2022

Altered Diorama Tins – Christmas Scene Tin

I’ve had another go at my Christmas tin idea and I have to say they turned out even better than I would ever thought.  I am soooooooo pleased with them, I can’t tell you.

Altered Altoid Tins. Christmas Snowman Diorama Tins

The 20ml tins came from eBay (£7.75 + £1.17 for 12 tins)

Altered Altoid Tin

I started by lining both sides of the open tin with a small print paper, adding a little faux stitching round the edges using a fine tipped, black, permanent pen and then the air dry, paper clay for the snow. I put a little glue behind the “snow”, just in case it shrank in the drying process.

Craft Table In Action

My table was full of all the ready prepared bits and pieces I needed to complete the snowy scene.

Wooden House Embellishments

The houses came from Papermania Bare Basics, however they have since changed the designs in the set I originally bought, but I have had them forever, so I’m not surprised.  I patched over the windows and heart with tiny scraps of red and yellow paper to add and close up the back.

On the front I coloured the houses with a white Posca Pen and then added DecoArt Americana Acrylic Paint Writer to the roofs, chimney and around the bottom.

I can’t remember where I got the small bottle brush trees from (but I need a some more for other Christmas ideas).  I took the bases off the trees and stuck them to the back of the houses (above), to give added dimension and in the process nothing was wasted.  I also trimmed the bristles off the back of the trees, so when glued to the back of the tins they lay flat.  I also added a little glue to the wire end of the trees before I sank them into the snow.

The Works 60 Wooden Heart packThe Works Wooden Hearts

The hearts I found in The Works in their Christmas Sale.  I added the writing, again using a fine tipped, black, permanent pen and then glued a small flat bead on the back, so that they would stand slightly proud in the lid.

IMG_1590

The snowmen are among the last of the ones I bought from Michael’s in New York, four years ago now, I love them.  They hold so many memories, I remember exactly how excited I was when I found them, reduced in the sale, but they have to be used.  

I also added some “Writer” to the snow to add more texture.  The tiny silver heart is a metal nail art decoration.

Christmas Diorama In A Tin Snowman SCeneChristmas Altered Altoid Tin. Christmas Diorama

I decorated the backgrounds with small, nail art snowflakes (eBay) which I also put on the front of the tins around the B-Krafty metal greeting embellishments, along with bigger plastic snowflakes and tiny silver flay back domes.

Christmas Altered Altoid Tin

On the back of the tins I glued a small jewellery bail so that the tin can be hung as a decoration on a Christmas tree.

IMG_1604

In all I completed 10 tins in this session and as I said at the start, I am sooooooo pleased with how they turned out, I felt like a proper crafter!

Christmas Snowman Scene Diorama. Altered Altoid Tin

I have another twelve small tins left, so I think I will use them all up for this idea, especially as I also have enough snowmen and trees to do it too.  I do need a few more houses, but I have found these on The Works website, a pack of 20 for £1, it’s a no brainer.
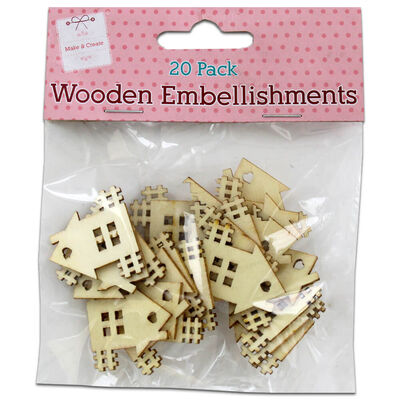
https://www.theworks.co.uk/p/wooden-crafts/wooden-house-embellishments-pack-of-20/5052089316928.html

……. And when the next batch of tins are done, I have these other tins to use up!

Altered Cigar Tin

They are quite a bit bigger, so I am thinking a tin Christmas card decoration, with a similar scene inside, using bigger embellishments and perhaps a verse or two of “Let it Snow” in an old typewriter font on the other side?  Not sure about the front …….. we shall see.

Tuesday, 3 May 2022

My Charity Shop Vintage Turquoise Glass Dressing Table Set

This has got to be one of my most favourite charity shop finds in a long, long time, if ever and it’s definitely a keeper.

Vintage turquoise Dressing Table set

As soon as I entered my favourite charity shop in Evesham I spotted just the colour, sat sitting on the bottom shelf of rather bland and boring, ramshackle collection of glass bits and pieces.  Erm, I do believe that I may have pounced, not unlike a lion on noticing a lone gazelle at the watering hole!

Vintage Turquoise Dressing Table Set.

The set was complete, comprising of a large tray, small trinket tray, two candlesticks, and a large lidded bowl/dish with two further matching, smaller ones…….

IMG_1565

….. all precariously grouped together with a few strands of Sellotape …..

IMG_1563

…… in flawless condition, not a single chip, doink or crack!  It had to be mine, especially given the colour of my boudoir, painted to remind me of the colour of the sea in Greece.

IMG_1564

I have never seen anything this colour before, no even in random, single pieces and as very few complete sets come up on Google/Pinterest, I am guessing that it’s a pretty hard to find colour.

IMG_1562

When I posted it on one of the Facebook charity shop pages I follow someone suggested that it may have been a prize in a Woolworth’s competition? 

Oh, and the price, hidden under one of the pots? £4, £4??!!  As I said this is a keeper, which I intend to bequeath only to someone I know will love it as much as I do on my death bed!

Happy days!

Monday, 2 May 2022

My Painted Decoupaged Charity Shop Chair …….

Sometimes, I loose my momentum or get distracted from a project, as in this case my free charity shop chair obtained late last year in Burnham On Sea.

Decoupage ChairIMG_1518

I started it in December, just before Christmas ………….

IMG_4523

……. and then I did diddly-squat, however by the beginning of April it was really getting on my nerves.

IMG_0088IMG_0091

I’ll be honest, I didn’t really have a plan as to what to do with it.  I already have a turquoise and decopatched desk and coffee table, doing it again would be overkill and a lack of imagination ……. so I thought I would just wing it and see what happened.

painted charity shop chairIMG_1395

I started by painting it in sections with emulsion tester pots from Wilko (£1.50), totally wrong paint with no preparation to the wood, I know, I know!!!!!!

IMG_1492

When several sections were completed (2 or 3 coats) I then varnished them with Wilko quick drying, clear satin varnish so that when I painted an adjoining section any emulsion that  I accidently went over could be easily wiped off.  I suppose there’s a method in my madness (above).

IMG_1494IMG_1503

When the chair was painted I hadn’t a clue what to do next.  I would have then liked to have painted more detailed patterns like I’ve seen on Pinterest, but I knew even my basic painting skills are pretty pants, so I tentatively decided to start using paper strips to add the detail ……. and then things got completely out of hand …….

IMG_1499

…… getting out various paper punches and going absolutely wild.

IMG_1510IMG_1501IMG_1496

It was completely over the top, but the chair was just for me to sit on in my craft room and I liked it.

IMG_1517

When I was down to just covering the last two spindles at the front my mind turned to the seat cover and then decided to throw caution to the wind by ordering half a meter (far too much) of chef’s check, heavy duty, cotton fabric from eBay (about £5.25).  I have never covered a seat before, but I think I did OK using a heavy duty staple gun.

IMG_1518

The last spindles seemed to take the longest time ever and seemed the most fiddley, but finally it was ready to start varnishing, this time with Wilko quick drying, clear glass, I’m still varnishing now, but eager to finally get it posted.  I will just keep going until the finish is as smooth as I think I can get it.  It won’t be perfect but as it’s just for me, who is going to look at it that closely?

Decoupage and Painted ChairDecoupage Chair.

Photographing it has been a nightmare but I think you can just about get an idea of how it looks.

Now, what to do next ………

Tuesday, 26 April 2022

Happy Holiday Charity Shop Shopping and Crafty Finds.

We were only away for a couple of days at Easter but Lu and I still managed to hit the charity shops of Minehead and I was really pleased with the couple of crafty things I managed to pick up.

Extra Large Wooden Jigsaw Pieces - Christmas Crafts

Like this large, 26 piece, wooden Peppa Pig jigsaw for just 75p (there was no box or picture, hence, I think, the price), something that was already on my shopping list, as I wanted to make some more jigsaw gift tags/decorations after realising their crafty potential.

Extra Large Jigsaw Pieces - Christmas Crafts

These really are big, with plenty of wiggle room to perhaps accommodate much larger stickers and/or embellishments than I would generally use.

The Works 6 Pack Festive PuzzlesThe Works Festive Puzzle Pack

However, when I get the time, my first project will be to see if I can come up with a simple but effective way to put one of these festive puzzles that I found in The Works Christmas sale (75p for 6 puzzles) on to a jigsaw piece, to make a novelty gift tag, using a suitably matching patterned paper on the front, then after varnishing both sides adding the puzzle? 

I reckon using twelve of the jigsaw pieces and the twelve puzzles I have, they would work out at 20p a tag, including paper, varnish and a thread to make.

Mason Jar Lid Crafts

I also could not believe it when I found this bag of jar lids for 99p.  I think Lu thought I had finally lost it when I declared excitedly “I’m having these!”, but there was method in my madness. 

Mason Jar Lids Christmas Crafts

I’ve seen several ways of decorating mason jar lids as Christmas tree ornaments (a bit like my cookie cutter idea from a few weeks ago) on Pinterest, but I remember thinking, where on earth would you find just the lids.  Looks like I found my answer.

In all there were 6 large lids and 14 smaller ones, with their respective discs, working out at just 5p each.  I am thinking of Christmas scenes, perhaps using my Tim Holtz village dies, air dry paper clay, mini bottle brush  Christmas trees and perhaps even a small snowman (not unlike my Christmas tins).

IMG_1763

There was also a small collection of plastic lids ……. originally I thought I would just use them as shallow glue pots for Iris and Bertie, but looking at them again, perhaps they also have more potential, so I guess it’s a case of watch this space.

Happy, crafty days!

Monday, 25 April 2022

Jigsaw Shaped Black and White Snowman Tags

From next week and for the next little while, I will only be posting on a Monday, with the occasional "object of desire/mooching/charity shop finds/heads up" on a Tuesday.  I am not ready to hang up my blogging boots up just yet, but sometimes the pressure to post takes the pleasure out of just fiddle farting, for fiddle fartings sake! 

My craft room drawers and cupboards are also really getting on my nerves, I seem to spend most of my time looking for things rather than crafting, so this week will see a concerted effort to get it sorted and if needs be a bit of a cull, although, to be honest, I expect I'll also buy a few more boxes to simply spread things around a bit more!

May is going to be a very busy month, with several weekends away, followed by, fingers crossed,  finally getting to Greece, two and a half years after we first booked, which is why, rather than crafting, I need to have a proper spring clean. I am going to stop eBaying for a while too, so I have unsold bits and pieces that will probably be donated back to the charity shop, as I am feeling rather bogged down.

However, once I am sorted and not feeling quite so cluttered,  I have soooooooooo many ideas I want to try, thinking Halloween and Christmas, which will, in turn, will continue to use up as much stash as possible. I have got so much made already, having made in bulk rather than just a one off item, which has also taken up a lot of my time, but if I keep up this momentum, I am seriously going to look into having a table at the local community centre in November to help sell anything I have that surplus to my own festive needs.

P.S. - I went and did it contacted Craft Fayre people - I am now on their waiting list for Sept  to Dec if there are any vacancies, so I will use the month of July to get things priced and bagged up and put safely away so I am ready to go if I get a call!

But I digress .............

This little project just about uses up the last of the snowman/snowflake sticker packs I stocked up on from One Below before Christmas.

Jigsaw shaped Black and White Snowman Tags

I’ve had the jigsaw pieces for a while now and they also really needed to be used up.

The Works - 2 Wooden Jigsaws - The Craft Place2 Wooden Jigsaws - The Works Crafts

So, I painted them black, using a Wilko tester pot (£1.50), giving them two coats on both sides, followed by the same in Wilko clear, quick drying, satin varnish to prevent any pen used bleeding into the wood.

IMG_1216

When everything was dry, I painted a snowy layer of white paint along the bottom of the jigsaw pieces (also using a Wilko tester pot)

IMG_1224[3]

I then added the snowmen and snowflakes, plus the handwritten “Let It Snow”, faux stitching and doodles using a fine tipped, white Posca pen.

IMG_1227

I also decorated the back to reflect the front. 

Jigsaw Shaped Black and White Snowman Tags.

I decided to drill a hole in the corner of each tag to put a length of red and white butchers twine through and to add a pop of colour ……..

Black and White snowman tags.

…….. then I remembered the small, red, heart shaped, flat back gems I had somewhere, which would be a subtle touch to put between the two snowmen. 

Wooden Jigsaw shaped black and white snowman tags

I was so chuffed with the result!