Tuesday, 24 January 2023

Cabinet Of Curiosities Part 2

I am sooooooooo cross with myself you wouldn’t believe, I got so into my cabinet project that I forgot to take any pictures along the way, in particular the papering process, I kept meaning to do it and then got completely absorbed, what am I like?

IMG_0108IMG_0110

However, after I posted last week I continued to add the tea/coffee stain inside and out until the cabinet was quite dark and almost unrecognisable from the clean and shiny one I started out with, it smelt quite lovely too!

IMG_0180

I was ready to paper the sides, back and door, but when the first four doors were covered, they looked so drab I didn’t think they would entice anyone, especially little ones to look any further, so I decided to opt for some more colourful paper instead …… but then went over them agan with the tea/coffee mix as I still wanted the cabinet to look as if it had some age to it. 

IMG_0181IMG_0183

Next followed layer upon layer of Wilko, quick drying, clear, glossy varnish, including the inside of the doors. I know a satin varnish would have been more subtle but I like shiny! Varnishing the doors was a fiddle and I know I need to do quite a bit of sanding around the edges where a varnish has strayed causing some to stick when opening and closing. I did whizz round the insides with the varnish too, but as it’s not going to show, it was only a quick flick.

IMG_0182

Off and on the varnishing took me three days until I was really happy and this is the stage I am at now.  I need to spend some time sanding now before I can start to embellish.

IMG_0163

I did originally stain the knobs in the tea/coffee mix, but then I thought I would go all out for gold instead, to add a sort of faded splendour to the cabinet, which I may also use on some of the embellishments I am planning to put on the sides of the cabinet and fronts of the doors …….. we shall see……….

Monday, 23 January 2023

Hobbycraft Wooden Christmas Decorations

As I always say, a bargain isn’t a real bargain unless you use them, so with so many new bits and pieces wheedling their way into my stash, I really ought make a start on working my way through them, so my apologises as this is a Christmas related post, so soon after the big day!

IMG_0227

Firstly, I can’t believe how such simple things could take so long to complete, either I am just getting slow or I faff and fiddle a little too much!

Hobbycraft Wooden Christmas DecorationsIMG_0060

I don’t think I originally included these wooden decorations from Hobbycraft in any of my earlier haul posts, but they were reduced from £2 to £1 each.

IMG_0061

I decided to give the decorations a lick of Wilko satin, quick drying varnish to help prevent the risk of any pen used bleeding into the wood.

IMG_0062

It was at this stage I discovered that the layers of the decoration could be separated, something I wasn’t expecting, but a very welcome bonus, making the colouring, glittering etc. much easier.

IMG_0066

The first stage of the decoration was painting the front layer, background trees, snowflake and snowman white and then colouring the house with brown Sharpie pen.

IMG_0177IMG_0178

I covered the windows of the house  over with a tiny patterned yellow paper to add a little more colour to the decoration and give the illusion of a light being on inside the house and then always conscious of what everything looks like from the back, painted over paper scraps white too.

I added snowy details to the front of the house using white Ranger Enamel Accents, a little doodling using a white acrylic paint pen and translucent glitter on the roof. 

IMG_0199

The background trees were glittered with a silver ultra fine glitter, and the Christmas tree at the front with green. The snowman given a hat and scarf using  red and black Sharpie pens …….hmmmmmmm.

IMG_0179

It was time to put the decorations together again, sanding them lightly beforehand because of the added layers of paint.  They were then glued together and put under a 2lb weight to help fix and flatten them.

IMG_0201IMG_0208

At this stage they still looked a little lacklustre, so I added white Tulip Slick around the edges and the bottom for snow, followed by a sprinkling of translucent ultra fine glitter, but the snowman just left me cold, he didn’t look right, so I was going to give his the Ranger Glossy Accents treatment, adding tiny, black, flat back gem eyes and buttons ……… but then ……..

IMG_0210IMG_0211

……. I received a wonderous parcel from my friend Diane and in amongst all the treasure were these resin snowmen ……… they were perfect and seemed to add an air of cosiness to the scene.  They weren’t an exact fit, but I think I’ve made them work.

IMG_0228

I may have then gone overboard in adding the wooden sentiment and poinsettia but  hey ho!

IMG_0231

Although seemingly simple, they were on my desk for a whole week ……

IMG_0229IMG_0230

……. as I constantly seemed to be waiting for something to dry ………..

IMG_0232IMG_0233

They certainly feel and look more substantial and not  as naïve as they originally were. I am not 100% with them at the moment, but they are now put away safe until November, when no doubt, my opinion of them will probably have softened.

Tuesday, 17 January 2023

Keyrings And Fridge Magnets - Guest Crafters – Iris And Bertie

The idea for these keyrings and fridge magnets has been in my head since the summer, it just didn’t come together properly until the very last moment before Christmas when I wanted to make some small presents for Iris and Bertie to give the special people in their lives.

IMG_1697

They feature pictures drawn by the dynamic duo earlier on in the year of themselves and Granny and Granddad that were just too cute not to find a way of using them to keep us all smiling throughout the year(s) to come.

298220341_3179815779002712_5874502394393657164_n297830244_3179815825669374_1271908224548647363_nDo not delete  - Copy

The 7cm x 5cm blank plastic magnets originally came in a tin of 20+ for just £1.99 from an Evesham charity shop.

IMG_1694

Judging from the other tins and their contents they had, someone had been having a bit of a craft room sort out.

The Works 12 Pack KeyringsIMG_1695

The keyrings came from The Works, a pack of 12 for £3.

IMG_1693

I started off by resizing the scanned drawings to fit the magnets and keyrings using my ancient copy of Publisher 2003.  It was a bit of a fiddle fart but despite my trepidation I got the measurements pretty bang on, so I didn’t have to go back to make any adjustments after the first sheets were printed off, woooo hoooo!

IMG_1696

All that was left to do then was cut out the pictures and fit them into the frames, putting two pictures back to back in the keyrings so that there was a picture visible from both sides.

IMG_1698IMG_1699

No great shakes craft wise I know, but a way of ensuring that a little bit of Iris and Bertie is always with us.  Happy days ………

Monday, 16 January 2023

A Long Term Project – A Cabinet Of Curiosities -

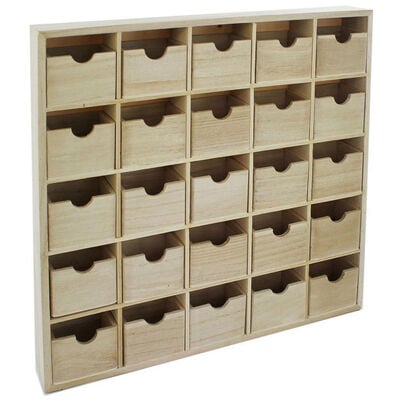
As I love a bargain, I was so excited to find the wooden Advent houses  in The Works had been reduced from £15 to £4, especially when one (I bought two) just cost me 25p, as I already had £3.75 on my loyalty card, but when I got home I knew I had to do something with one of them, at least, pretty quickly to justify the splurge and the space they were taking up. A crafty bargain is only a bargain if you use or do something with it!

IMG_0058IMG_0073

However, I wasn’t sure that I wanted to go down the Christmas route with either of them, so my initial thought was to try to put a Cabinet of Curiosities together with each door opening on to a scene or random, but interesting collection of little tranklements that I always seem to pick up in various Charity Shops, but often get lost on my normal shelves.

IMG_0092IMG_0091

Soooooooooo I did some mooching on Pinterest, saved a few ideas …….. and a nugget of a long term project was born. 

I wanted the outside to look a bit sort of antiquey, worn and old fashioned, so the first job was mix a concoction of tea and coffee and a bit of paint to use to stain the wood. I’m not sure how long it is going to take to darken in multiple layers to my taste, but I’m sure I’ll get there by next week!  I also decided to wash over the back of the doors and the insides of each compartment while I decided how I might line them, but that stage might be a while off yet.

   IMG_0072IMG_0093

I removed all the knobs, no mean feat, with some of the surface wood splitting, but as the doors will be covered anyway with various papers it didn’t really matter.  Said knobs were then soaked in the tea/coffee/paint concoction to age them too. This also helped to soften and remove the glue that had originally been used to fix them.

IMG_0086IMG_0089

I’m planning on using some of the papers above to cover the sides of the cabinet, doors and possibly to line some of the compartments.  I might also try to age them with the tea/coffee mix, before using a quick drying satin varnish to help seal everything, but again this might be a little way along the track.

IMG_0090

I’m excited! My other mission now is to find all the curiosities to go inside, which is going to take time. I have a few bits already, but no charity 10p box etc. is going to go unscoured for tiny treasure, as I allow my usual obsession for getting things in proportion to fly out of the window, for once, scale just doesn’t matter.  I can see it all in my minds eye, but it’s hard to explain.

When finished I hope the cabinet will be a bit of an heirloom piece for Iris and Bertie, with each door opening to reveal a magical display which will be filed with awe and wonder……..  well, that’s the plan anyway!

Wednesday, 11 January 2023

What’s A Girl To Do?

OMG ……… what’s a girl to do ……….?

IMG_0058

Even the ladies in the shop were shocked to see how low these advent calendars had been reduced to, four flipping pounds, that’s less than a posh coffee and a slice of lemon drizzle any day of the week! Well, it would have been rude not too wouldn’t it? Sooooooooooo, I bought 2, I know, I know, but one was only 25p as I had £3.75 on my Works loyalty Card, what am I like?  I am already thinking of a couple of cabinets of delight?????? I just need to get cracking!

The other plainer advent calendar drawers are now reduced from £18 to £13 online but £8 in the shop!  I did however manage to resist this time, mainly because I have one set already to do something wit in time, but nevertheless, what a bargain!

Tuesday, 10 January 2023

A New Tradition?

I wish I’d started doing this with Iris and Bertie before, but as they loved doing it so much, especially Iris, it’s something we’re definitely going to continue in the future.

IMG_0041

Iris and Bertie chose the “best” tree along the path in the school grounds and then decorated it with the wooden peg decorations I made in the run up to Christmas and despite being outside for at least six weeks, in all sorts of weather, including snow, they have stood the test of time really well with none falling apart. 

IMG_0955

A week later we added a whole pile of silver, glittery icicles, found in a charity shop for, I think, £1.99.  We were going to add some glitter snowflakes the following week, in the the last week of term but unfortunately the snow set in and put paid to that idea.

IMG_0042IMG_0043

Unfortunately the pictures don’t do the tree justice, it did look really pretty.

Inspired, Iris now wants to decorate the tree throughout the year (????)  starting with Valentines Day, when we’ll decorate it with red hearts at the start of February, so my mission, should I wish to accept it, is to scour the charity shops and sales for heart baubles etc., followed then by bits and pieces for Easter six or so weeks later ……….. fingers crossed I can find all they things we need.