Friday, 19 October 2012

Jewelled Mirror

I don’t often make things for myself, but this is ALL for me ….. and my Lady Boudoir!!!
Jewelled MirrorDo remember the jewelled mirror I saw in Accessorize in Exeter in April this year? Well I never forgot it and Marc and I often talked about the idea and other ideas he had used to make similar mirrors using all sorts of things, other than jewellery.
043The whole thing took me about five nights to complete over a couple of weeks using an old mirror which measures approx. 23ins x 23ins, that I’ve had for at least twenty five years and has been on almost every wall in the house!
Bejewelled Mirror starting pointTo cover it I’ve used up all my old unwanted jewellery, flat backed gems, charms, beads etc. anything that glittered was bunged on, plus a few new bits from Primark and Claire’s that I needed to fill in the last few gaps … so I guess it’s cost me £20 to complete, plus a tube of E6000 glue, as recommended by Marc.
Bejewelled mirror work in progress.I have to admit I had a love hate relationship with the mirror all the way through until the very last evening, which is why I kept on leaving it and then going back to it ……
Jewelled Mirror CraftsIt wasn’t pretty enough, the bits didn’t look right together, it looked messy  …..and then I got irritated by having really gluey fingers!
Bejewelled Mirror.But the last lot of frippery that I bought especially, including six Primark stretch bracelets and three daisy chain necklaces from Claire’s sale …..….. especially the  metal daisies, that are the only “jewels” that I have scattered all round the mirror that seemed to bring everything together.Jewelled Mirror..It was on the final night of gluing and sticking that I could see that it was going to be even more beautiful than I had imagined and then I got obsessed by filling in the tiniest space with small pearl beads or tiny gem …..  less was definitely not more as far as I was concerned!  And now, I have my fairy mirror …….. even if I don’t exactly see a fairy looking back at me ….. I shall always feel like a fairy when I look at it!!!!!

Friday, 12 October 2012

Tom and Laura’s Engagement Card

Monkey Engagement CardThis is the engagement card I made for my son Tom and the Lovely Laura, it’s a good job that they are just as monkey mad as me!
Monkey Engagement Card.I’ve taken a photo from my other blog and just embellished it with micro fine glitter, which has to be one of my “Top 10 Can’t Do Without”  products and various heart shaped stickers from my vast collection.
Engagement Card MonkeyI handwrote the sentiments and also added a little gold pen to parts of  the champagne bottle.  Done and liberally micro glitter dusted!

Friday, 5 October 2012

Save The Day Calendar Cards for Tom and The Lovely Laura’s Wedding

Save the date wedding calendar card(above) My first efforts in trying to put an idea together….
Did I mention that my son and the Lovely Laura got engaged a few weeks back?  It was the most wonderful news the family could have asked for as we all love Laura so much …. and I couldn’t wish for a more wonderful “new” daughter.
Genius at work(above) Aghhhh, a pile of rejects, mistakes and not quite right efforts trying to get the idea in my head to come together!
The wedding will be in August next year …. and I wasn’t sure if my crafty services would be needed …. but guess what ….. ???!!!  So please accept my apologises now, for I fear you may all get heartily sick of the constant wedding theme that will no doubt be running through this blog in the few coming months!
Calendar Save The Date.Calendar Save The Date Card
So, it’s going to be a lovely colourful rainbow of a day, “very them” …. and as we were talking Laura told me that when she last visited the hotel where the wedding and reception is going to be, there was beautiful bunting hanging in the courtyard for another wedding, which she loved  ….. and that gave me the idea for the “Save the Date” cards……
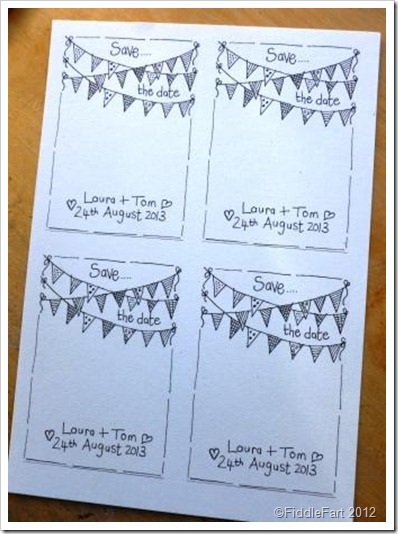
Save The Date Calendar Wedding…… which in the end I decided to doodle, to give them a proper homemade/handcrafted style ….. but you will not believe how hard it was getting the bunting “just so” was!  I drew it all in pencil first, but as soon as I went near it with an fine liner pen I would put a line in the wrong place and as a perfectionist had to do it all over again! Once happy with the final result, I scanned the base and calendar parts to make jpegs that could be copied and pasted onto A4 sheets (using Publisher)  and then printed,  cut out and finally the cards put together.
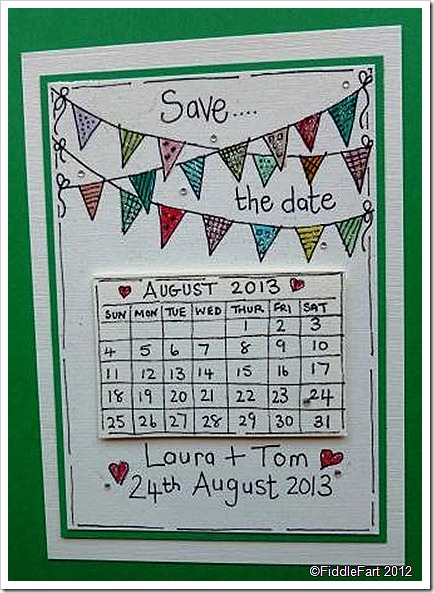
Wedding Save The Date CalendarAnd here’s what the final cards will look like …. (though I wished I hadn’t photographed it on a green background!)  I have mat and layered the base card on green for this example as Laura is toying with an emerald green dress …. but I think I may vary this with colours taken from the bunting.   The calendar is fixed in place with an adhesive foam pad for extra dimension. The bunting will be coloured in with Promarkers and sprinkled with Hunkydory Diamond Sparkles ultra fine glitter when I begin my production line.  The finishing touches will be made with a few tiny clear flat backed gems scattered here and there, there is one on the date, but it doesn’t show up too well, so that will be changed to a coloured one.   I will then attach a strip of magnetic tape to the back, so that it can be put on a fridge etc. to remind the guests  to “save the date”!
I hope I have ordered enough of the ivory linen effect card for all the stationary from papermilldirect, prices have gone up, as have so many things. When I first started cardmaking seriously P & P used to be free if you spent over a certain amount, which is why I used to order two Mega Boxes at a time to last me a year or so, I can’t afford to do that now,  however their ivory and white linen effect card still remain my favourite card with which to make all my card blanks.

Friday, 28 September 2012

A Change In Blogging ….

waterlily
I only have eight scheduled posts left to blog, but, rather than come to an abrupt and final end, I have decided to post on Fridays only to see how it goes.  I have to be truthful and say that I really don’t have the enthusiasm or fire to craft or blog any more, but by posting on a weekly basis I am hoping that it will afford me the time to see if my momentum does come back.  I started blogging on 20th August 2009, and have written 1,396 posts and not missed one day! (and the same goes for Mums Monkey)  I had been mulling over the thought of stopping on 1st January 2013 anyway, leaving the blog “live” and the ideas floating about in the ether forever, but, I just wasn’t expecting the bite on the bum I received four months ago.
compressed poppiesBUT as and when and if the ideas start coming rest assured they will still get posted if somewhat spread apart. 
compressedI hope to continue writing Mums Monkey …. those boys have really kept me sane (!?!?) over the summer, by making me find a funny, quirky or poignant angle on the most ordinary things/occasions in my/their life …. so I hope you will continue to read their adventures …. because their adventures are mine too.
036Let’s just see how things pan out ……..

Thursday, 27 September 2012

21st Birthday Newspaper Card

This card is A5 in size and is made using white linen effect card …… and was still wet when I took the photos!!!!
Newspaper Card Aston Villa
The brief for this card was Patrick, 21, Aston Villa, and his cat Bella amongst other things, so I think I ticked a few boxes.
009
I tried to match the main colours of the Aston Villa strip to other sections of the card …..
010
……. and work in a message from the cat!
Aston Villa Newspaper card
I put very simple decoupage layers on my newspaper cards to add texture and definition and then add a touch of Ranger Glossy Accents to highlight them further.
Newspaper Card

This is what the “bones” of my A4 sheet of      card look  like after I have printed it,  having already designed it in Publisher and then copied and pasted the sections I want to make the decoupage layers with.

Wednesday, 26 September 2012

Punched Art Christmas Rockin Robin/Elizabeth Shaw Mint Crip Novelty

Punched Art Christmas Robin
I am being very lazy again, using more pictures than words for this post,  but hope you can still get the gist of how I have put this paper punched Christmas robin together …..
Stampin' Up Circle Punch
These are the two punches I used ….
Punched Art Christmas Robin
….. and these are the punched parts I have used to put “Robin” together …… not a lot to him really!
005
In the top picture I’ve just popped him on a makeshift background to show how he would look on a Christmas card…. but  he would make an excellent embellishment for an Elizabeth Shaw Mint Crisp…. ……… by just adding a matching plain brown circle on the back!

Tuesday, 25 September 2012

Christmas Parcel Tags–Trying To Be Good!

Christmas Parcel Tags CraftsI know there are going to be some very tempting new Christmas goodies in the shops very soon, but I know I need to resist …. I have got enough crafty bits and pieces to last for the next hundred Christmas’s …. so I really do need to use them up first …. but to be honest I know at some stage, a moment of weakness will envelope me and things will just slip into my basket!
Christmas Parcel Tags
….. And with all these good intentions in my mind ………I’ve made some  gift tags using felt parcels and clear flat backed gems  from Hobbycraft , kraft card and red string from Traidcraft,  all bought several years ago and all  needing to be used up, the parcels in particular.
Kraft Christmas Parcel tags CraftsThey took a matter of minutes to make.  I am going to put them on parcels wrapped in my all time favourite brown paper which is always so versatile and so easy to match with ribbons etc..

Monday, 24 September 2012

Bejewelled Lizard Canvas

Jewelled Lizard CanvasI’m not a lizardy sort of person, but I found this die cut lizard amongst all my bits and pieces and wondered if I could do something with it of an artistic type nature …
jewelled lizardI first glued it on a 5ins x 5ins canvas as the card was too flimsy to support the hundreds of flat backed gems I decided to stick onto it, using Ranger Glossy Accents as a glue.
008
As I said …. it’s not really my sort of thing so I am not sure what I am going to do with it now its finished!

Sunday, 23 September 2012

Cards Using Foil Stickers

Foil Flower Stickers 2
Both these cards are made using ribbed effect Kraft card, and part of a text patterned 12 x 12 paper, mat and layered on purple mirror card.
Foil Flower Stickers
The stickers are raised foil with flat backed gems and cost £1a pack from a funny little discount store I found in Brixham when on holiday last year, needless to say, I bought several packs!
Craft Stickers

Saturday, 22 September 2012

Guest Crafter For The Day …… Ren

renThis gorgeous little girl is my friend’s daughter Ren. I sent her a bag of crafty bits and pieces after I had a “grande” tidy up day and here she is posting her “Thank You” card for me …… couldn’t you just eat her up?  You will notice she is also wearing a gorgeous bracelet “designed and handcrafted” by herself, made with some of the wooden beads that I’d put in her goodie bag.
card from RenAnd this her card, giving me a mahooooosive run for my money …. the front is beautiful and stunning  enough, each embellishment carefully chosen and placed with so much care ….. but it’s the inside that made me squeal …..
Thank You Card from RenOh my life …. I love it sooooo much.  It’s now on the window sill in my craft room where I can look at it as I work …. and be inspired!  THANK YOU REN for my card and THANK YOU FOR BEING MY STAR GUEST CRAFTER OF THE DAY!!!

Friday, 21 September 2012

Penguin Christmas Tags

These tags were made using children’s covered wooden dominoes and measure 7.5cm x 3.5cm.
Penguin Tags
My mum was thrilled when she found me these penguin buttons way back in January, but rather than put them away until near Christmas I made these tags within days of getting them.  They have been waiting a long time to be used, but guess whose Christmas present they will be going on?

Thursday, 20 September 2012

Halloween–Mini Printers Tray

I love these little trays, they are the packaging for small wooden embellishments and I have featured projects using them before, and when I had used all I had Sam came to the rescue and sent me a some more, “Thank You” Sam!Halloween Mini Printers TrayAll I have done is colour the edges and sides with a black ProMarker pen
Halloween Printers Tar… and then lined each compartment with paper in Halloween colours in orange, purple and green.
Halloween Printers Tray..The fun bit is putting all the little embellishments together…..
Halloween Printers Tray.…. which takes quite a while to gather up
Printers Tray for Halloween…. and to find a spot for …. but it’s always such fun!

Wednesday, 19 September 2012

My Stampin’ Up Owl Punch

This little item has been on my object of desire list for quite a while, I have seen so many ideas for using it on Google that this little beauty just had to be mine.
Stampin Up Owl PunchI haven’t seen my mate Lisa, who among many things is a Stampin’ Up demonstrator for months and it was a perfect excuse to get her round for a natter if I ordered it from her (£15.50)
Stampin Up Owl punchI did this dogs face ever so quickly just to illustrate this post, but you can see just how versatile the basic owl body is, I have seen it used to make ghosts, penguins and reindeer faces … so watch this space. I am sure that after I have copied a couple of ideas I have seen my feeble brain will come up with a few ideas of its own!
Stampin Up Autumn Winter CatalogueLisa also bought me a sneaky Autumn/Winter catalogue! As you know I am not the most competent stamper, but it’s worth having a look for just for the ideas. Lisa is starting up a couple of Stampin Up’ classes in the Wolverhampton area in the next couple of months and I said I will join in and be a willing pupil.  When I have more information about places and times I will let you know just in case anyone else would be interested but in the mean time there is some information on Lisa’s Stampin’ Up blog.

Tuesday, 18 September 2012

Halloween Ghostie Lollipops

Halloween CraftsIn the parcel from Dianne in Florida that I featured a couple of weeks ago was this glorious Ghost Sucker (!!!) Wrap Kit … and it was one of the first things I played with.
Halloween Ghost Lolly suckerIt took me three attempts to find the perfect lollies to make the perfect ghosts …. mini chuppa chups
Halloween Ghost lollipop suckerI am so pleased with the way they have turned out, the only thing I did changed from the instructions was to secure the ghosts head with a bit of cotton thread first so it would be easier to get the ribbon tied just right. Wooooo woooooo woooooo!!