Tuesday, 19 November 2013

Let It Snow Glass Bauble Card

This card measures 3.25ins x 7ins and is made using a hand cut white linen effect card blank.
Let it snow glass bauble cardI made this card way back in August, and it's been waiting for it's "Grand Unveiling" ever since!!!!
Let it snow glass bauble card. 2I stamped the snowman using a small Anita’s stamp (sorry no serial number) and then built a little scene around him using a Pastel Blue Promarker pen, a white gel pen to do some tiny snowflakes and a sprinkling of Hunkydory Sparkling Diamonds.  Then I applied a thin layer of Ranger Glossy Accents on the back of  a 1in glass cabochon that I got from a company in China a few years back,  carefully centring  it over the image and then leaving it to dry overnight.
Let it snow glass bauble card. 3
When the “bauble” was dry I carefully cut round the edges and then cut a thin piece of blue card and layered it on silver mirror card.  I found the centre of the card and drew a line down the middle, sticking another piece of mirror card at the bottom for the top of the bauble followed by a dollop of PVA glue to the back of the bauble to stick it down.
Let it snow glass bauble card. 4.
All that was needed then was a doodled bow and a bit of “fiddlefart” writing … very less is more …. and if I say so myself … I love it!

Monday, 18 November 2013

My Bejewelled Christmas Tree

You know when you have a crafty idea,  but you can’t find what you need to make it and then you almost give up? 
Dunelm Illuminated Christmas Tree, bejewelled christmas treeWell,  that was me.  Originally I was looking for some more of the small branched table Christmas trees I had from Poundland last year to hang all the gorgeous beads I got from WholePort, but I scoured every shop in town (and out) and just couldn’t find any!
Wholeport BeadsThen while I was in Dunelm …. just about to pay for my “faux mink throw”, I spied this illuminated tree for just £4.99 from across the checkout, it wasn’t quite an Ulrika moment but ……
Dunelm illuminated Christamas Tree…… as didn’t look that special, and I wasn’t really that sure about it,  but when I looked at it up close, I wondered if I could attach the beads to it somehow  ….. perhaps with jump rings?  So, despite my reservations I decided to risk my ill-gotten £4.99!!
Wholeport pearl beadsI am soooooo glad I did, it looks gorgeous all bejewelled, if I might say so myself, tasteful and elegant ….. very suitable for my festive lounge!!!  Admittedly my fingers are a little sore at the moment as I don’t have a clue how to use the tweezery things I have in my drawer properly, so I admit I opened and closed the rings with my said fingers!!!
WholePort beads. bejewelled Christmas tree. Dunelm Mill Christmas treeBejewelled Christmas Tree. Dunelm illuminated Christmas tree
But, it was sooooooo worth it!

Sunday, 17 November 2013

A Cracker Of A Workshop With Kirsty Wiseman at Domino Crafts

Domino CraftsYesterday I went to a craft workshop at Domino Crafts in Wolverhampton, lead by Kirsty Wiseman.  I have always loved Kirsty’s blog, photography and everything she creates, card wise.  I remember once going absolutely crazy about making flowers using a roll of bandage after seeing the idea on Kirsty’s blog http://limegreenbogiegirl.blogspot.co.uk/
1452560_614700501905702_2065414172_nSo to meet her in person was just too brilliant!  She was lovely, friendly, bouncy and looked fantastic after losing at least 2 and a half stones …. after cutting out carbs …. so not only did she inspire me craft wise, she also inspired me think about trying to lose some weight (again!!!!!), especially when I had to crop my tum and hips out of the photo below!!!!
Kirsty Wiseman and MeWe made a cracker using Stix2 products, http://www.stix2.co.uk/ plus a die (the make and name escape me) to make the cracker wrap, very simple but so relaxing.
Stix2.The most exciting part was Kirsty showing us how to use a glue gun to make cabochons/pearls, I have a glue gun, but now need to get some glue sticks to practice. When Kirsty showed us how to colour a circle of hardened glue with Mica powder ….. OMG …. it was magically transformed!  I admit there are some mediums I know about, but have shied away from, and it’s days like this that inspire and give you confidence to try these new materials.
Stix2Kirsty also bought some cards along that used the technique and that she kindly allowed me to photo.
Kirsty Wiseman Christmas TreeThis tree is absolutely adorable using http://www.stix2.co.uk/christmas-tree-with-star-greenKirsty Wiseman I'm Dreaming CardAnd this Christmas wreath doesn’t use Candi, as I first thought but dots made with a glue gun and then finished with microbeads, white Micra powder and transfer foils, gorgeous!
Kirsty Wiseman Christmas Jumper CardKirsty Wiseman Workshop
And as for the jumper stamp used in these cards  …… again I’m sorry I don’t know the maker, but it’s soooooooo cute and I can think of so many cards it could be used on, especially with Christmas jumpers everywhere this year.
Kisrty Wiseman CardsAs I said a brilliant afternoon which saw me leaving Domino’s several pounds lighter ……. as I found some very unusual and lovely embroidered ric rac braid and eight bottles of ultra fine glitter, since Marc has re-ignited my interest in using it.  If you are ever anywhere near it’s worth popping in and having a good mooch …..

Saturday, 16 November 2013

Nordic Style Christmas Cards

These cards each measure 5ins x 5 ins and are made using hand cut Kraft card blanks.
Nordic heart CardThese are the cards I made using the felt Nordic style Christmas decorations (although it does say wooden on the packets!) I found in Poundworld (they have wooden ones just the same in Poundland).
Poundland Christmas decorations woodenfelt_thumb[9]They are very much, “less is more”, the sort of card I would like to receive.
Nordic Star CardRemoving the bows was a little hit and miss, some came off easier than others,  but I think I have managed to cover up the original hole for the hanging thread with a strategically placed pearl pretty well.
Red Nordic Tree Christmas Card

Friday, 15 November 2013

Wonderful, Wonderful Times With Marc – Marc’s Sizzix Pop Up Christmas Card

Cuttlebug three kings embossing folder follow that starThis is one of Marc’s 2013 Christmas cards.  I can’t give you any detailed instructions as to how he made it,  but hope the pictures coupled with a few comments here and there from me will paint the picture for you.
The base of the card is made using a Sizzix pop up card die
http://www.sizzix.co.uk/product/658048/sizzix-pop-n-cuts-magnetic-insert-die-star-3-d-pop-up
Sizzix-Pop-N-Cuts-Magnetic-Insert-Die-Star-3-D-cut-at-home-635728-8919aAnd embossed using the Cuttlebug Three Kings embossing folder:-http://www.amazon.co.uk/Cricut-Cuttlebug-Three-Embossing-Folder/dp/B006RK4PFI
Cuttlebug Three Kings FolderThe inside is equally stunning and detailed, Marc used a Darice 4.23” x 5.75” Embossing Folder – Stars Code: DEF-1218-63
follow that star card sizzix and cuttlebug diesI think Marc encountered a few problems when fitting the silver embossed inside involving quite a bit of trimming that he hadn’t expected, as it slightly overlapped the outside of the card, which it shouldn’t have done …..
sizzix star card dieMy only claim to fame on this project was the band that goes round the card, an idea I think I may need to copy for some of my cards ….. I printed bands, about 3/4 in deep in Landscape (in Word) using Papyrus font size 20 ….. Marc then cut them out, glued the end together and added a few tiny peel offs. A band is such a special touch on any card
Follow that .... Cuttlebug embossing folder ChristmasThe back of the card is equally as detailed.
Follow that star die cut card sizzix cuttlebugStunning and such a lot of work …… can you believe Marc made of 100 of them, he is so much more patient than I am!.  If I have left anything out or Marc has anything to add I am sure he will in the comments box, which I will then add to this post to help further.

Wednesday, 13 November 2013

Wonderful, Wonderful Times With Marc– My ThermoMorph Face

This isn’t a project,  just an idea after I started musing at Marc’s!  I took the remains of the ThermoMorph that I was asked to review a couple of weeks ago for Marc to play with, I wasn’t entirely convinced of it’s potential for me “personally” as a crafter, but I thought Marc might be able to come up with an ingenious use for it.
ThermoMorph can be re-used over and over again if an idea doesn’t work out and I had forgotten I had put some “failed” faces I had moulded back in the pot, so when we opened it again there they were.
mould_thumb5Anyway, Marc had awakened my interest in micro glitter when he had got out his mahoooosive collection to cover these Scottie dogs to use on tags and cards, he must have every colour under the sun  …..
Glittered die cut scottie dogs …… and I started to play with the face, first adding red glitter to the lips, then a thin line of blue to the eyes, followed by eyebrows and a blush to the cheeks using Promarker pens.
Thermomorph FaceThe cold, white waxiness of the ThermoMorph gave the face an haunted/ethereal look which all came together when I added a black background and doodled hair with a white gel pen.  perhaps this is an idea I will come back to in time.
And while I am on the subject of ThermoMorph you just have to have a look what Nicky made with hers, …… a snowman kit and Marc if you see this can you make me a set!!!!
And while you are looking,  have a look at this post too, I got the mould from Poundland too to use with my ThermoMorph but unlike Nicky never actually got round to doing anything with it …… doh!!!

Monday, 11 November 2013

Wooden Advent House No. 2

Advent House. Wooden. tescoI must be a glutton for punishment, because yesterday morning while listening to the omnibus edition of The Archers I finally finished a second Advent House, as an early Christmas present for my sister-in-law who has been so unbelievably golden to me over the last eighteen months. I wanted to make her something special, that perhaps will become an heirloom her children will fight over!!!!!!
002I now have one last Tesco house left …. and that will be for Tom’s and Laura’s next year, and Lucy will be given my original one.  Anyway I digress …. I decided to use HobbyCraft Christmas 12 x 12 canvas sheets on this house, thinking it would be different to use a textured “paper” and it would save me all the varnishing!!
Altered Advent House. craft Advent House. Advent HouseI kept to my basic design, using the same Hobbycraft Advent numbers as I used on the one for Jacob, but I had to source a lot of new stuff, like new snowmen (Craft For Christmas from eBay), some sparkly gift wrap (from Bulters) which should prove far more economical for other Christmas projects too, for the snow as I had absolutely no A4 white glitter card left………..
Advent House TescoAltered Advent House. Wooden Advent House. Christmas Advent House. Heirloom Advent House.
….. plus some silver corner and small dot peel offs and some green and gold trim from the market (£1.50 a yard) …… oh and two of the snowflakes I got from the charity shop earlier in the week glued together with a flat back gem in the centre, at the top of the roof.
Altered Wooden Advent House. Christmas 2013Wooden Advent House. Craft. Tesco. Altered Adevnet House
I think I fiddle farted with this house far more than I did with the other three I have made …. every time I thought that is it, I found somewhere else to embellish ……
Altered Wooden Advent House. Decorated Advent HouseWooden Advent House. tesco
……. it just seemed to go on and on and on!!!  But if you can’t over embellish at Christmas, well when can you?
I also need to apologise ….. life is rather busy at the moment, but I have enough posts in the bag to keep to an every other day type schedule,  but I don’t think I will be able to produce the amount of “new” ideas that I have done in the past ….. however, the old ideas are still there if you go to “labels” on the right side of the blog and click on anything that begins with Christmas or sounds remotely like!!!
003I will endeavour to do something with all the bits that I have shown you in my recent heads up …… I am slowly building up the blog to it’s former self  ….. and am loving crafting again ….. the buzz is definitely back ….. it’s just that  my social life is too !!!!!!

Saturday, 9 November 2013

Wonderful, Wonderful Times With Marc – Ranger Melting Pot Experiments - UTEE Cubes

Ranger Melting Pot squares experimentWhen I saw an idea for making UTEE cubes using a Ranger melting Pot on the website below I was desperate to have a go during my next stay with Marc ……
….. however as per usual I left getting the ice cube tray that I needed to the last minute and then could only find novelty ones …. not an ordinary plain square one.  Once in London I searched Notting Hill from top to bottom with no joy, and it was only a chance visit to a charity shop that I found one in Battersea for the princely sum of 25p!
Ranger melting Pot Utee cubesUnfortunately, by this time I only had a shady idea of the blog post that had inspired me …. and looking back now I’d got it wrong!!!  I started by putting a small square of patterned paper in the bottom of each cube, followed by some tiny charms and at Marc’s suggestion some hologram glitter and micro beads, our expectations were not too high as this first try was only an experiment.
Utee cubes Ranger melting pot..Ranger Melting Pot Utee Cube.
I poured in about 10mm of clear UTEE into each square and then we could only keep our fingers crossed. As we were watching the Create and Craft demonstrations as we worked because the Melting Pot was the Pick of the Day we found out that by using a heat gun it was possible to get rid of any bubbles that formed in the pan.
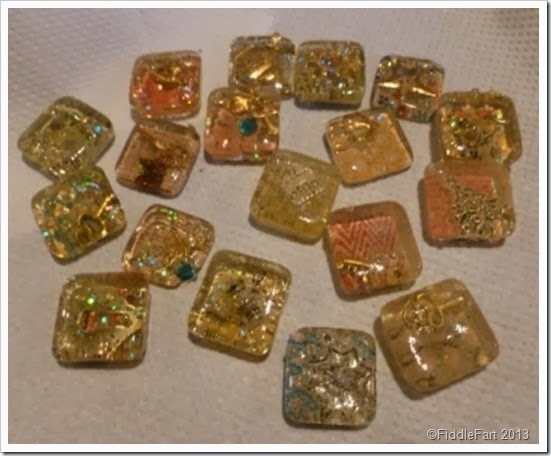
Ranger Melt pot squaresOnce set the cubes came out of the tray without too much trouble, eased out carefully with one of Marc’s pokey tools.  The results were mixed, but we learnt an awful lot for “next time”.  I think I need to find a shallower ice cube tray or square fondant mould for example and after checking Roni’s post again I shouldn’t have put the paper on the bottom because the charms disappeared into the pattern….. doh!
Melt PotHowever, the beauty of the Melting Pot is that nothing goes to waste, if things don’t turn out as you hoped, you simply melt them down again, and believe me Marc doesn’t waste a thing,  he patiently removed the paper from the back of any “dodgy” cube, and then melted it down again, removing and saving all of the charms.  He then poured the UTEE onto the heat resistant craft sheet and when set it was put away safe ready to be used again.
Ranger Melting Pot squares experimentI only stumbled on Roni’s blog a short while ago, but I just love it,  I don’t think that there was anything I didn’t love on her 31 Days of Halloween ….. and I definitely need to make an Apothecary/Halloween House for next year.
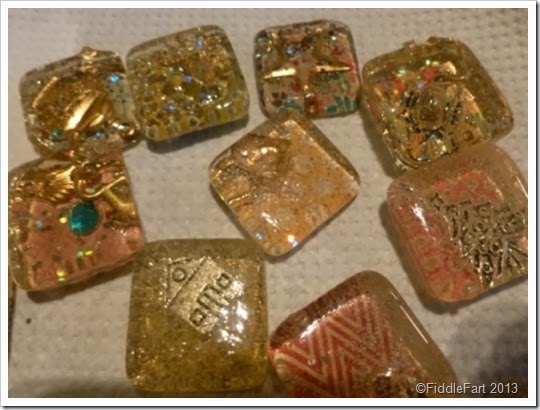
UTEE cubes Ranger Melting PotI have to be honest, this is the second time Marc and I have played with his Melting Pot, and this time it’s potential has blown me away …… being able to use something like this has made all the difference, how many of us have seen something demonstrated, been enthralled, got your hard earned money out and then bought it home only to gather dust after an initial play ….. I hold my hands up ….. I bought a Sizzix Texture Boutique after seeing it demo’ed on QVC and have used it once!!!!!!
The proof and value of any new tool has got to be what you do with the things you produce, I am sold, but what I do with what I have made with Marc when I get home will be our validation …. I am thinking perhaps an embellished luxury gift tag …… so as I always say, watch this space!
I also think that I could make a “job lot” of cubes containing just glitter and mircobeads to use as base pieces of one of my bejewelled mirrors, giving me an even foundation on which to build the more fancy layers etc. 
Let’s just say it’s a long, long time since I have been this excited by a piece of crafting equipment!