Saturday, 4 October 2014

Safe …. Mini Halloween Pumpkin Lanterns

I don’t know about you but though I love candles, I am very wary of Halloween, candles and children …… but it’s so lovely to create a little awe, wonder and magic for them ….. so I got to thinking ……
Poundworld Mini Horror Pots _thumb[6]Poundland Battery Operated FlickeringTealights
………. what if I married some mini pumpkin pots (6 for £1 from some Poundshops and DiscountUK stores) with Poundland battery operated flickering tea lights?
Mini Horror Pots Pumpkin facesI wasn’t sure if the tea lights would fit or the light would be strong enough to shine through, but they did, on both counts!
Mini pumpkin pots Halloween….. and looked so cute all lit up. DiscountUK also had packs of skull and Frankenstein pots too.
So for £3 you could have six little decorations that children could safely carry around or have in their rooms without any worry (well, except for perhaps the odd nightmare!)
I was also thinking that you could take the handles off the skull pots, put a tea light in each one and then stack them on top of each other in threes or a six to make a spooky tower of skulls!  Watch this space!!!

Friday, 3 October 2014

Halloween Hanging Bat Card.

This card measures 6ins x 6ins and is made using a hand cut plain purple card blank.
Halloween Bat Card. Bat CardI haven't used this Memory Box branch die before and was thrilled to see how delicate it actually was ….. I can think of so many cards I can make with different things hanging from the branches for all themes and occasions so watch this space.
Bat Card. Halloween Back CardFor this card I used three mulberry paper bats that I’ve had for years and just given them a set of tiny googly eyes each.  A scattering of tiny silver stars and a handwritten sentiment and a few white dots here and there using a white gel pen finish the whole effect.
98187Memory Box  - MB98187 WOODLAND BRANCH DIE  Code: MB98187

Thursday, 2 October 2014

Magic Glowing Lanterns

I’ve seen this idea so many times on Pinterest and wondered if it really worked, and now, having a little granddaughter I want to make sure that there is always something wonderful and magical going on at Nanny Nell's!
Glowstick lantern...I just got a clean,  dry jar and added a string hanger …….
Magic glowstick lantern.……. then took two glow stick bands and some micro glitter (but I wouldn’t bother with the glitter again as it didn’t seem to add anything to the overall effect).  The idea is to cut the glow stick in half and let the liquid drip into the jar ….
spooky kitchen wall …… not as easy as I thought (!!!!) and then I chose to “paint” the glowy stuff round the inside of the jar. Perhaps it’s a good idea to wear goggles or at least glasses, and I don’t think this is really something that children should do!
Glowstick LanternThe overall glowy effect lasted for about twenty minutes, after that the liquid gathered in the bottom of the jar, but still continued to glow for another hour or so after.  But I only used two small glow sticks (18 wristbands £1 from Discount UK) …. I could have tried more, but this was only my first experiment.
This also got me to thinking of other ways to use glow sticks ….. my next experiment ….. is to see what they look like worked into my twig door wreath, perhaps for Halloween.
http://www.wikihow.com/Make-Mason-Jar-Glow-Stick-Lanterns
http://chemistry.about.com/od/glowinthedarkprojects/a/Decorative-Glow-Stick-Lanterns.html
http://www.pinterest.com/havingfunathome/glow-stick-ideas/

Wednesday, 1 October 2014

Another Display?

I don’t do a display for ages and then two come along in the same week!!!
This display is on the opposite wall to the waterfall display …. a contrast to the cold and bleakness of Iceland!!
It was much, much easier to do as well because I found much of the papers/materials were already in the Geography store cupboard, including the sea frieze paper, must fortunate as I did not particularly relish the thought of painting the sea!The trunks of the palms trees were made using strips cut from a corrugated cardboard box, which I then charcoaled and chalked to create the ridges on the trunks. I was also fortunate enough to find some grass patterned border roll from which I was able to cut into palm leaf shapes and fringe to give an element of dimension. I did the same for the ground foliage and a few palm leaves using green copier paper which I crumpled for texture and then drew the leaf veins using a mixture of charcoal and chalks.
There was a temptation to then glue gun some shells on to the plastic doors of the board, but I thought better of it …. as I didn’t want to be on constant call to go over to glue them back on every time one fell off!

Tuesday, 30 September 2014

Duvet Covers Of Desire

I have a bit of a thing about bright duvet sets …….
Fab bedding 2
Fab bedding 3
These sets were on Achica the other week and you will never know how much I lusted after them ……
fab bedding….. especially the last set ……If I had such a set (fortunatley or unfortunatley, well out of my price range) I would have been forced to linger and lounge in bed ….. perhaps forever …… feeling (if not looking) absolutely fab-uuuuuuu-lush!!!!!!

Monday, 29 September 2014

One Of My Rare Display Boards

Part of my job is “doing” displays, but these days I very rarely have time to do one as I would really like, as the paperwork element of my job just seems to have taken over, and “arty” displays are just not a priority. I’m afraid it’s a sad case of just wang the work up, I’m not proud, but at least I try and get it done in a vaguely symmetrical way.
However, I did have some time during the summer holiday, when the school was empty to spread myself out, make as much mess as I liked, without any time restriction …… my brief was to “recreate” the Skogafoss waterfall which we were fortunate enough to visit during our A Level Geography trip to Iceland at Easter. 
The board I had to fill must have measured approximately 5ft 6ins x 4ft 6ins (it may have been a little bigger) and I had a budget …… but I decided to do my own thing and use suitable bits and pieces I found round school.  So the gravel at the bottom of the falls was made from a collage of newspaper and the sky, similarly made, using scraps of blue copier paper……
…… and the water fall was made using layers and layers of white bin liners and shredded plastic sheeting.
The cliffs either side of the fall were the hardest to do, I am rubbish at perspective and I was doing this all by free hand and eye, constantly looking at the pictures I had ……
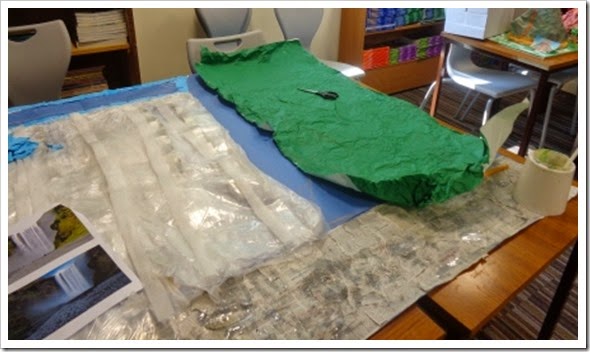
…… So I just got several lengths of black and green poster roll and cut them roughly to the shape of the rocks and then screwed them up to create something that resembled the texture of the rock.Next followed lots and lots of chalking and charcoaling and rubbing out, again trying to capture the texture.  It was at this stage I began to hallucinate!!!  Sometimes when I am working really close to something I need to just walk away from it and then come back to it, standing back and seeing it with fresh eyes.
And when I did, the next day, I could see where I was going and realised there wasn’t that much more to do.
I added a few very basic figures to try and give it some perspective
And then I had to try and get it onto the board in one go, single handedly!!!!
And, if it didn’t fit or look right, I didn’t have a clue what I would have done.
But it did, and I was dead chuffed.
If I may say, the pictures do not do justice to the depth and flow of the water ………… all those layers gave it a sort of fluidity and life …..
….. well, that’s my opinion any way!!!

Saturday, 27 September 2014

Problems With Silhouette

Today I thought I might just get my Silhouette out as Marc is always nagging me to use it more and after seeing what The Equally Lovely Denise makes with hers …….  I was going to look at what I have in my library and perhaps make a simple card or two …….

Picture1….. well, it all started well and I saw all the files loading …… then it started to initializing and that was it!!  I last downloaded some files from the online shop in mid April and all was well then!  I researched any problems and fixes, and gathered there had been  …. and downloaded in turn the latest two software programmes from Silhouette  - the Legacy being the one that seemed to be the most recommended from forum/blog posts etc.

SILHOUETTE STUDIO® VERSION 3.1.417 (RELEASED 8/4/2014)
SILHOUETTE STUDIO® VERSION 2.9.45 (RELEASED 1/10/2014) LEGACY

…… but still nothing!  Agh … I know I don’t use it as often as I should but it’s a handy piece of kit to have lurking in the background …. I have messaged Silhouette, who have always been quite helpful in the past ….. but at present it is most annoying …. is it a problem anyone else has had.?

A Couple Of Heads Up …….

I have to say that the Poundshops of Wolverhampton are disappointing on the Halloween front this year with regards to stickers …. not a one!  I think this is going to be a duff year for finding interesting stuff to alter and craft with.  I would have liked to have found some skeleton hands as I had an idea or two for them  …….. but it’s all a bit same old, same old, and a little bit uninspiring.  But there’s still time and I’ll keep on looking.
However, it’s worth having a look in Wilkos  as they some nice little bits and pieces, especially as they are priced up at 65p-ish a bag for spiders, bats and skeletons.
0334938_lAnd I am wanting this lantern (£5) which would look great at the bottom of my garden sitting on a gnarled tree trunk stump! http://www.wilko.com/halloween-decorations+lights/wilko-halloween-spooktacular-pumpkin-tealight-holder-terracotta/invt/0334938
Primark Light Up Christmas Tree JumperAlso ……. Christmas jumpers are now rearing their head in Primark (men's dept.) I wandered round with the light up Christmas Pudding for about 20 minutes before putting it back …. as I kept on reasoning that I really do have enough Christmas jumpers ….. and the ones with lights were £18.  But ……. I might, just might have to go back!!!!
Primark Light Up Christmas Pudding JumperThey had a other designs priced at £9 which were musical …….. and this year the designs aint half bad!

Friday, 26 September 2014

Merry And Bright Christmas Cards

These cards measure 6” x 6” and are made using a hand-cut plain red card.
Bright Red Christmas Card, Christmas Colours Christmas Card. Nine Square Christmas Card. Faux StitchingAs I said the other day this Christmas I am determined to make a HUMUNGUS dent in my Christmas embellishment collection and in making these cards I managed to use up all the HobbyCraft foil stickers I had left over from last year, plus the last of the smaller snowflakes from a disassembled garland I found in a charity shop (also last year).
Nine Square Bright Christmas Card Snowflakes. foil Christmas stickersI haven’t made a nine square card for ages but Marc has been nagging and I have to admit although fiddly they are a brilliant way of using up all your odd, small stickers and embellishments etc.
Nine Square Bright Christmas Colours Christmas CardI’ve also gone up a size on my cards to 6” x 6” which are a little out of my comfort zone, but again, I have a pile of larger envelopes that need to be used up.
Nine Square Christmas Card. Foil Christmas Stickers. Faux Stitching Christmas Card. Bright Christmas CardThe squares on the card each measure 1.25ins and are mat and layered on red and white panels, finished off with white faux stitching using a white Uni-ball Signo gel pen.

Thursday, 25 September 2014

Look What’s Fallen Into My Poundshop Basket This Week ……. And Ended Up In My Craftroom

This week a pack of nail caviar sort of dropped into my basket while I was browsing the shelves of Poundland!
Poundshop Nail CaviarTwelve phials of caviar ….. or, if you are a crafter, micro-beads, but I was looking at them for possibly using them as charms on jewellery or as an embellishment on tags (I am still working on that idea),  The only thing I need to do to them is take out the stoppers and spray them gold as the plastic just aint working!
Whats on my desk wednesdayWith my mojo currently in overdrive my craft room is now being given a right old bending, for a while, when my mojo was flagging,  I admit to only using it to use my computer to write my Monkey blog.  Working in such a small area has taken some getting used, I confine a project to the turquoise mat,  with my tools etc. around me. When Marc was with me, we worked in the front room (as I do for large projects) and all the crafty stuff has to follow!
work deskBut, it does keep me disciplined and on track, I can’t get everything out and lay stuff all over the floor like I used to in my old room and I have to make sure everything is left tidy at the end of a crafting session …… that way everything feels fresh to start or continue a project the next day …..
003I do find having my A4 card/paper in stacks on the shelves instead of in drawers frustrating though, sometimes finding a sheet of card can be such a palaver, but as far as I can see, at the moment that’s the only way it can be done.
Columbo My Guilty PleasureBUT ……. since I discovered that I can indulge in my guilty pleasure Columbo on my tablet on demand ….. I can spend even longer in my craft room and crafting. Usually, on a Saturday afternoon rain stops play when there is a Columbo double bill on 5USA and I’d have to go downstairs to watch it ….. but now ……. now I can do both!!  Life just keeps on getting betterer and betterer!

Wednesday, 24 September 2014

Tea Light Snowmen

This idea has been around for a while now, I believe it originated from a Stampin’Up project, but somehow over the years I’d missed it …… until now. I first found it here:- http://inkingidaho.blogspot.co.uk/2012/11/snowman-tea-lights.html, but just Google “tea light snowman” and a whole plethora of snowmen turn up!
Tealight snowmen...So …… what you need to get started is a pack of battery tea lights from any Poundshop, they usually come in sets of four.
Because I didn’t have any of the punches used for the original snowmen I took the basic idea and changed it to suit the materials I did have, deciding not to use a scalloped circle on the back or the plain circle for the face which went over the front of the tea light. 
Tealight snowman .It took me quite while to work out a basic set of templates for the hat, but got there in the end …… and once I got that right, decided to go the whole hog and added confetti holly and flat backed pearl berries!
Tealight snowman. facesThe face was easy, as I had just bought a couple of packets of black flat backed pearls for my  gingerbread men from http://stores.ebay.co.uk/Lardysticks-Larder?_trksid=p2047675.l2563 – size 4mm for the mouth and 5mm for the eyes. I glued the gems straight onto the tea light with a woodwork PVA.
tealight snowmantealight snowman. 
The scarf is made from a 23cm length of ribbon. I used a blob of glue gun glue on the top of the snowman's head to keep it in place while I tied the knot and then trimmed the ribbon with pinking shears when I was happy with said knot .
Once I had the first snowman under my belt (above) I could then decide on a colour theme based on the ribbons and Bazzill card I had already got.  I embossed the hat card for extra texture using an old fashioned ribber ….. something crafters used to use before there were embossing folders!
Craft Ribber. Blast from the pastI could have added a magnet to the back of my snowmen to make them fridge magnets but in the end I decided to stick a pendant loop on the back of the bobble so that the snowman could be hung.  I have visions of one hanging in the front window of a car.
tealight snowman. hangerAnyway, that’s my take on a very popular idea ….. as I said at the beginning, just Google the idea to see the different variations.
Hanging Tealight snowmanI was thinking, wouldn’t they look lovely in the gaps between Christmas bunting hung by a small peg or what about on a wreath??????