Saturday, 2 November 2019

My Halloween Shelves

Sorry this is a bit late but I just ran out of days in the run up to Halloween to post!
But nevertheless I thought I would show you a few of the Hallowed corners of The Towers even if it is after the event 
I didn't go too mad ....... well, as mad as I could have .......
....... but there was still plenty on (tasteful) display to give the flat a spooky atmosphere for when Iris and Bertie eventually arrived after a few days away in Devon for their Halloween weekend sleepover. 
I have to say that what Poundland lacked in Halloween stuff that I could actually craft with, as in the past, things like 3D stickers, small skeletons, paper pads and paper chains, they more than made up for with bits and pieces of an ornamental type nature.
Marc bought me a whole pile goodies from the Malvern branch (one of the best stocked that we have ever found, although the Tamworth one is also very good too) and then we bought even more when we had a day out together in Worcester at the begining of October.
I hope that their range next year isn't as good, because to be honest I need to call a halt to my collection as I really don't have any more space to store it all ........
....... but there again, knowing Marc and I, I expect I'll be saying exactly the same thing next year, especially as we are both  members of the Facebook Poundland Appreciation page, which doesn't help one little bit when everyone starts showing all the "must haves" they have found.

Friday, 1 November 2019

My Halloween Tree

It's erm ...... beginning to look a lot like Halloween at The Towers.
I decided a while ago to decorate a Halloween Tree this year just to see the awe and wonder on Iris and Bertie's little faces when they come into the lounge and to hopefully help make some wonderful memories ...... plus, I don't really need any excuse to get the Christmas tree out early!
I decorated the tree with skull, pumpkin and Frankenstein pots from One Below (Wolverhampton) - £1 for a pack of 6.  I have used these pots so many times over the years as Halloween favours, filling them with chocolates etc. but never as tree decorations.
I then added a couple of nets of plastic/rubber bats (12 for £1, also from Poundstetcher). I put a screw eye hook in each of their backs and then threaded them ready to hang.

To add just a little more colour I then added four blue, beaded Christmas garlands that I got ages ago in the January sales, originally bought as they should go with my Christmas baubles, so they will definitely stay around long after the Halloween mayhem is over!

Thursday, 31 October 2019

Halloween Finds

HAPPY HALLOWEEN!

I thought I would share a couple of my Halloween charity shop finds with you to celebrate.
I don't think that there is that much age to them ........
....... but they are a little different to the ceramic ones I have also bought from Poundland.
They certainly have a lot more detail .......
.....and at 40p each what's a girl to do, but take them home and give them a flipping good clean.
I might have to go over a couple of worn spots with a surreptitious Sharpie pen or two, but these will certainly deck my festive halls over this Halloween weekend.
This velvet covered Raven wasn't a charity shop find, it came from Wilkos and cost £4.  I just had to have him, he did had two sunken red eyes which was very unflattering, but these were soon replaced by a black flat back gems.  He won't be packed away after the festivities either, I love him so much he's going to be a permanent feature in my lounge diner, with a tea light behind him in the evening he just looks fantastic.
And finally, these graduating potion bottles were from Hobbycraft for £2 the pack.  I bought them for Iris as she is Harry Potter mad at the moment, but before she gets them I think they need the fiddle fart treatment, a little more colour, glitter and few interesting contents ....... happy days!

Wednesday, 30 October 2019

Trick Or Treat Halloween Card

This card measures 14cms x 14cms and is made using a pre- cut and creased smooth white manufactured card blank.
This card was so simple to put together but again I wanted move away from using the stereotypical Halloween skeletons, ghosts and pumpkins 
All the Halloween type coloured papers came from a huge Origami paper pad from The Works. My apologises as I can't remember where the adhesive, black plastic letters came from (most likely Home Bargains or B M Bargains).  Each letter was backed on the paper scraps and then mat and layered on black card.
My favourite confetti spiders came out to play again, after being given tiny, silver flat backed eyes (I need to order some more of these as they have been so versatile) and a layer of Ranger Glossy Accents to give their bodies extra dimension.  A few clusters of three dots here and there using a fine liner pen finish the card.

Tuesday, 29 October 2019

First Halloween Card

This card measures 14cms x 14cms and is made using a hand cut and creased smooth white card blank.
This card was made for my lovely next door neighbour's new baby Kristzian. This year he won't know anything about it, but I know Iris and Bertie will be desperate to Trick or Treat Kata and pop in to see Kristzian.
I covered the front of a plain white card with an orange patterned origami paper (The Works) and then other scraps from the same book in suitably Halloween type colours for the "patches".


The wooden number 1 was coloured with a purple Sharpie pen and then covered it with a layer of Ranger Glossy Accents to help it stand out.
The stickers came from this years Flying Tiger Halloween Range (£1 per pack) and were again given the Glossy Accents treatment to give them extra dimension and texture. 


A few stars, a couple of pairs of googly eyes on the spiders, a little bit of faux stitching and clusters of three dots here and there using a black fine liner pen finish the card off nicely.

Monday, 28 October 2019

Boo Halloween Card

This card measures 14cms x 14cms and is made using a hand cut and creased smooth black card blank.
The original design for this card was not my idea  I found it on Pinterest where it used card/paper die cuts, but as soon as I saw it I remembered that I had some laser cut, wooden wreath shapes that were almost exactly the same and I certainly had a wooden letter B that would go with them.  
I simply coloured them using an orange Sharpie pen and then applied some green, ultra fine glitter  to the leaves before gluing the shapes onto the card blank.
For a little more texture/interest I then added a scattering of tiny, silver stars and clusters of white dots using a white gel pen here and there.  Such a simple but effective Halloween card, but without all the usual pumpkins, ghosts and skeletons. I am so pleased with how it turned out and am now wondering if I can adapt the idea again to fit any Christmas words that have an "O" in them ....... holly, jolly, noel pehaps?

Friday, 25 October 2019

Objects Of Almost Unbearable Desire ....... Laura Ashley Willow Crystal Droplets Branch Pendant Light

I think you all know by now that I have a HUGE things about chandeliers and droplet light fittings, ......... well, if so, can you imagine the sort of state I was in when I saw this in the window of Laura Ashley in Worcester?  Marc was with me at the time and sadly he had to witness my drooling .........
....... and then, when I was able to collect myself and speak coherantly again would you believe we actually stood there and discussed how we could make something similar ....... !!!!!????? Erm ...... I don't think so!!!
I've since looked the fitting up on the Laura Ashley website and found that online they were reduced from £420 to £294, so the £280 price tag in the shop window was a real bargain!!!
I am just going to keep my eye on them to see if they come down any more ......... and if/when they are reduced to £100 or even £50 (in my dreams), two of them could be mine ...... (in your dreams again madam) ......... or I may just have to simply learn to live without them!  

Thursday, 24 October 2019

Halloween Pick N MIx Display

Just a bit of silly fun today. I found this toy Pick N Mix dispenser on e-bay at a pretty reasonable price, it was boxed, unused and came with all it's bits except for the sweets ........
....... so I presume it was old stock and the sweets were out of date which was fine by me ......
........ because I wanted to turn it into something special for Bertie and Iris for our Halloween sleepover party. Looking at it now in the pictures it looks more like a Bush Tucker Trial for I'm A Celebrity Get Me Out Of Here ...... however I don't think it will really matter once it is surrounded by other Halloween decorations on their little Pick N Mix table, it's just me being over fussy on the detail!
I secured each of the drawers with a sticky foam pad so that they didn't move around or fall out when little fingers were attempting to get their sweeties out ..... it wasn't absolutely necessary, I was just being a Nanny who tends to think of all the possible scenarios before they actually happen! 
I made (and kept) a template of the original card top and sides for the dispenser, because I was already thinking ahead to Christmas and having a Santa's Pick 'N' Mix ....... and then an Easter Bunny one!!
Once cut out I crudely embellished them with various plastic Halloween bits and pieces and stars I  already had using a glue gun and then added a few doodles ...... nothing fancy, as this version was only going to be used for two days at most ..... I also left the threads from the glue gun as they looked a bit like cobwebs.
All I need to do now is fill it with various chocolate bits and pieces, hopefully with a Halloween theme, but if not I am sure I can make up a few gruesome names for Jazzies, chocolate buttons and jelly beans!

Wednesday, 23 October 2019

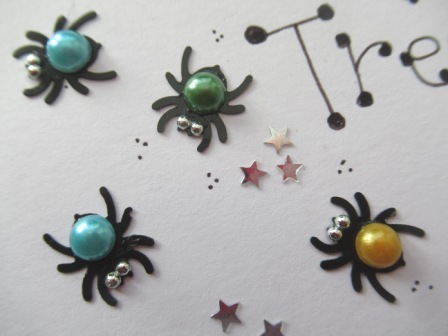
Halloween Spider Card

This card measures 14.5cms x 14.5cms and uses a plain, pre-creased blank as its base.
I wanted to make a Halloween card for Lu and wondered if it was possible to make something that was pretty and feminine but still with a creepy feel. I think I may have just about succeeded, however I also think that I may have got a little carried away as far as the number of spiders is concerned.  What was intended to be just five to seven spiders on a card soon became an infestation, but fitting for Halloween?
I started by doodling the sentiment using a black fine liner pen in the centre of the card.
The spiders were originally Halloween confetti found in a charity shop. (I must look on line to see if I can find some more as I have almost used up all that I had). I put a small, pastel coloured flat backed pearl on each of their bodies and then two tiny weeny, silver flat backs for their eyes, so tiny that they made me go all cross eyed trying to place them.
The final touches came from a scattering of tiny silver stars and clusters of three doodled dots, again using a black fine liner pen.  I love it, I hope |Lu does too.

It's funny how one idea often leads to another as I am now wondering if I could do something similar but in a small shadow box frame, replacing the wording for a doodled web?  I guess that just depends on my finding some more spiders .....  

Tuesday, 22 October 2019

Quick, No Frills Halloween Lanterns

It was Bertie who gave me this idea .........
I had left a pop bottle on the radiator in the hall to take out to the bins when he looked at me with his serious face and said "Nanny, you could craft with that!" ....... which got me thinking!
It's nothing fancy or particulaly inventive, I have simply cut the bottom off a bottle, very crudely  covered it with a layer of green/orange tissue paper, using PVA glue ........
...... and then added a very basic Halloween type face, followed by a couple more coats of watered down PVA before being left to dry.
When all the lanterns were dry I punched a hole on either side of them to tie a string handle which I think I will probably hang the lanterns from on the back fence, in the garden, with perhaps the help of a plastic tie.
I thought I should try them out in darkened surroundings i.e my windowless bathroom, to see how they would look in the dark .......
I think they will be fine, I just need to get some new battery tea lights as the ones I used in the try out were quite old.

All these lanterns and any more I make or find, plus glow sticks etc. will form part of a trail in the back garden creating a spooky "Midnight Walk" for Iris and Bertie during our special Halloween Sleepover  I am just praying for a dry night as I am not sure how long the PVA glue will last in wet/damp conditions!

Monday, 21 October 2019

Christmas Is Coming - so I am hoping to add a couple more posts on a Thursday & Friday now & again 'till then.

Halloween Favour Bags

It seems like years since I have made any festive favours using Elizabeth Shaw mints, but decided Halloween would be the perfect opportunity to "revise the art" by making something for Bertie to give all his "Chestnut" staff before they broke up for half term. 
In doing so I discovered that my trusty scallop and plain Stampin Up punches are beginning to show their age, they do seems to punch as crisply as they used to do and are fussy about what papers I use with them.  
I have tried to "sharpen" them using aluminium foil and some metal sheet I had, but I am not convinced that they will last for that much longer. I have totally lost touch with Stampin Up but perhaps, after Christmas would be a good time to see what they are doing now and if possible replace these much used and loved punches.
I have also discovered that finding good Halloween (and Christmas) stickers, particularly of the 3D, puffy or bubble variety is getting harder and harder (when I think now of what the pound shops used to sell, I should have bought them by the box load!).  The ones above came from Morrisons (3 sheets for £1) Hobbycraft (a waterfall pack for £2, including puffy, foil and paper stickers, so excellent value, and Flying Tiger (£1 for 1 sheet of approximately 20 foiled stickers, five design packs available).
I simply punched out scalloped and plain circles in Halloween colours, putting a sticker in the middle and then added a little faux stitching round the inner circle and dots on each scallop, using a fine liner pen, before sandwiching a mint between two circles using double sided tape to secure them.  There are 24 chocolates in each box of Elizabeth Shaw mints, so I was able to make up twelve packs in all.
I put four chocolates in a small cello bag accompanied by a few plastic spiders to give the favours an extra creepy trick or treat twist.  I also added a matching scallop circle sentiment to the corner of each bag just to say they were from Bertie. 
I just love the colours of Halloween ...... I really must think of a way of incorporating them into one or two Christmas cards or tags this year if I get the time.