Monday, 16 May 2022

Adventures In Resin ………. Christmas Gift Tags

Well, since I went and ordered another larger resin kit from Amazon I guess I have sort of got the bug, but after that’s used up I think that will be it for a little while.

Resin Gift Tags - Christmas Trees

In my last resin post I was struggling with air bubbles forming in front of the snow/glitter card.  When I did some research several YouTubers suggested covering paper with white glue first, which I presume was PVA, so that’s what I did…….

Resin Christmas Tree Gift Tags.

….. allowing the first/bottom layer of resin to set hard first, then adding the glitter card, generously coated with PVA on both sides and then leaving it to dry for at least 24 hours, before adding the stars, snowflakes and the final layer of resin.

Resin Gift Tags

I’ll be honest, when I removed the resin from the moulds my heart sank, I had either been too generous with the PVA or too impatient to add the next layer of resin or both, because the glue appeared to be still wet within the resin, causing the glitter affect to disappear beneath a sea of white, aghhhhh. However, I put the tags on the windowsill and over a period of weeks (I know, weeks) the glue slowly dried in the resin, only one remains stubborn, but should be fine too in another week or so. So yet another steep learning curve.

Resin Christmas Tree Gift Tags

My next experiment, will needless to say, involve a lot less PVA and I’m also going to reverse the process, putting the glitter card in first, then when dry the tree and then the stars and snowflakes, the front being what you see when you look at the mould rather than the back, if that makes sense?

Resin Christmas Lights Gift Tag

I just love how the strings of Christmas lights turned out, far less brain work was needed for them, just a layer of resin which was allowed to set for a couple of hours, followed by the lights and stars and then another layer of resin, simples! I have another pack of light embellishments (£1 One Below)  which should be enough to make at least another ten tags.

Resin Christmas Light Gift Tag

I have a couple more ideas for things to put in a tag  …… I just need the time and the patience!

Sunday, 15 May 2022

Guest Crafter–Bertie …… With His Fridge Magnets.

I could just eat this little boy’s fingers one by one …….. I know they will lose their soft, round podginess before too long and I dread the day when he won’t slip his hand into mine as we walk along, so until then I’m not letting go.

Lucky Cat Fridge Magnets

Anyway, I found this tin of DIY fridge magnets a while back in a local chairty shop and at £1.99 for at least 20, it would have looked rude to have left them on the bric a brac shelf, as I knew, one day, someone would want to create with them.

Draw you own Fridge MagnetsIMG_1627

Bertie is obsessed with China, goodness only knows where he’s had that from, so I guess it was obvious when he said he wanted to make a Chinese magnet for his beloved Auntie Lulu.

IMG_1614

It was therefore very fortuitous that I’d spotted these Lucky Cat foil stickers in Home Bargains and had put them away for him for such a creative occasion.

Lucky Cat Fridge Magnet by BertieLucky Cat Fridge Magnets.

Well, he just nailed the Chinese tassels and I just love the fish in the bowls, the labelling and the perr and meow.  What is he like?

To Lulu

And Bertie, being Bertie, it then had to be presented equally as well, in an organza bag (The Works 8 11cm x 8cm bags for £1), a tag and the all important red ribbon, where he held the knot in place while I tied the bow. 

DIY photo Magnet

……. And, as he is “doing” medieval life with a visit to Warwick castle this term, he also threw in a magnet for Mum and Dad, which he said didn’t need any wrapping!

A morning to keep in my heart forever, especially as Berts doesn’t lend himself to drawing and fiddle farting that much without a serious cause, bless him.

Tuesday, 10 May 2022

Craft Room Sort Out

Aghhhhh,  this is a job I have to make myself do at least twice a year, when I feel I can’t find anything, everything seems to be in the wrong box/drawer and any recent acquisitions haven’t found a new home and end up is bundled in a drawer and instantly forgotten. I can’t be the only crafter that “stuff” sometimes gets too much for, when I question whether to call time on crafting before my stash finally swallows me up?

IMG_1812

So, after the Easter holidays and when Iris and Bertie had been through almost everything, I started ….. it took me three days, off and on…..

IMG_1814

….. but calm and order have now been restored and I feel I can craft again without having to get everything out to get to something I need to use and chaos ensues. Everything seems to fit somewhere, without the new large boxes I had anticipated might be needed, leaving whatever spare surfaces I had still free.

IMG_1821

Not a lot was actually thrown out, but what was, was mostly packaging, broken boxes and the odd bit.

IMG_1824

While I was at it I made notes of anything I could do without, which will probably be sold, offered or made into grab bags for any Craft Faye I might to do later on in the year.

IMG_1815IMG_1816

In one hidden corner I found a box and basket full of all the wooden bricks I had been collecting from various charity shops for pennies. That was almost my point of despair. How many bricks did I really think I needed, despite all their potential, never in a month of Sundays would I ever use them all. So I picked out the rectangles and squares, the most useful, (but probably still too many) and then bagged up the rest to donate back from whence they came,  bearing in mind that I already have at least 40 odd Jenga bricks, all painted, ready to be turned into snowmen as potential random kindness gifts this Christmas.  What am I like?

IMG_1822IMG_1817

And a question….. what happens to all the plastic lids and boxes that you’ve put carefully aside for such a clear up job?  Why, when you get them out again, do none of the lids match any of the boxes, but did when you originally put them away?

IMG_1819

Crafting can now be resumed with Kermit able to relax again, while I complete all the half way through projects in my “working on basket”,  before starting on any new ones.

IMG_1820

However, one decision I did come to was to have doors (matching the others in the room) put on the shelving unit.  It’s nice to have a few nic nacs on them, but they are really deep and the space behind my tranklements wasted.  So I called my man “that does”.

IMG_1813

I don’t really want to fill this new cupboard space with even more stuff, but instead move all the bigger tools I currently keep in the drawers into it. I also want to keep the bedding I have when visitors sleepover in there.  It will make things much simpler as it’s a bit of a rigmarole at the moment when everything is in my bedroom cupboards.  It’s sort of spreading things out a bit more for much easier access. My man that does always has a long waiting list, but hopefully the wait will be worth it …… where I will put my tranklements then however is another story.

Monday, 9 May 2022

Altered Diorama Tins – Christmas Scene Tin

I’ve had another go at my Christmas tin idea and I have to say they turned out even better than I would ever thought.  I am soooooooo pleased with them, I can’t tell you.

Altered Altoid Tins. Christmas Snowman Diorama Tins

The 20ml tins came from eBay (£7.75 + £1.17 for 12 tins)

Altered Altoid Tin

I started by lining both sides of the open tin with a small print paper, adding a little faux stitching round the edges using a fine tipped, black, permanent pen and then the air dry, paper clay for the snow. I put a little glue behind the “snow”, just in case it shrank in the drying process.

Craft Table In Action

My table was full of all the ready prepared bits and pieces I needed to complete the snowy scene.

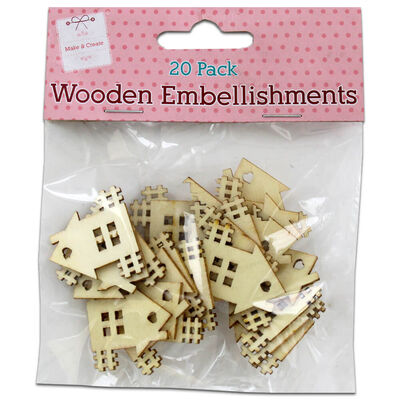
Wooden House Embellishments

The houses came from Papermania Bare Basics, however they have since changed the designs in the set I originally bought, but I have had them forever, so I’m not surprised.  I patched over the windows and heart with tiny scraps of red and yellow paper to add and close up the back.

On the front I coloured the houses with a white Posca Pen and then added DecoArt Americana Acrylic Paint Writer to the roofs, chimney and around the bottom.

I can’t remember where I got the small bottle brush trees from (but I need a some more for other Christmas ideas).  I took the bases off the trees and stuck them to the back of the houses (above), to give added dimension and in the process nothing was wasted.  I also trimmed the bristles off the back of the trees, so when glued to the back of the tins they lay flat.  I also added a little glue to the wire end of the trees before I sank them into the snow.

The Works 60 Wooden Heart packThe Works Wooden Hearts

The hearts I found in The Works in their Christmas Sale.  I added the writing, again using a fine tipped, black, permanent pen and then glued a small flat bead on the back, so that they would stand slightly proud in the lid.

IMG_1590

The snowmen are among the last of the ones I bought from Michael’s in New York, four years ago now, I love them.  They hold so many memories, I remember exactly how excited I was when I found them, reduced in the sale, but they have to be used.  

I also added some “Writer” to the snow to add more texture.  The tiny silver heart is a metal nail art decoration.

Christmas Diorama In A Tin Snowman SCeneChristmas Altered Altoid Tin. Christmas Diorama

I decorated the backgrounds with small, nail art snowflakes (eBay) which I also put on the front of the tins around the B-Krafty metal greeting embellishments, along with bigger plastic snowflakes and tiny silver flay back domes.

Christmas Altered Altoid Tin

On the back of the tins I glued a small jewellery bail so that the tin can be hung as a decoration on a Christmas tree.

IMG_1604

In all I completed 10 tins in this session and as I said at the start, I am sooooooo pleased with how they turned out, I felt like a proper crafter!

Christmas Snowman Scene Diorama. Altered Altoid Tin

I have another twelve small tins left, so I think I will use them all up for this idea, especially as I also have enough snowmen and trees to do it too.  I do need a few more houses, but I have found these on The Works website, a pack of 20 for £1, it’s a no brainer.

https://www.theworks.co.uk/p/wooden-crafts/wooden-house-embellishments-pack-of-20/5052089316928.html

……. And when the next batch of tins are done, I have these other tins to use up!

Altered Cigar Tin

They are quite a bit bigger, so I am thinking a tin Christmas card decoration, with a similar scene inside, using bigger embellishments and perhaps a verse or two of “Let it Snow” in an old typewriter font on the other side?  Not sure about the front …….. we shall see.

Tuesday, 3 May 2022

My Charity Shop Vintage Turquoise Glass Dressing Table Set

This has got to be one of my most favourite charity shop finds in a long, long time, if ever and it’s definitely a keeper.

Vintage turquoise Dressing Table set

As soon as I entered my favourite charity shop in Evesham I spotted just the colour, sat sitting on the bottom shelf of rather bland and boring, ramshackle collection of glass bits and pieces.  Erm, I do believe that I may have pounced, not unlike a lion on noticing a lone gazelle at the watering hole!

Vintage Turquoise Dressing Table Set.

The set was complete, comprising of a large tray, small trinket tray, two candlesticks, and a large lidded bowl/dish with two further matching, smaller ones…….

IMG_1565

….. all precariously grouped together with a few strands of Sellotape …..

IMG_1563

…… in flawless condition, not a single chip, doink or crack!  It had to be mine, especially given the colour of my boudoir, painted to remind me of the colour of the sea in Greece.

IMG_1564

I have never seen anything this colour before, no even in random, single pieces and as very few complete sets come up on Google/Pinterest, I am guessing that it’s a pretty hard to find colour.

IMG_1562

When I posted it on one of the Facebook charity shop pages I follow someone suggested that it may have been a prize in a Woolworth’s competition? 

Oh, and the price, hidden under one of the pots? £4, £4??!!  As I said this is a keeper, which I intend to bequeath only to someone I know will love it as much as I do on my death bed!

Happy days!

Monday, 2 May 2022

My Painted Decoupaged Charity Shop Chair …….

Sometimes, I loose my momentum or get distracted from a project, as in this case my free charity shop chair obtained late last year in Burnham On Sea.

Decoupage ChairIMG_1518

I started it in December, just before Christmas ………….

IMG_4523

……. and then I did diddly-squat, however by the beginning of April it was really getting on my nerves.

IMG_0088IMG_0091

I’ll be honest, I didn’t really have a plan as to what to do with it.  I already have a turquoise and decopatched desk and coffee table, doing it again would be overkill and a lack of imagination ……. so I thought I would just wing it and see what happened.

painted charity shop chairIMG_1395

I started by painting it in sections with emulsion tester pots from Wilko (£1.50), totally wrong paint with no preparation to the wood, I know, I know!!!!!!

IMG_1492

When several sections were completed (2 or 3 coats) I then varnished them with Wilko quick drying, clear satin varnish so that when I painted an adjoining section any emulsion that  I accidently went over could be easily wiped off.  I suppose there’s a method in my madness (above).

IMG_1494IMG_1503

When the chair was painted I hadn’t a clue what to do next.  I would have then liked to have painted more detailed patterns like I’ve seen on Pinterest, but I knew even my basic painting skills are pretty pants, so I tentatively decided to start using paper strips to add the detail ……. and then things got completely out of hand …….

IMG_1499

…… getting out various paper punches and going absolutely wild.

IMG_1510IMG_1501IMG_1496

It was completely over the top, but the chair was just for me to sit on in my craft room and I liked it.

IMG_1517

When I was down to just covering the last two spindles at the front my mind turned to the seat cover and then decided to throw caution to the wind by ordering half a meter (far too much) of chef’s check, heavy duty, cotton fabric from eBay (about £5.25).  I have never covered a seat before, but I think I did OK using a heavy duty staple gun.

IMG_1518

The last spindles seemed to take the longest time ever and seemed the most fiddley, but finally it was ready to start varnishing, this time with Wilko quick drying, clear glass, I’m still varnishing now, but eager to finally get it posted.  I will just keep going until the finish is as smooth as I think I can get it.  It won’t be perfect but as it’s just for me, who is going to look at it that closely?

Decoupage and Painted ChairDecoupage Chair.

Photographing it has been a nightmare but I think you can just about get an idea of how it looks.

Now, what to do next ………