Saturday, 3 October 2009

Little Girls Handbag Card

I don’t often make cards/boxes from kits but when I went to NEC Hobbycrafts last year, I just had to have the K & Co Book of Paper Purses …….
I made this bag as something a little bit different for a work colleague for her beautiful little girl.  I understand she took it to school to show her teacher! Ahhhhh
K & Company Paper Purse
 K & Company Paper Purse Kit
 K & Company Paper Purse 1
Jorgie’s mum had written a little birthday poem, so I put each line on a new page in a little tag book to put in the bag
.Little Tag Book Containing Poem Birthday Poem
But I have to admit that after making the purse, the rest of the kit has remained untouched in the cupboard, it was too fiddle farty and not my type of thing, despite me being so desperate to own it!

Thursday, 1 October 2009

Frog Prince In A Tin

Frog Prince in a Tin
I know, I know, this is a totally mad idea ……
I made it for my lovely friend at work, Sarah.  I didn’t want to give her an ordinary birthday card and as we are always joking about finding her a husband, this is what I came up with!
Frog Tin Lid
The container is one of those travel sweetie tins, I didn’t bother to do anything with the sides to cover up the advertising, I thought it would add to the charm, the lid explains itself, with the Scrabble letters used to spell out her name.
Frog Pronce in a Tin (1)
The frog is absolutely adorable, I just wish I could find a couple more of him.

Tuesday, 29 September 2009

Easy Peasy Decorated Peg Idea

Decorated Pegs 1
I cannot claim this idea as my own because I saw something very similar in a “posh” shop over the weekend and just had to make my own version.
decorated pegs
All I have used is five ordinary pegs, stuck on a length self adhesive ribbon and co-coordinating gems.  I have also added a small magnet on the back of the peg. …… done and dusted!
What a brilliant Christmas idea for teachers, etc. and they only take minutes to make!
Decorated pegs in gift bag

Monday, 28 September 2009

Little Monsters Card

Picture 191
This is a simple and quick child’s card using Paperchase stickers.  The  handwriting is my own!
Writing letters at odd angles is a quirky effect that means you can get away with the text not being exactly in line.
One of my trademarks on my cards is three tiny dots scattered here and there. In a line of characters like this, it sort of joins them together, making the pattern flow.

Sunday, 27 September 2009

Japanese Doll Card

Japanese Dolls
These are two cards I made using Momiji stickers, they are just so cute.  The background paper is a an origami paper I’ve had for ages. I have embellished the stickers will little bows, flowers and gems for dimension.

Friday, 25 September 2009

Gardening card

The wooden embellishment on this card came from http://www.designsonpine.co.uk/, they have a lovely craft section and I have had a few bargains in their clearance sale. It’s worth having a look for something a bit special, especially if like me, you love pastel hearts and stars.
Picture 199

Thursday, 24 September 2009

Card Made Using Punches

Picture 228
I won a competition in Quick Cards Made Easy with a card very similar to this.
The background squares are hand drawn and coloured using pastel Pro Marker pens. The shapes are  made using a variety of paper punches, I like to double layer them for a 3D effect and fluff them up a bit (but these seem to have gone a bit flat!). 
The tiny gem and sequin embellishments used to decorate the punchies are nail embellishments from Poundland, just the right size for very small work.

Wednesday, 23 September 2009

Queen Bee Card

Picture 193
I found these Bang On The Door fabric patches at a carboot sale, three for a pound, bargain!
I have co-ordinated the colours of the bee with oddments of paper I had.  The text has been done using an old fashioned dynamo tapewriter I got off e-bay.

Tuesday, 22 September 2009

My Daughters 25th Birthday Trip to London Album

I made this for my sister Jan to give to my daughter for her 25th Birthday. As a birthday present she was taking Lucy to London for the weekend and the book sets out the itinerary ……
Needless to say my daughter is very spoilt and my sister is VERY generous!
Picture 336
Lucy
Happy Birthday
 The Plan

Train to London 
Walk to Hotel
Hotel
Oyster
 Underground
Ave QFull English
Shopping
 Sign here
 Ross
Homeward Bound
 Crocs

Monday, 21 September 2009

It's Party Time!

When making a card I usually start with the embellishment and work round them. 
These stickers were a bargain from Home Bargains, a little while ago, as a bogof. They worked out at £1.99 for two packs and I must have got 6+ cards from them.
The background paper was from a 12 x 12 scrapbook set I got from Ryman's,  which matched perfectly in scale and colour.
Every time I have made a batch of these cards they have sold immediately.

Sunday, 20 September 2009

Another Wedding Card

Oooooooooooooops, the eagle eyes among you have probably spotted my error when making this card, I have missed out the "r" in "your" !!!!!

Fortunatley the error was spotted before the card was sent!  Phew!!!!

WED1
This is a wedding card I make quite often as it is simple and unfussy.
I have also made this design up for a set of wedding invitations for a lovely couple last summer.
wED 2

Saturday, 19 September 2009

Baby Tags

baby g

 Picture 026
I love the idea of babies in pea pods! 
These tags were made using the large Sizzix pea pod die. It does come with a babies head, but it seemed too small and out of proportion, so I have used another larger Sizzix head die instead and cut the body and hands out myself.
The writing is my own and the embellishments are from Assessorize.  The background papers are from a baby scrapbook kit from The Works.

....... And Two Baby Cards

bOY SWEETPEA
GIRL SWEETPEA

Friday, 18 September 2009

Altered Jigsaw Pieces

jigsaw
I am fascinated by altered art but it just doesn’t look right when I try it!
I don’t think I use the dark moody colours the experts seem to and I am scared when it comes to choosing the right stamps to get the effect I admire. All I know is I like stamps with text and crows (and goodness knows what that says about me!)
Picture 146
I love Tim Holtz and I drool over his DVDs.  I was thrilled to get up close to him (and get the above shot) while he was demonstrating  at the Birmingham NEC earlier this year. But this is uncharted crafting territory for me,  and not one I think I will be able to truly master. Unless Tim ever gets to see this blog and decides to take me under his wing!!!
Anyway this is my sorry attempt at altering jigsaw pieces.

Thursday, 17 September 2009

Cards from Christmas Past

Here are a few of my Christmas cards from last year ……….
Angel Christmas CardI’m not 100% about this angel! She looks like she’s got jam all over her face! 
Card using Christmas Tree brads
Everso simple….. topper made using wavy layers of white glitter card, Christmas tree brads and tiny silver stars on a on a long thin blue card blank.
I make all my own card blanks using my trusty Coppernob scoring board and always put a blank insert inside them.
Christmas Cards with snowman buttons
Think these are “Dress Up” buttons from a huge bag I got from US EBay.  The snow flakes are table confetti, sorry I can’t remember the name of the paper.
Christmas Card using cake decoration
This pathetic little snowman is actually a china cake decoration I got from Penkridge Market (Staffs), think they were 30p each.
Christmas Lights Christmas Crad
This is one of my favourite cards ever!  The bulbs are from Crafts for Christmas.  I threaded them one at a time onto  crafting wire, winding the wire round a cotton bud about four times before adding the next bulb, then tucked the surplus wire behind the base card and finally mat and layered onto silver mirror card.Christmas tree with buttons
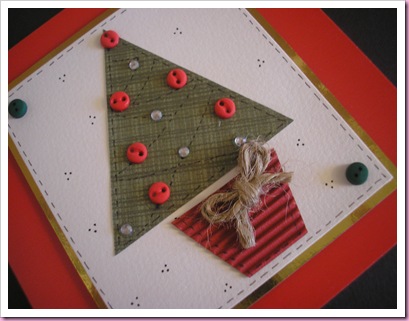
This card is a reject, as the tree  is ever so slightly squiffy.  Snowman Card using Poundland Stickers
This snowman card was a lot of fiddle fart…. with a lot of mat and layering and faux stitching.  The snowman and star were from a big double pack of 3D stickers from Poundland. When I saw them I filled my basket, because if you don’t buy them when you see them, you never see them again!Forensic Christmas Card
My son works in Forensics and likes to give his friends a forensic themed card each year! 
The H’s were cut out on my Cuttlebug (now traded in for a Big Shot), the fingerprints were taken from Google and glittered with translucent micro glitter …… and would you believe it  someone in his office identified that the fingerprints were actually upside down!
Finally this is the picture I put on my cards, for my kids, as we are all quite Monkey mad!  (If you haven’t already, have a look at my other blog by clicking on the monkey picture at the top of this page , it’s quite, quite mad!
Well that’s some of my cards from Christmas past! 
Now all I have to do is make cards for Christmas present!

Wednesday, 16 September 2009

Christmas Pudding Badge/Embellishment

I love the christmas puddings on cards. This is an idea I am working on …….
Picture 136
It’s is made using my Bandai badge maker.  I have used a brown paper under the plastic protective cover, added Anita’s 3Dimentional paint for custard/cream, used the tiny dots left over from a black  peel off sheet for currants, table confetti holly leaves and small red gems for holly berries.
I was thinking that without the badge pin being attached it would make a cute topper on a card or on a cracker.
If you haven’t got a badge maker I am sure the idea could be adapted with different badge making kits/parts

Tuesday, 15 September 2009

An Early Christmas Card - Mistletoe

Picture 217
I don’t stamp very often and when I do I have to keep it very, very simple as I am so caggy handed.
I love using pearls on my cards and this small stamp from The English Stamp Company is perfect for doing just that.
I stamped the mistletoe onto a square of pale cream card and then carefully tore the edges to give a ragged effect.
I sewed round the edges, rather haphazardly, with gold thread, using one of those small battery operated hobby sewing machines. To finish the design I made another slightly larger square, sewing round it too.  The two squares were then stuck together and added to a card blank.