Monday, 10 April 2017

Iris and Bertie’s Easter Bunny Lollypop Stick Picture Frames

After having never used lollypop sticks in my crafting before, I think I am in serious danger of getting addicted!
Popstickle Stick Easter Bunny Picture FrameThese are two bunny picture frames I have made for Iris and Bertie for their invitations to Easter Lunch chez moi, followed by an Easter Egg Hunt, an Egg and Spoon Race and giant frog tiddlywinks in the garden, at the back of my flat.
Popsickle Stick aster Bunny Picture FrameI first coloured the lolly sticks with a green and yellow Sharpie pen and then glued them together with PVA glue to make the frame.
Pop EastPOpsickle Stick Easter Bunny Picture Frame 1Pop Easter b
I stuck the background scene onto a scrap of strong white card to strengthen it, not wanting curious fingers to poke right through.  I added a square of self adhesive magnet on the back too, as one of the walls in their hall is painted with magnetic paint.
Pop stick East ay pop eastY Post East a
I then built up the pictures by adding bunny bodies etc. before adding the self adhesive, felt heads and carrots (from Yellow Moon), and then lots and lots of faux stitching in white gel and black fine liner pens.
Popsickle Stick Easy Bunny Picture Frame yqA handwritten sentiment finishes off the design, but can be removed after Easter.
Popsickle Stick Easter Bunny Picture Frame ywwI now have quite a few more ideas for lolly stick frames …….. I am already thinking calendars and Save The Date fridge magnets.

Saturday, 8 April 2017

The Twelve Frames Of Christmas – Festive Patchwork Box Frame Decorations

When I am browsing, looking for ideas, I love to look at how people, particularly in the U.S seem to decorate the whole of their home at Christmas.  Now, my flat is pretty small and I reckon I could just about manage it too …… and I am thinking about starting in my L shaped hall.
HallAt the moment it has twelve Ikea Ribba box frames on two of the walls containing insect brooches, but I have only used masking tape to hold the backgrounds in place ……. they could be very easily replaced temporarily, if only for the month of December.
2 CHristmas Patchwork Box Frame aSo, that is what I am planning to do……. making twelve festive patchworks, using Christmas papers and embellishments, and making good use of the giant square punch I got for £1 at the recent HobbyCraft Show at the NEC.
Ikea Ribba FRameOne a month should be easy, but as we are now in April I may have to double up on some months.
Patchwork Christmas Memory FrameWith a plan in my head, I gathered all the bits and pieces together and set them out roughly, but knowing that I would probably make changes as I went along.
2 Patchwork Squares2 Patchwork a
Each square measures 1.5ins and was mat and layered on silver card, with faux stitching round the edges.  These squares were then arranged on a larger square that would fit within the mount that comes with the frame.
2 Patchwork bThe next bit was to glue the twelve chosen embellishments and then fiddle fart some more by adding lots of flat backed gems, eyes, stars etc..
2 Christmas Patchwork Box FrameIt was easy to get carried away, but at Christmas, less is more really doesn’t count.
2 Christmas Patchwork Box Frame cUsually, I am quite particular about things fitting within the squares and being in proportion to each other, but I’ve let those ideas blow in the wind, I want the frames to look really homemade and not over overthought.
The frames also stand perfectly on a shelf, so I might consider buying a few extra (£3.50) to make up and give as presents to people, like my sister in law, who would really appreciate a decoration that is a little bit different.
Well, that’s one done, only eleven more to go!

Thursday, 6 April 2017

Halloween Lolly Pop Stick Spider Fridge Magnet – Incy Wincy Spider

This is not my original idea, I found it and then pinned it on my Inspiration Board on Pinterest http://makingofamom.com/craft-stick-spider-craft/ ….. and then made a few minor alterations.
b Popsickle Stick Halloween SpiderI have never used lolly pop sticks in my crafting before, but they kept cropping up during my Pinterest browsing, something I always do in bed for about half an hour before turning off the light …. so finally I decided to get me a few packs to play with, and this spider was the first thing I decided to make.
Popsickle Stick SpiderPopsickle Stick Halloween Spider wwww
I coloured the sticks using a black Sharpie pen.  Positioning the sticks to get an evenly spaced, convincing spider leg combo was a bit tricky, but in the end I got there, securing them with a “tacky” PVA glue.
Pop 3mmmI can’t believe that I didn’t have any black card to use for the spiders body, but this corrugated card turned out to be a much better substitute, because it added some texture.  I punched it with a large, scallop edged circle punch and then again coloured it with a black Sharpie.
Pop 3 trMore dollops of glue ensued, plus two pieces of self adhesive magnet strip.
Popsicle Stick Halloween Spider 3The final touch was the googly eyes, it was tempting to add a couple of fangs too, but I resisted.
Popsickle Stick Halloween Spider 5Although originally with Halloween in mind ….. I think Mr Spider can go on my fridge and be Incy Wincy Spider for now.

Tuesday, 4 April 2017

Bertie’s First Birthday Card – Old MacDonald’s Farm Card

I think this must count as the most cheatiest card ever!
Old MacDonald Birthday CardThe birthday card I had originally planned for Bertie’s first birthday turned out to be totally pants, time was running perilously close, so what’s a girl to do but raid her sticker box ……. and this pack of farm stickers answered my prayers!  I just took them out of the packet, left them on the card backing exactly as they were and just did a bit of emergency mat and layering on patterned and silver card!  Bertie, bless him, will never know, that all the animals etc. were not the result of many hours strategic and very careful placing by his Nanny, who was really hoofing it.
The card base was hand cut from an A4 sheet of white linen effect card and measures 21cms x 13cms.

Sunday, 2 April 2017

Halloween Door Wreath

Oh my life, Halloween in April?  Have I finally totally lost the plot, in more ways than one? 
Halloween Door Wreath 8Well, there is method in my madness.  I can’t say my Easter Wreath was the easiest of projects, but I had the other half of the ring left, and if I didn’t use it quickly, it would have just languished in the box under the bed and more likely as not got all damaged and grubby until I chucked it out ……. but I had an inkling of an idea ………
Halloween Door WreathIMG_1956
……. as I had a huge bag of plastic spiders and snakes after making a spider and snake hunt for Iris last Halloween and I swear they have been breeding since then!
Halloween Door Wreath 3Halloween Door Wreath 5a
First I wrapped the ring with wide, purple ribbon, followed by a narrower orange one, and then finally with some spiders web ribbon that I got from Micheals in Las Vegas four years ago, sometimes it just takes a while to finally use those craft bits and pieces that you swooned over years ago!
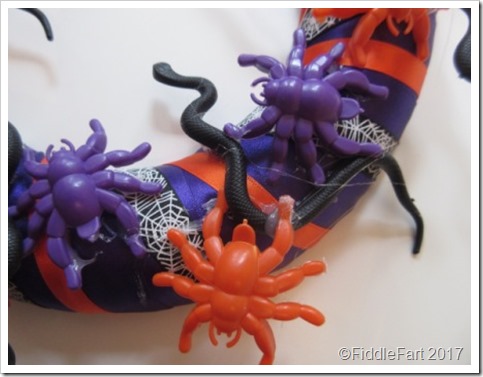
Halloween Door Wreath 6It was then in the lap of the gods as to how the rest would come together, especially after my experience with the flowers on my Easter wreath, but this simply  made itself.  I started with the spiders, gluing them with a glue gun, followed by the snakes .
Halloween Door Wreath 13Halloween Door Wreath 12
I then used green flat backed gems to add some extra colour, as it looked a bit too orange and purple, plus few gold stars. Seeing that it was turning out pretty well, it gave me the confidence to fiddle fart even more by adding googly eyes to the spiders, giving them more character and tiny flat back gems for the snakes eyes.
Halloween Wreath Door Decoration 11In my haste to get this post done, yes, there are blobs of glue all over the shop, and when its all dry, a few of the glue stick strand can be removed.
Halloween Door Wreath 9aI think it could also take a few larger silver stars to fill some of the large gaps,  but at the moment I can’t remember where on earth I have put them.
Halloween Wreath Decoration 10Halloween Door Wreath 9
…… and then at Halloween (in …. owwwww 6 months time!), I reckon I will be able to wrap a set of small battery operated lights around the wreath, concealing the battery box at the back, to give it an extra spooky look.
Can’t believe I am saying this now …… but I am looking for some more wreath bases as the ideas just keep on coming! 

Friday, 31 March 2017

My Easter Door Wreath

Oh my life, I finally finished my Easter Door Wreath, aghhhhhh ……….
Easter Door Wreath 1…… I’ll make no apologises for all the wet glue that’s still visible in the pictures, I’ll have you know that I was up at 8 o’clock on Thursday morning getting it done, I was so sick of it!
Easter Door Wreath 2And am I pleased?  Well. yes I am, I am pretty chuffed with myself, I am so glad Marc wasn’t with me while I was doing it though, as he would have been tutting as only Marc can tut, and remarking on how impatient I am, he, Marc the Prince of Patience!
Easter Door Wreath 4I used a glue gun to attach all the flowers and leaves, as it dries almost instantly, I wouldn’t have been able to cope with flowers and leaves sliding everywhere! There are a few stands of glue here and there, but these are easy to pick off, and anyway, I can always say it’s strands of spiders web.
Easter Door Wreath 5I used a tacky PVA glue to stick the gem centres, I can’t remember what they are actually called, but they look like little jelly sweets and came in tubes …… I got them from HobbyCrafts Show many moons ago, they were quite the thing at the time, but it has taken me until now to use them.  I did try using flat back gems but they looked too shiny and sort of tacky.
I am frustrated at my lack of crafting this past two weeks, something seems to have been happening every single day, however I have reserved Sunday, no matter what, to get back on track. Laura goes back to work on this Wednesday and I will have Iris and Bertie on Tuesdays, Wednesdays and Thursdays.  I am hoping that Fridays will be my housework day, leaving me the rest of the week to do at least some crafting ………… 

Wednesday, 29 March 2017

An Easter Wreath Experiment

Oh my goodness, how did I ever find time to work, or am I just showing my age and slowing down.  When I think of everything I had to to do when I worked …… and what I actually “have” to do now …… oh well!
Easter Crafting TableThis is where I left off crafting last week and I haven’t progressed any further, however, I thought I would show you what I had done so far on the wreath I want to put on my Easter door.
Easter Wreath The wreath, has been a huge learning curve as I have never made one before, I thought it would be sooooooooo easy, but at every turn I have met with something that has hindered my progress.
Easter Wreath 1The polystyrene ring came from Hobbycraft, and was my first stumbling block as it was rounded on both sides.  I tried to cover it “bare” with punched flowers, but it just didn’t look right, the flowers didn’t lie like I wanted them to.  In the end, in sheer frustration I sliced the ring in half using my best carving knife, and then covered it in purple ribbon left over from Tom and Laura’s wedding unbelievably some four years ago.  I now realise that I what really should have done was buy the set of two cardboard rings that I ummmed and ahhhed about at the much maligned HobbyCraft Show at the NEC! Flat circles, are, for me, definitely the way to go when making any future wreaths.Easter Wreath 3The flowers still didn’t lie exactly as I wanted, but I decided I was in too far to start fiddle farting again, but I still couldn’t help doing a bit of this and that, with punched leaf sprays and flower centres before really fully committing.
Easter Wreath aI decided to keep things really simple and only add one punched centre to each large flower, at the start I went overboard with fancy centres, but it was too much.
aster Wreath bSo, this is as far as I have got after a week ……….
Easter Wreath cPerhaps I am over critical when working on something that is totally new to me ……. but ….. I wish ….. I had gone for more spring and pastel type colours, to me the wreath is too strong and hot, where for Easter, I think it should have been light, cool and dainty, if that makes sense?
I now need to add more leaf sprays and gem centres to the flowers and then, hopefully, it will be completed by my next post.