Monday, 15 December 2014

Gingerbread Man Christmas Wreath

NO …… I didn’t make this, I wish I had, but my sewing is totally pants. It was made by The Lovely Donna in my office ….. I gave her some die cut felt gingerbread men and she just flew with the idea!!!
I am soooooo jealous, I want it so badly!!! Perhaps, even badly enough to want to start sewing!!!!!
Incidentally, the “naked” wreath came from Poundland …… I feel another shopping trip is imminent ….. they are well worth stocking up on for 2015 projects …..and not just for Christmas!

Sunday, 14 December 2014

Gingerbread Men Bottle Caps

I am not sure if these work 100%, I think they just need a little more tweeking.
I need to use more vibrant colours to make up the background, use a finer permanent pen on the faces and perhaps use a touch of clear varnish or less Anita’s 3D clear glossy finish, as the gingerbread men seem to be made from an mdf which might be coloured and I think some of that colour has bleed just a little …..
However, from a distance they look pretty OK …… I think having to go so close to get a decent picture  just goes to show up all the tiny imperfections on something that is already very, very small!

Saturday, 13 December 2014

Penguin Bottle Cap Christmas Tree Decoration & Penguin Tray Pendant

I am still experimenting with bottle caps v pendant tray tree decorations.  I have to admit that for the shabby, rough, handmade look the bottle caps win every time …… however, since the wearing of Christmas jumpers is limited at work to a half hour window of choice on the Christmas dinner rota …… I  intend to wear a few pieces of festive jewellery as a subtle gesture of protest in the run up to the end of term!  So for that, the festive pendant has its place!
I was rootling about in the boxes of bits I have on my craft room shelves and found these penguins left over from the good old days when Christmas stickers were really inspiring (and cute), and since penguins are very “in” this year, I had to use them.
I simply made backgrounds of sky and glittery snow using scraps of paper , and stuck them into the bottom of the bottle cap and pendant tray. Next came the penguin, followed by a good dousing of Anita’s 3D clear gloss finish, with the penguin liberally covered, but still standing slightly proud.
However, when they were set they lacked something, so I tentively added tiny hologram stars ….which really did add the festive sparkle they were lacking!
It’s too late now, but I am determined that when Christmas is over and I give my craft room the really good sort out it needs,  I am going to sort out a box of tiny things that either fit in a bottle cap or 1in pendant tray to make more of the same …… building up a collection of bits and pieces to sell, as I am determined to find a couple of craft fayres  next year, something I have never done and to chance my luck, and if I want my stalls to be swarming (????), I think I need to be selling stuff that no one else will have.

Friday, 12 December 2014

Santa’s Belt, Christmas Matchbox, Favour Tree Decoration

This is another idea I had for using my Stampin’Up matchbox die to make a tree decoration to use up the mega box of small Lindtt teddies I got.I have had the silver, plastic buckles forever, and wasn’t originally sure if the proportions would work, but I think they are OK.
To make the belt I just cut a black matchbox lid using the die and then trimmed it so it could be threaded through the buckle and then wrapped it round the middle of the matchbox, securing it with double sided tape.  A small, black button and a scrap of white, self adhesive, border finish the box, making it ready to hang on the tree.

Wednesday, 10 December 2014

Wayfair UK And My Christmas Wreath Tutorial

You may remember a little while ago me telling you that I had been approached by Wayfair UK to produce a “crafty” tutorial using some of their products.......  http://itsallfiddlefart.blogspot.co.uk/2014/11/wayfair-uk.html
Wayfair DIY Christmas Wreath Table CentrepieceAs I said then, I was a little apprehensive at first, explaining that my usual “stamping ground” for finding bits and pieces for upcyling projects were mainly charity or Poundshops, but in the end I was eventually cajoled into producing a little something……….
Putting the instructions together for the tutorials wasn’t too hard, it was just like a blog post but by numbers, however I really struggled with the photos, not only having to match them up to a strict template, but also in the staging, something I have never done before.  When I blog a project it’s a matter of getting up as close as I can on a plain background, no fuss, no frills, no background, but as you’ll see, if you pop over to the "Inspiration" section of Wayfair's website I really had to dress things up!  So a lot of lessons learned and next time I am staying in London with Marc, I need to get his partner Iain to take me in hand and show me just how to stage like an expert!!!
downloadAnyway ........  it was a very new venture and a steep learning curve, but it was also such a great thrill to be spotted and asked ...... and there's another tutorial to come on 16th December!

Penguin Bottle Caps

I am sooooooo into bottle caps and pendant trays at the moment, these are not quite finished yet, they need a jump ring and thread with a bead on to complete them, but you’ll get the gist.
I am now constantly on the look out for small, dimensional  embellishments that will fit into a bottle cap, and these skating Jolees penguins are a perfect fit …….
…….. bringing back very happy memories of my wonderful trip to Michaels in Las Vegas, which is where I bought them.

Tuesday, 9 December 2014

Jewelled Snowman Christmas Card

This card measures 6ins x 6ins.
Jewelled snowman cardOh my goodness, what was I thinking (above)? I was trying to do something a little different from my normal less is more style, in an effort to use up some of the bits and pieces, like the snowman and corner peel offs that I’ve had for ages but never used, but somewhere along the line something went very hideously wrong ……
jewelled snowman Christmas Cardjewelled snowflake christmas card
……  it was the addition of the Poundland, self adhesive strips of clear gems!!!  Too much, far too much!
Much better gingham christmas cardI just couldn’t live with it, so I carefully removed the central panel and cut a 6ins x 6ins grey gingham card blank to stick it on to……
Grey gingham jewelled snowman christmas cardPhew, much better, a still a little fussy for me perhaps, but much, much better!!!!

Monday, 8 December 2014

Let’s A Do The Conga–New Year Card

This card measures 6ins x 6ins and is made using a hand cut, white linen effect blank.
Those pesky Paperchase robin stickers (£1) are at it again, this time doing the conga!
I just couldn’t resist it!

Sunday, 7 December 2014

Magic Reindeer Food – Free Tag Download

I have never made Magic Reindeer Food before, but, as I have seen it sneaking its way into the shops this year, so I thought I would have a go ….. trying to make it as simple and as economical as I could.
I decided that I would use some very old brown envelopes for the packaging, I have had them forever, but they had lost all their stick, but they were strong and would cost me nothing.
I then turned the said envelopes into bagalopes, there are lots of tutorials on the net on how to make them,  the one I have linked to is really easy to follow.:- http://craftyjournal.com/basic-bagalope/.  I didn’t do any fancy measuring, I just used my Coppernob score board, using the same line to score all the way round the envelope, after cutting off the flap and defuncked sticky stuff and cutting the edge with pinking shears.
For the food, I used mixture of “All Season” bird food (I kilo bag from Poundland), mixed with a few Jane Asher sugar stars and edible glitter also from Poundland (2 for £1), bagging it up in cello bags.
Then, I went back to the making some tags, which I decided to use “create” using Paint to “draw” a reindeer face, minus eyes and nose. I copied and pasted the design onto a tag, along with a poem that I also found on the net, but altered everso slightly to suit my needs.Magic Reindeer Food Tag 2014.From there, I made a PDF sheet of 10 tags on Dropbox that you are welcome to download and use https://www.dropbox.com/s/ften8bqz5cwaqxx/Magic%20Reindeer%20Food.pdf?dl=0
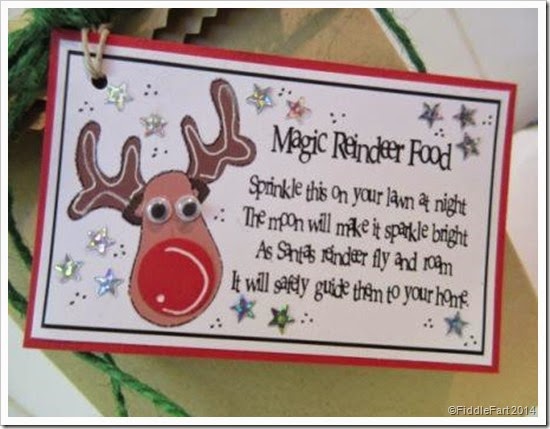
And now, you can see why I chose to miss out the nose and eyes, I knew googly eyes would give the reindeer character, as has his nose, which is a punched circle with a little white gel pen highlighting (like on the antlers).  A scattering of small hologram stars and a few doodled dots here and there complete the tags. By leaving the tags relatively plain you can create lots of different reindeer characters and add other embellishments without too much hassle.
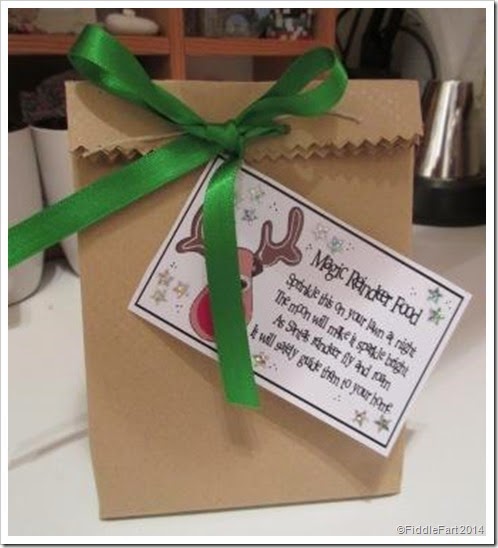
With my original packing I used a green ribbon, but although I have miles of it (leftover from Tom and The Lovely Laura’s Rainbow Wedding), it did seem a tad extravagant, so decided to exchange it for a doubled up length of green gardening string ….. which somehow made it more rustic, natural reindeery feel , if you know what I mean.
The tag also lacked a little something, so I mat and layered it onto scraps of red card, which not only made it stronger, but made the tag “pop”
Anyway, if you do download and use the basic tag, please, please, please send me photos of what you do with them, then I can write another post where we can all share our ideas if not for this but future Christmas’s.

Saturday, 6 December 2014

Christmas Tree Bottle Caps

A festive experiment today, that I think needs fine tuning for Christmas 2015, which is why, at this stage, I haven’t added any jump rings or beaded thread to hang them.
My intention was to put very simple and unadorned Fimo Christmas trees into the bottle caps,
…….. but then, I got taken over by the bling monster …..
…… who forced me to cover them with tiny Poundshop nail jewels and stars!!!
I think there is room for both designs, but the Christmas trees need to be just a fraction wider to fill the cap more, as it looks little lonely and isolated, and perhaps a few flat stars in the background ……
……. but, I do have a year to get it right for next Christmas!!!  OMG, did I really say “next Christmas”?????? I think I am finally losing the plot!!!

Friday, 5 December 2014

Marc’s Fancy Bead Glass Markers

I am certainly going to make a few sets of these glass markers to give as small fairing gifts this Christmas, a brilliant idea for using up odd beads, as soon as I can dig out some of my long lost Christmas charms that is!
glass wine charmsMarc has simply taken thin hoop earrings and threaded an assortment of beads onto them.  You can be as fancy or as plain as you like, the world’s your lobster!
Beaded glass wine charm.beaded glass wine charm
Marc generally puts them in packets of six, but to be honest you could go the whole hog and put them in some right fancy (personalised?) boxes to match.
Beaded glass wine charm. crafts As soon as I make mine you will all be the first to know!

Thursday, 4 December 2014

Simple Christmas Branch Card

This card measures 6ins x 6ins and is made using a hand cut, linen effect card blank
Stars on a branch cardI used my Memory Box  - MB98187 WOODLAND BRANCH DIE  Code: MB98187 for this very simple card.
After I had glued the branch on to the card, I went over it lightly with a white gel pen and then a Quickie Glue pen to add a light sprinkling of translucent micro glitter to give it a Christmassy feel.  Unfortunately the photo just doesn’t bring out the magical twinkle and sparkle of the glitter.
Stars on a branch card.I then drew threads to hang the silver, metal, star charms from (this is my demo card …. so next time the lines will be straighter!), and as I wanted to hid the eyes on the top of the stars I added very small red flat backed gems which just added enough subtle festive colour to lift the card. Voila!

Wednesday, 3 December 2014

Fir Cone Christmas Trees

I know these have been done a million, million times before, but I have never done them!!
fir cone Christmas TreesI have had the tiny 3cm tall flower pots in my cupboards for years (and I mean years), they were originally bought for putting Easter eggs in, but I have never, after all these years, found an Easter egg that fit!!!
mini terracotta flower potsThen the other day I noticed lots of fir cones round the bus stop where I stand to come home from work ….. and wondered…….  so I popped a few in my bag to try…….
OMG …….. they fit perfectly …… and you know I am a little anal about crafty things being in proportion ……
fir cone christmas treeSo, I glued the cones and pots together with a glue gun and then proceeded to paint the tips of the cones with white acrylic paint and then, while the paint was still wet gave them each a very liberal dousing of translucent micro glitter from a very huge pot Dianne, my friend in Florida sent me a year or so ago, by the time I finished, I looked like a Christmas tree!
The temptation was to then carry on embellishing with gems, stars and tinsel etc. but I reined myself in by just topping each tree with a simple wooden star outlined with a black fine liner pen …… no over egging of the pudding here!
I think I am going to squirrel these away now and then on 1st December will put one on each of my office colleagues desks to welcome in Advent ………. and another few bits from my humungous crafty stash bite the dust!

Tuesday, 2 December 2014

Robins Rockin’ Around The Christmas Tree Card

This card measures 14.5cms x 10cms and is made using a hand cut, white linen effect card blank.
The ideas for how to use this seasons Paperchase Robin stickers (£1 per pack) just keep on coming ……
All I did was dig out an old chipboard Christmas tree and put a foam sticky pad on the back so it would stand proud and I could put robins peeping from behind it. I then placed the robins around it in a way that it looked like they were dancing  ….. and finally, just added some of my own doodle style handwriting and a few dots here and there to finish it all off.  So cute!

Monday, 1 December 2014

Another Set of Christmas Matchboxes

I had a good old rummage in my box of Christmas bits and decided that it was high time these assorted bunch of 3D embellishments were finally used ……
…… and then scrabbled around for small scraps of gingham or other red and cream patterned paper to do some mat and layering.
I also found that I just had enough of the lacy borders Marc spent a morning cutting out for me during his stay in the summer to decorate the sides.
A few red flat back gems, CraftWork card circle sentiments, small peel off corners and a little faux stitching bring everything together.
All that’s needed now are two chocolate bears……
…… for the matchboxes to be ready to hang on the tree.