That was really all there was to it, but it has increased my curiosity for using acetate in other baubles, perhaps next time using a suitably festive monochrome picture, even though the photocopier I use doesn’t particularly like acetate!!
When I mess about trying to decide where to put the tiniest and most insignificant of flat back gem I call it Fiddle Farting, hence the name of the blog!!!
Sunday, 30 November 2014
Personalised Christmas Bauble
I put this Christmas bauble together for a friend at work who had recently lost her cat but wanted to keep its memory on her Christmas tree each year. She said she didn’t want anything fancy, just her cats name.
Now, when I was in London with Marc I noticed that one of the trends this year in Christmas baubles was to use a printed, monochrome acetate in them, either plain text or a picture, so I thought I would try it ……
So nothing fancy ….. I just typed the name in a circle, guessing the size I needed and then printed it off on acetate. I then cut out the circle, which proved a little too big, so trimmed down again and then rolled it up to fit into the opening of one of the clear, glass baubles I got in the Dunelm January sale this year, reduced from £4.99 for a box of three to £1 (well, naturally, I bought all they had). Originally they had a swirl of paper tartan ribbon inside, but that was soon fished out. Luckily the circle held its place and then I added a sprinkling of small polystyrene balls and silver snowflake confetti.
Saturday, 29 November 2014
Stars On A Branch Christmas Card
This card measures 6ins x 6ins and is made using a white linen effect hand cut blank
There is absolutely nothing to this card at all which is why bit probably took no more than five minutes to put together.
I used my Memory Box - MB98187 WOODLAND BRANCH DIE Code: MB98187 ………
Friday, 28 November 2014
No Bob, Bob Bobbing Allowed, Robin Christmas Card
This card measures 6ins x 6ins and is made using a hand cut, white linen effect card blank.
Thursday, 27 November 2014
Gingerbread Man Christmas Card
This card measures 6ins x 6ins and is made using a hand cut plain brown card blank.
This card uses up part of a pack of the metallic, puffy stickers that I got from HobbyCraft last year (more stash busting). I reckon I should get three cards from one pack, but I wish there had been two more hearts and two less gingerbread men per pack so that I could follow through the pattern exactly on each card instead of hurting my brain thinking of another combination for the last one!!!
Wednesday, 26 November 2014
Santa Matchbox Christmas Tree Decoration
More matchbox Christmas tree decorations today, on which I managed to use up a whole pile of wooden Santa's I had forgotten I’d even got, until I went rummaging in some boxes on the top shelf of my craftroom looking for something completely different!
Tuesday, 25 November 2014
When The Red, Red Robin Christmas Card
This card measures 6ins x 6ins and is made using a hand cut blank of PaperCellar Christmas patterned card.
It’s an idea I think could be developed further ….. and fortunately I have got a couple of spare packs of robins to work with, even if it’s after Christmas. These robins have so much potential!
This Christmas, like Halloween has been a poor year for “good” stickers, my staple for cards etc. …… I know I could stamp …… but you know me, I am such a lazy crafter!!!!
Following On ……Fiona Says …..
Following on from my excitement on finding Mason Jars in PoundWorld Fiona sent me this e-mail and photos ……
“Just seen your post about the mason jars, it is a big thing in America, all my relatives use them, I was soo excited when I saw them in Poundworld and just thought I would let you see what I did with them, they are filled with hot chocolate fixings”
Fiona
Now there’s an idea …… not sure where Fiona’s Santa hat’s have come from, or if she’s made them ……. but I am wondering if the wine bottle toppers I have seen in Poundland might work?
Poundworld Glass Drinking Jars
I think you can see how fast these were selling in Poundworld yesterday, and I just couldn’t resist either! I loved them these drinking jars when I saw them in Vegas and did bring a couple home with me, despite needing to pay extra luggage allowance, because at the time they were hard to find in UK and very expensive!
Monday, 24 November 2014
Tiny Gingerbread Men in A Tiny Jar Christmas Tree Decoration
This was one of those projects I was concerntrationg on so hard I forgot to take any pictures as I was going along …… doh!
It’s a one off for one of the girls in my office who this year has gone mad on gingerbread men for her festive decor ….. and I thought this would be a tiny something for her tree.
The bottle is about 4cm tall (from The Works 99p for 6) into which I have put seven tiny fimo gingerbread men made using the tiny silicone mould I bought a couple of years ago from Etsy and a few tiny hologram stars
Sunday, 23 November 2014
Tiny Christmas Tree In A Bottle
As you know I have wanted to make a tiny Christmas Tree in a bottle for ages after stumbling upon them on Pintrest…… and at last finally, look what I’ve done, I am sooooooooo chuffed.
I have been hampered by not finding what I believe are called bottle brushes in UK, I realised I would have to look for the in USA but oh my life the postage when I thought I had found a supply. Then finally I found some (1in high)on Etsy, with a reasonable P & P and my heart sang!!
My next obstacle was the bottles and there I had to take a leap of faith, I measured the ones I had from The Works and worked out that they “ought” to fit so bought a few more.
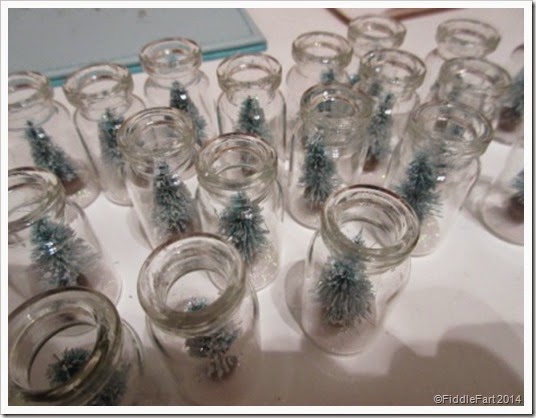
When the trees arrived all went like clockwork when I experimented with the first bottle as the tree just slide in (picture below)
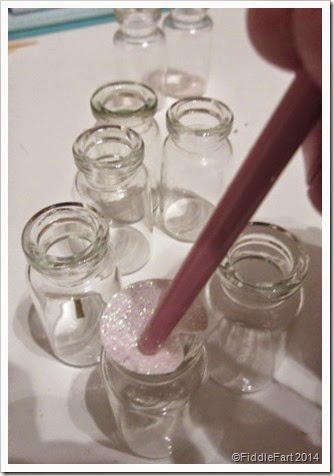
Then disaster struck ……. after putting a circle of white glitter paper inside the bottle, to look like snowy ground, (a very fiddly task), and the trees were dry, I attempted to one into a bottle …… only to find they just wouldn’t go beyond the neck of the bottle, no way would it slide in …. the first one must have been a fluke!!!! I was distraught! But I was determined I would not be beaten.
Then I had a eureka moment and removed one of the tree bases and replaced it with a wooden bead …… it worked and still looked in proportion! So all bases were then duly replaced ……
Putting the trees wasn’t a problem, I used E6000 glue on the bottom, but had to keep checking as it dried that the tree didn’t lollop to one side …. so had to twiddle with them every so often to make sure they were centred.
While they were drying I got on with the corks, simple gluing on a decorative spacer bead and a tiny eyelet. It was tempting to add something round the neck of the bottle but that obscured the view of the top of the Christmas tree and that was what the idea was all about, so in the end I decided that a pearl on the hanging thread was enough.
So there you are, I have finally made something I always wanted to make but didn’t have a clue how to ….. I will give the bottles (if I can bear to give any away) to special friends instead of a card, cards are usually discarded after Christmas, but this token can be put on the tree year after year.
So I started blithely painting and glittering the first twelve trees, with a mixture of white paint and PVA and then a sprinkling of translucent micro glitter
Saturday, 22 November 2014
Wooden Heart Tree Decoration
This was an experiment, but I think it’s an experiment I won’t repeat as I feel that I may have over egged the pudding ……
Friday, 21 November 2014
Chocolate Sprouts Christmas Tree Decoration
Do you remember the nets of chocolate sprouts I found in M & S a few weeks ago, well, I have finally used them!!!
I put them in matchboxes to hang on the Christmas tree.
I used my Stampin’Up matchbox die to cut the boxes and have finally found a way of folding and putting them together without driving myself demented, with thanks to YouTube!!!
I found an image of a Christmas sprout, copied and pasted it, so I had enough to put on nine boxes (enough for the number of sprouts I had) and then further embellished them by adding glossy 3D paint to the hats and bobble, googly eyes and a smiley mouth, and left for 24hrs for the paint to set.
While they were drying I put the matchbox covers together trying to use as many of the odd bits and pieces I have in an effort to use up stuff, rather than buy any more!
I also decided to go the whole hog and added holly confetti and berry flat backed gems to the sprouts hats, plus a few gold peel off corners here and there. The gold foil, sentiment circles come from Craftwork Cards.
I secured the ribbon hanger using an eyelet set with my cropodile and then added a bead for extra detail and colour.
Thursday, 20 November 2014
Robin Christmas Tree Card
This card measures 6ins x 6ins and is made using a hand cut blank of PaperCellar Christmas patterned card.
All I have had to add to the design was the tub using small, square, flat backed gems, a red flat back gem star on the top and a few dots here and there to fill in the spaces.
Wednesday, 19 November 2014
Fimo Snowman Pendant Tray
I think this is a posh version of my bottle cap ideas!!!!
Marc reminded me about the 1in pendant trays he sent me a while back, saying that as they are a ready made pendant, there would be no fiddle farting about punching holes and attaching jump rings as with a bottle cap.
However, while this second version was cooking, I prepared the pendant tray, making a background of plain blue and glittered paper and doodling a few snowflakes.
When the snowman had cooled I glued him into the tray using E6000 glue, which is really strong and then filled the tray with Anita’s 3D clear gloss finish to add a bit of depth and dimension.
So I had a go ….. the snowman ….. agh, as well as working on such a tiny scale, working with white fimo is a nightmare, trying to keep it white, especially when adding other colours. And, this is my second snowman, after getting the first one just right …. I only went and put him in a oven that was too hot and burnt him!!! Can you burn snowmen?
I am particularly proud of the snowman’s arms …. boy were they fiddly!!
Subscribe to:
Posts (Atom)