Sunday, 8 December 2019

Iris's Eraser Nativity Scene

Something to make you smile today.
I found Paperchase Nativity erasers set in a charity shop for £1.49, and although I thought Joseph and the shepherds looked ever so slightly dubious, I also thought that perhaps Iris and I might be able to do something with them.
Suffice to say Iris loved with them and embraced with them in her usual creative flair and enthusiasm A box was duly sourced and covered with no frills, brown parcel tape in an effort to keep said box together by Nanny and then Iris weaved her magic on the inside providing back door and straw on the floor.
And then for good measure, ensuring all festive bases were covered, she then added the Santa set of erasers I got from The Works.  I think it's all rather beautiful, bless her.

Because of all the tiny pieces involved in both sets of rubbers I did insist on gluing the characters  together first with a really strong glue before they were "played" with.  It was a bit of a learning curve, however if I ever see similar sets, perhaps at Easter, I might now consider using them again as a different sort of embellishment to put in a diorama or printers tray for example.

Saturday, 7 December 2019

My Festive Bedrooms

I think I may have gone a little overboard this year in my festive guest room ........
It's a bit busy and I am not to sure how cosy and relaxing it would be to sleep in there  ........
...... but at least there will be no mistaking that's it's Christmas!!! 
I was worried that since I gave the room in a deep teal signature wall earlier in the year that the Christmas bits and pieces I had would still work, I think they do, so perhaps it's just this new colour combination, plus the extra bits of silver I need to adjust too.
The festive flowerpots for my car boot cactus's sitting on the window sill were all charity shop finds, plundered on the same day from different shops, all costing 99p each.
There is a little less ornamentation in my room.
I decided not to go with any festive bedding in this room this year, as the white broderie anglaise I already use works, I have just added two red pillowcases at the back plus a red cushion in the middle, of the two silver ones, which needless to say all end up on the floor when I go to bed!  
The small ribbon embroidered cushion was another charity shop find for just 99p.
I wasn't too sure whether the three retro, white, metal mirrors that are usually above the bed were festive enough especially as it's also quite a space to fill, but when I saw the large red glitter stars in B & M Bargains reduced to £1.49 I could see that they would work in both rooms.
I now really need to curb my enthusiasm for buying any more festive frou frou, I really have more than enough ....... but when you spy a painted terracotta Santa wall plaque for just 99p in Oxfam what's a girl to do?

Friday, 6 December 2019

A Bit Of A Crafty Charity Shop Haul

A week or so ago I nipped into the Salvation Army charity shop in Evesham and found these Christmas cello bags (below). It took me a bit to work out exactly what as they were just bundled in a nondescript basket on a table......  
...... but as soon as I did, at just £1 for 300 bags, 100 of each size, they were a no brainer.
Then as soon as I got home I immediately regretted not buying another pack plus a set of twelve small boxes that they also had, which, after I had thought about it, could have been used to house  dioramas.  I reckoned I had missed the boat seeing them again so put it down as coulda, woulda, shoulda!
However, when I went back about two weeks later they had a £1 table and I had another mooch and found the very same boxes ....... needless to say I got two sets.
They are actually ring boxes and as I suspected really sturdy.  I am not sure if I can use the foam insert but I already have a couple of ideas for dioramas for next Christmas. They are small enough to hang on a tree, but first I  need to work out a way so that they will hang evenly on a tree branch, then if I manage that, I can to put a scene inside, but keeping the lid, so when the box is opened what lies within will come as a surprise, if that make sense?  
Also on the table were these sturdy (must be the word of the day) flat bottomed, party/lunch bags in a rainbow of colours for another £1 for 24, another no brainer .......... 
...... as were packs of 100 11ins x 5ins cello bags, as you can never have enough cello bags! And there' was more .........
........ 20 wooden reindeer tags (£1) ..... I can see them now coloured brown, with a large, red flat backed gem nose, glittery antlers and a googly eye, perhaps even a collar with a bell, probably not a project for this year, but you never know. if I get five minutes. I got two packs as I thought Bertie's nursery class might make good use of the other.
And finally, the most intriguing of all, a nail art set again for just £1.  I don't do nails so I don't really have a clue what I have here, but I looked at it with a crafter's eye and then added an extra one to my haul for Marc.  
I have paid £1 for just a wheel dispenser of nail art gems in Poundland many times before which contained a lot less gems.  Here there are twelve different colours and I reckon there's at least 100 of each, which makes the pack well worth £1 for the gems alone.  There were also what looked like five double headed embossing tools, all with different sized ball ends (if you'll pardon the expression!) which I am sure will also come in useful for scoring and embossing ........
........ plus a pack of fifteen brushes ..... I'm not sure their exact purposes, but I can already see me brushing glitter away from projects using the fuller ones. They will all get used, I am sure, at one time or the other, even if it's just for gluing tiny areas.
And it still goes on ..... there were thirty rolls of  very thin metallic tape, all different colours.  They will probably be a nightmare to use but I am already thinking of using them for outlining/underlining cards, toppers, tags etc.?

The four triangular sponges will always useful, but there was also a pack of five round sponges with a holder, these, after some research, are used for applying tiny stencils to nails, so again could/will be useful on certain projects. For just £1 for this lot, it would have been rude not too!

On the same day I also visited The Vale Wildlife Charity shop, although I have more than enough bits and pieces to deck my various festive shelves, I am always on the lookout for retro/vintage pieces.  There is no age to the above, however  I couldn't resist it for 50p.  I thought it might hold a tealight but is solid and reasonably new. I also found something "hideous" for Marc to make him laugh, but I can't show you that until after Christmas so as not to spoil the pleasure for him when he unwraps it!!!

I really like this shop as it sells things at really decent prices, there is nothing I hate more than finding something from Primark marked up at double the original price.  It's always busy and at the prices they sell for you don't have to stand there asking yourself if you really need something for 50p or £1.
I have had some really cracking stuff, including my sunburst mirrors in my spare bedroom ..... and if something doesn't work on my shelves /walls etc. I simply donate it back. 

Thursday, 5 December 2019

Simple Snowflake Card

This card measures 14cms x 14cms and is made using a hand cut and creased smooth white card blank.
A very simple card today, in the small hope of emulating Marc's very simple but effective Christmas cards of the past two/three years.  Following Marc I have chosen to use white on white.  
I simply stamped the sentiment onto a blank card using my Tim Holtz stamping platform, as someone who always a reluctant and often frustrated stamper in the past, wasting too much time, paper, card and tears in it's pursuit, I can't tell you how much I love this tool! 

There are two wooden layers to the snowflake and one gem which means that it would be a card to be delivered personally or popped in a parcel, postage at Christmas is exorbitant enough without posting a card that would come under the large letter category!

Wednesday, 4 December 2019

Christmas Carrot Decorations

Carrot tree decorations????  Well, I suppose it was Aldi's Kevin The Carrot that was probably the inspiration for this silly idea!
There is a charity shop on the corner as I come home in the evenings that occasionally leaves a box of unsold bits and pieces outside ...... and well, it would be rude not to have a little mooch, and it was after one said mooch I found these two plastic carrots most probably from a food play set left abandoned and unloved........
I immediately thought of Bertie and how, when he was a baby used to sleep cuddled up to a giant Ikea soft toy carrot (?????) and decided then and there that I needed to rescue them to hopefully give them a completely new life as Christmas tree decorations, one each for Iris and Bertie to go into the bag of tree decorations I make them each year.
The first thing I did was drill a hole in the top of each carrot (using my model makers drill) in order  to fit a screw eye hook to hang them by.  I coloured the top with a red Sharpie pen to create a Santa hat, adding 3D snow effect and a little iridescent micro glitter for extra sparkle to make a fur trim and bobble.   
I decorated the hats with a punched holly leaf and three, red, flat backed red pearls.
The face was next using googly eyes and a black Sharpie pen smile, followed then by arms and hands.  

Close up photos take no prisoners, so before these two are wrapped in tissue I need to give them a quick brush down to remove all the surplus glitter. I know it's a really daft idea but who says carrots are only meant for the festive dinner table, especially ones that  were originally destined to end up for all eternity somewhere under a landfill site.  Happy days!

Tuesday, 3 December 2019

Monkey Christmas Card For 2019

I don't think I have ever been so well organised as far as this years Mum's Monkey cards is concerned, as they were all done and dusted back in June!  OMG!
Each year I rack my brains for a new theme for them ......... and as I was about to pack away my festive bed linen for another year the idea of "God rest you merry gentlemen" sprang to mind, so a last minute photo shoot was called and the perfect shot secured. I then sat on the picture until around May when I had them printed for just 5p per copy from Aldi.
In June I decided to put them together.  The hats and bobbles were glittered over using white micro glitter and embellished with holly confetti and small, flat back, red pearls.
There was also a lot of mat and layering to be done to pick out the blue of their pjamas and red of the bedding........... with a little faux stitching on the pale blue layer thrown in for good measure.
I created the sentiment in two parts and again these were mat and layered on red.
The final touches came with the addition of  silver snowflake confetti (please forgive the blobs of wet glue in the picture), with red flat back pearl centres and a few clusters of three red dots here and there.

With The Towers now festooned in all it's festive gaiety and The Boyz once more donned in their gay apparel, I guess it is the perfect opportunity to be thinking of next years card, any and all suggestions gratefully received .......  happy days!

Monday, 2 December 2019

Little Peg Doll Christmas Snow Scene Decorations.

I just don't have a clue what to call these little things other than "peg doll Christmas scene decorations"??!!

I got the idea after seeing examples of peg dolls with acorn cup hats on Pinterest.  I've had a box of acorns, cups and twigs for about two years now, after collecting them during a weekend in Wells and so many times I was almost about to either chuck them or give them to nursery, but I am so glad I didn't now.
The peg dolls, sold as wooden counters, were from The Works, the small bristle Christmas trees, which are really lovely and I am praying that I can find some more were from Poundland (6 for £1), and the tiny Christmas dominoes were a charity shop find from years ago.
I coloured the "dolls" bodies with Sharpie pens, then glued on the acorn cup hat, adding a tiny punched holly leaf with three equally tiny flat backed red pearls for the berries. I then covered the picture side of the dominos with 3D effect snow, before changing the original circular, flat base of the trees for a natural coloured bead to give a little more space to work with. I added a few small, iridescent, polystyrene balls and tiny silver balls to fill the space around the peg doll and tree and give extra texture.
I foolishly used a fine liner pen for the eyes and mouth ..... when I really should have known from experience that they would bleed into the wood, doh, doh, doh  ...... however in this case I was able to salvage a near disaster by covering the original pen eyes with tiny black nail art studs, but lesson learnt, next time I will either use a black Biro or glossy enamel accents to do it.

That said, I think these will be the only three I make this Christmas because what I really wanted to do was make them into tree decorations but no matter where I put a screw eye hook (or pair) the blessed thing just turned upside down, it's a physics/balance type problem I know but I just couldn't work it out and after over an hour trying I gave up.  Any suggestions would be gratefully recieved because at the moment I am completely stumped.

As they are I can see them put among Christmas cards and/or other decorations on a shelf and if I had a few more I could perhaps even see them as place settings at the Christmas table.

Thursday, 28 November 2019

Two "Crafty" Charity Shop Finds

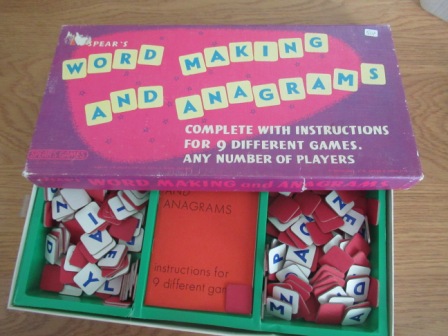
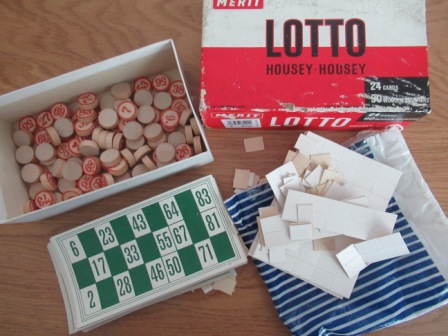
I am always on the look out for bits and pieces I can use for crafting in any charity shop I visit, in particular games that use letters and numbers and as it happened I found both these games on the same day, in different shops for just 50p each.
I thought that this blue set of capital letters will come in very handy on cards where I use different letter stickers/embellishments to spell out greetings i.e Happy Birthday. I am also wondering, taking into consideration their blue colour how they would look spelling out a complete festive phase or word on a plain white card, scattering snowflakes or stars around them for a snowy, cold feel?
...... And then, I am currently in two minds as to how to use this vintage Bingo game, initially it was the numbers I was after (all present and correct 1 - 99), perhaps using numbers 1 to 25 on a vintage style Advent Calendar, but after finding that it was complete I am now thinking that since Iris and Bertie love playing number games so much, perhaps we should (for a while at least) use it in the way it was meant to be?  Hmmmmm, lovely, lovely, lovely wooden numbers though!

Wednesday, 27 November 2019

Christmas Fairy Door

I have never attempted a fairy door before, but seeing as I had all the basic bits and pieces I thought it was about time I had a try .......
....... and for my first attempt I don't think I have done too bad.
The door, fence, trees and door wreath all came from The Works.  
I started off tentatively by attaching the door to a strip of spare balsa wood. I removed the original star on the door and put the little door wreath in it's place, which I later decorated with tiny weeny, silver flat backed gems.  I wish now that I had also replaced the pearl door handle with a large gold flat backed gem and gone over the black door hinges with gold 3D effect paint, but it's a lesson learnt for the next one I make!
I added the trees, which needed quite a bit of fluffing to make them presentable and covered the balsa base with 3D Snow Effect ..... at this stage it was beginning to look a lot like Christmas! 
I then got totally carried away, adding the fence to the back of the door, colouring it with a red sharpie pen. 
I filled the trees with various sized, pearl and gold effect flat backed gems with a large star on the top .......
......... followed by a"Welcome" mat using a textured brown card and an attempt at a doodled squiggly writing to look sort of "mat like", if that makes sense, using a black fine liner pen.
By this stage I decided I might as well go the whole hog, putting snow all round the door and then adding a string of little fairy lights to it, plus windswept snow on the fence. The very final touch came from the small, irredescent, polystyrere balls (Poundland) piled up to look like snowballs which I think really makes the scene. I have such a thing about proportion but with this door I think I have just about got it right, keeping it whimsical, without spoiling it with too much accuracy.
It sits very nicely on my skirting board, but when December comes I am thinking that it perhaps needs some tiny snowy footprints leading up to it, I can't wait to see Iris and Bertie's reaction when they see it for the first time.