Tuesday, 8 September 2009
Can I Bribe You With Some Blog Candy?
I have had almost 1,000 visitors to my blog since I started it just over three weeks ago..... I am so excited! I would love to make that magic number in the next day or so ...... if you would like to help me get there, please leave a comment on this post and I will find some Christmas Blog Candy for one, randomly picked, commentor!


Something Old, Something New …. Wedding Gift For A Bride
First of all, please forgive me for these awful pictures.
I hope, despite the horrific nature of the photography you can make out what I have made.

This is a little book I have cobbled together several times now as a gift for a bride.
It measures 4 x 4 ins and was made using my bind-it-all. The cover is a silk covered card, (very lovely). The pages are cream card which I have faux stitched with a light brown, fine tipped pen.
On the left hand side of the book I have made pockets using a matching cream/gold embossed paper. I tell people who ask me to make this book, to put in small pictures and/or mementoes of the bride as she grew up, or little messages from the bridesmaids, etc. to make it extra special.
Each page is made up from the “old, new, borrowed rhyme. The “old” on the first page is made using old lace, a mother of pearl button, and old gold safety pin. The button and pin are methods of joining two things together, …. as the bride and groom will be on their wedding day.
The “new” page is made up of mini scrabble letters (Jolees)spelling the word “Life” to represent the new life the bride is about to embark on, and the heart shaped lock and key, symbolise security.
“Borrowed” is a bit tongue in check ….. two credit card charms!

Forget-me-nots have been used to represent the “blue” and dragonflies are an ancient symbol of growing, changing and maturing.
…. and finally I have put an old polished sixpence on the last page.
I have tied cream ribbons to the binder of the book and a small heart shaped gold charm that says “Made with Love”.
Phew!
Monday, 7 September 2009
Sat Nav Card

Beep Beep! Men’s cards are hard! I would much rather work with pretty things like flowers, beautiful paper, ribbons etc.
The idea with this card started with the weeny car stickers which I bought from Mei Flower at the NEC Hobbycrafts Show.
I found a picture of a SAT NAV screen and added the text “Happy Birthday” then printed it twice. The topper is a very basic two layer “decoupage”, made by cutting out the image, including the SAT NAV frame and then just the SAT NAV screen. These are mat and layered on silver mirror card.
The background is part of a page from an old road map book, (a car boot sale bargain, bought for pence, which comes in very useful at times), which I’ve mat and layered on red.
Advent - Countdown to Christmas Chalkboard
I was still thinking about my Advent Chalkboard this morning, when I had one of those “eureka” moments, I suddenly remembered a wooden Christmas garland that I bought in a garden centre sale, for a couple of pounds, a little while ago.
It took a bit to find …. but the search was well worth it, as the snowmen on it are just perfect!

I have attached some gingham ribbon to the string hanger and added the writing and snow with white Posca pen, adding a touch translucent micro glitter along the bottom. All I need now are a few wooden snowflakes here and there around the frame. I'll post another picture when the board is completed.
I hang my head in shame though, I can’t be the only one who has so much crafty stuff that I forget what I’ve got, can I?
Sunday, 6 September 2009
Where Can I Get…….?

Ideas wanted please ………
I have just bought some really cute Giselle Graham chalkboards (10 x 7 cms) from e-bay, that I want to turn into Mini Advent Christmas Countdown Boards
I am going to write “ …..days to Christmas” on them with white Posca pen and attach either a piece of chalk or a chalk pencil on a string, so that children can fill in the days left till Christmas.
But now I am stuck as to what to use to embellish them (probably in the right hand bottom corner, and across top and bottom).
If it is to last for more than one year, I think wooden embellishments are the best idea – and I like the idea of snowmen or a Father Christmas.
Any ideas where I might get something suitable? I like the America folksy art/cutesy style, and I guess I am looking for something about 4 cm tall, but at the moment I don’t have a clue where to look.
Diary/Notebook

I made these little diary/notebooks as presents last Christmas for all the staff I work for.
They were made using my Bind-It-All, and measured 4 x 4 ins. Each book contained about twenty four pages of light weight, good quality cream card, which I edged by hand, using a taupe coloured pen (aghhhhh). The patterned paper and butterfly used are K & Co.
Inside the book, on every second left hand side page, I made a pocket and in that put a monthly calendar (created using Publisher, and printed in a light brown)
To finish the whole thing I attached a heart shaped glass bead to each ring of the binder.
I packaged them in a brown card box made using my trusty box maker (another e-bay bargain)…… fiddle farting in a nutshell!
Saturday, 5 September 2009
Seems Like A Nice Young Man

This is a card I made for a young lady, for her 13th birthday and potty about Zac Effron.
I decided that thirteen was old enough to be able to cope with a glimpse of belly button, and the slight suggestion that this young man was a trifle hot and may possibly have to take his shirt off!
The image was half inched from Google images. It was mat and layered first on gold mirror card, then a K & Co retro style paper, and finally gold again, on a white A5 size card.
The red swirls were cut on my quickutz silhouette and the hearts made with assorted punches. Scattered clear gems were used to finish the effect.
I prefer the card without the text, as it could be used as a picture after the birthday, but it was returned to me to have daughter bit added on. Swings and roundabouts!
Friday, 4 September 2009
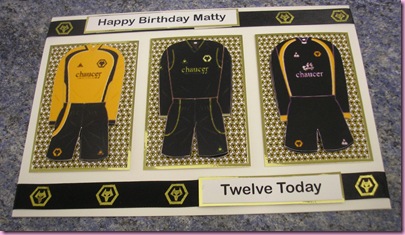
Up the Wolves
As I come from Wolverhampton it stands to reason that I am asked to make cards for Wolves Supporters …..


Thursday, 3 September 2009
I Never Know What I Am Going To Be Asked For………

My sister-in-law asked me to make a card for a young man who was off to University, which included some money for him to use in an emergency.
I used a Sizzix shaker box for the money holder and folded a £10 note carefully, so that the Queen’s face was clearly visible. To add a bit of humour I added googly eyes to the plastic front of the box and “diamonds” on Her Majesty’s crown and earrings.
The inside of the card continues with the words “Please feel free to trash this card. Good Luck at Uni”
Wednesday, 2 September 2009
Something Very Different For Me … Glass bead Bracelets
I don’t usually make jewellery, but when I saw the long multicoloured beads I just had to have them. I just love the colours in them, I don’t have many beads but what I had just go so well together I am thrilled with the result.


Tuesday, 1 September 2009
Card for Hannah’s 18th Birthday

This card was a nightmare to get a good picture of because the gold card reflected the light. hence the dodgy colour!
It was made for my sister-in-laws, best friends, daughter’s 18th Birthday.
The numbers, letters and leaf flourishes were cut on my Quickutz Silhouette, the flowers are punchies and for the centre of the flowers I have used small pearls. I have put three layers into the flowers and then “fluffed” them up to add dimension and texture.
Monday, 31 August 2009
A Wedding Card

This is a wedding card I made recently for a friend. I love looking at Digi Scrapping sites but have used the images in my cards rather than in a scrapbook.
The newspaper is a template I made and have used it for all sorts of occasions. A lot of people ask me to make a card that includes personal details and a newspaper format is just perfect for that.
Using the template, I have selected colours to suit the occasion, added the details given to me and then pasted the bride and groom and glasses from a digi set from Graphics ©Scrappin Doodles http://www.scrappindoodles.com/.
I print another copy of the bride and groom and the “exclusive” panel, cutting them out to use as a very basic “decoupage” layer using sticky pads to hold in place.
To complete the card, I add iridescent micro glitter to the glasses and Anita's 3D Clear Gloss finish on the eyes, bow tie and flowers for an extra 3D effect.
Sunday, 30 August 2009
Assessorize and Paperchase Stickers
One of my favourite sources for small "puffy" stickers is, unbelievably, Assessorize, the clothes/accessories shop. I stumbled upon them on a stand in the children's area and have been a huge fan ever since. They are small and ideal for making toppers.
 They are quite cheap, about £1.75 per pack, and I can usually get five to six toppers from one pack. They have several different sets at various times of the year, but be warned, get them when you see them, because once they are gone, they are gone!
 My sister is on "special watch" for their Christmas stickers. Last year they were fabulous, (see Sizzix Christmas Matchbook), cute santas, reindeer, penguins, trees. I can't wait to see what they come up with this year. The cards I made with them just flew!
Saturday, 29 August 2009
Sizzix Christmas Matchbook - Using Sizzix Originals Matchbook Cover & Inserts - 38 - 1128
This is a "crafty" experiment, it follows a post from a couple of days ago. It's a bit of nonsense really, but was fun to make.
 I've used the Sizzix Matchbook die again, but this time I've embellished it with some Christmas Assessorize stickers left over from last year.
 I've used the Sizzix Matchbook die again, but this time I've embellished it with some Christmas Assessorize stickers left over from last year.
 It's cute, and I think it would be good in one of those Advent calendars that you put small gifts in
or as a place card on the festive table.
Thursday, 27 August 2009
Another Place, Crosby Beach, Liverpool, 26th August 2009

Crosby Beach, Liverpool, is a magical place.
There are 100 cast-iron, life-size figures spread out along three kilometers of the foreshore, stretching almost one kilometre out to sea.
I left two wish bracelets on statues 88 and 91, I don't suppose they will withstand the weather and the sea conditions for too long but I made my wishes and if they are found by other visitors, the wishes will pass on to them .........

Zutter Mini Bind-It-All Scrapbook.
This is a mini book I have just made for a friend at work, whose daughter is going to study in Argentina for the next twelve months.
 She gave me a list of her daughter's interests, including her love of swimming and running, eating fruit and veg, all things Spanish and reading. She also asked me to include a message about only being a phone call away and how much her family loved her, which I have included on the last two pages.
 I have used my trusty Zutter Bind It All to make this album, the pages are 4 x 4 ins and the cover a fraction larger. On three of the pages I have added a little tag with small, individual pictures of Imogen's family, with a little charm attached.
 I have also made a box with a tag to complete the gift using my box maker (bought from e-bay, I couldn't be without it, what a brilliant invention!)
 Wednesday, 26 August 2009
Sizzix Mini Matchbook Album - Using Matchbook Cover & Inserts 38-1128
I have had the Sizzix Matchbook die for ages, but have not used it until today. For a first effort I am quite chuffed. (Please excuse my nail bitten finger, it's there only to illustrate how small the matchbook is. I shall have to get a false nail to stick on for any similar pictures in the future!)
 The album is made up of four pages, on the first three I have put a mat and layered picture and embellished it with little hearts and faux stitching. The last page is embellished in the same way but I have handwriiten "We Love You"The album is kept together with two mini brads and the cover decorated with two punched hearts.
Tuesday, 25 August 2009
 Recently, I bought a Bandai Super Badge It badge maker on e-bay for about £10 and then, would you believe it, found another smaller version at a carboot a few weeks later, for which I paid the princely sum of 10p, because the lady didn't want to take it home again!
 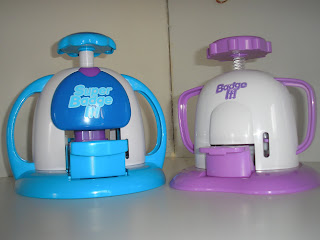 Its a brillaint piece of crafting kit, (not just a kids toy), easy to use, with endless crafting possibilities, but here's the sad bit ........ Bandai have discontinued it! Badge refills are still available from their website, but when these sell out, that's it! Needless to say I have amassed a small stock.
Monday, 24 August 2009
A Birthday Card with a Difference
 My Brother-In-Law is doing his Masters Degree in Art and I wanted to make him a birthday card this year that was a little bit different, this is the result!
 I got the tiny easel and canvas from The Range in Telford a couple of weeks ago. A pack of two easels or canvases were £1.99 each, which I thought was a bargain.
All I have had to add, apart from the writing, is the palette embellishment, which was part of a pack of 3D stickers I've had for ages.
Sunday, 23 August 2009
How To Make An Itsy Bitsy Advent Calendar.
 I have been asked for some instructions on how to make my little Advent Calendars. I am hoping that the pictures will do most of the work, please bear with me, I'll try my best and hope I get everything in the right order .........
First, design your numbers. I used A4 page setting in Publisher and 2 Peas font "Typo" (download from http://www.twopeasinabucket.com/), font size 16 for December and font size 65 for the number. Each square measures approx. 4.5cm x 4 cm. I managed to get all 25 on one sheet. Cut numbers out. To make the body of the calendar, cut a piece of card (I used dark blue leather effect) approx. 9cm long x 6.5cm wide. Add two wavy strips of white glitter card along the bottom . Put a length of ribbon on top of the "snow", leaving enough to stick behind the card to give a neater finish. Add a bow to the main ribbon by threading a smaller piece underneath and making a single knot. Mat and layer on silver card.
 Cut a co-ordinating piece of card approx 5cm x 5cm and mat and layer on silver card and stick onto the snow scene.
 To make the body of the calendar, cut a piece of card (I used dark blue leather effect) approx. 9cm long x 6.5cm wide. Add two wavy strips of white glitter card along the bottom . Put a length of ribbon on top of the "snow", leaving enough to stick behind the card to give a neater finish. Add a bow to the main ribbon by threading a smaller piece underneath and making a single knot. Mat and layer on silver card. Cut a co-ordinating piece of card approx 5cm x 5cm and mat and layer on silver card and stick onto the snow scene.

Decorate a mini bulldog clip with co-ordinating ribbons and secure the numbers in its grip. Carefully attach the clip to the calendar body.
 Add an embellishment to one side of the calendar, I used a "Dress It Up" snowman button. As a finishing touch add several clusters of three dots on the sky area in white pen.
Finally stick a magnet on the back. And voila!!!

Subscribe to:
Posts (Atom)